
As I stood in the kitchen, my hands dusted with flour and my eyes sparkling with excitement, I could hardly contain my enthusiasm for creating a showstopping treat for Easter. This year, the star of our dessert table will be the delightful Kit Kat Easter Cake. It’s an incredibly easy and kid-friendly recipe that combines the fun of candy with the joy of baking, making it a perfect choice for family gatherings. Plus, it’s not just a delicious cake – it’s a stunning centerpiece that will have everyone reaching for their cameras (and their forks!). So, are you ready to whip up a cake that’s sure to impress? Let’s dive into this sweet adventure together!
Why is Kit Kat Easter Cake a must-try?
Easy to Make: The joy of this recipe lies in its simplicity. You don’t need to be an expert baker to create a stunning dessert that wows.
Crowd-Pleasing Delight: With the playful crunch of Kit Kats and colorful decorations, this cake appeals to both kids and adults alike, making it perfect for family gatherings.
No-Bake Options: If you’re short on time, the flexibility of using pre-made components offers a quick solution without sacrificing flavor or fun, just like our other favorites like Easter Dirt Cake or No-Bake Easter Swirl Pie.
Creative Decoration: Get creative! The vibrant colors and festive elements make this cake a true centerpiece that’ll have everyone reaching for their phones to snap a pic.
Versatile Ingredients: Feel free to swap decorations based on your taste and the seasonal goodies you have on hand. Your unique twist will make each cake special!
Let’s bring a touch of magic to your Easter celebration with this unforgettable Kit Kat dessert!
Kit Kat Easter Cake Ingredients
• To create this delightful Kit Kat Easter Cake, gather the following simple ingredients to make your creation not just easy but also bursting with flavor.
For the Cake Base
- Store-Bought Cake – Saves time and effort; perfect for a no-bake approach.
- Chocolate Cake Mix – For a homemade option, follow the package instructions for a quick batter.
For the Decorations
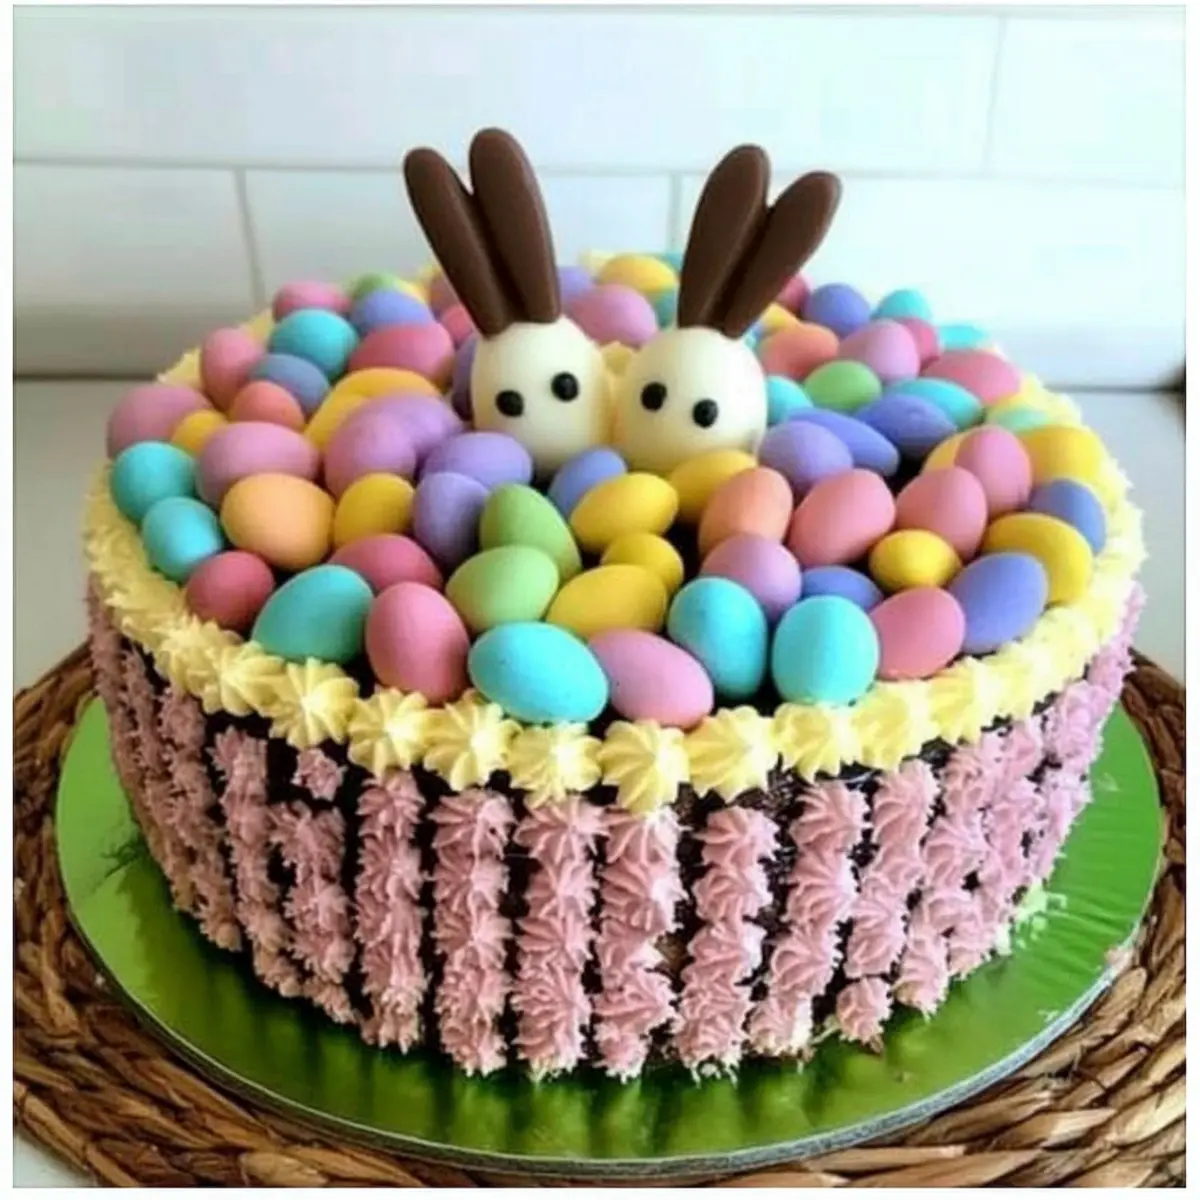
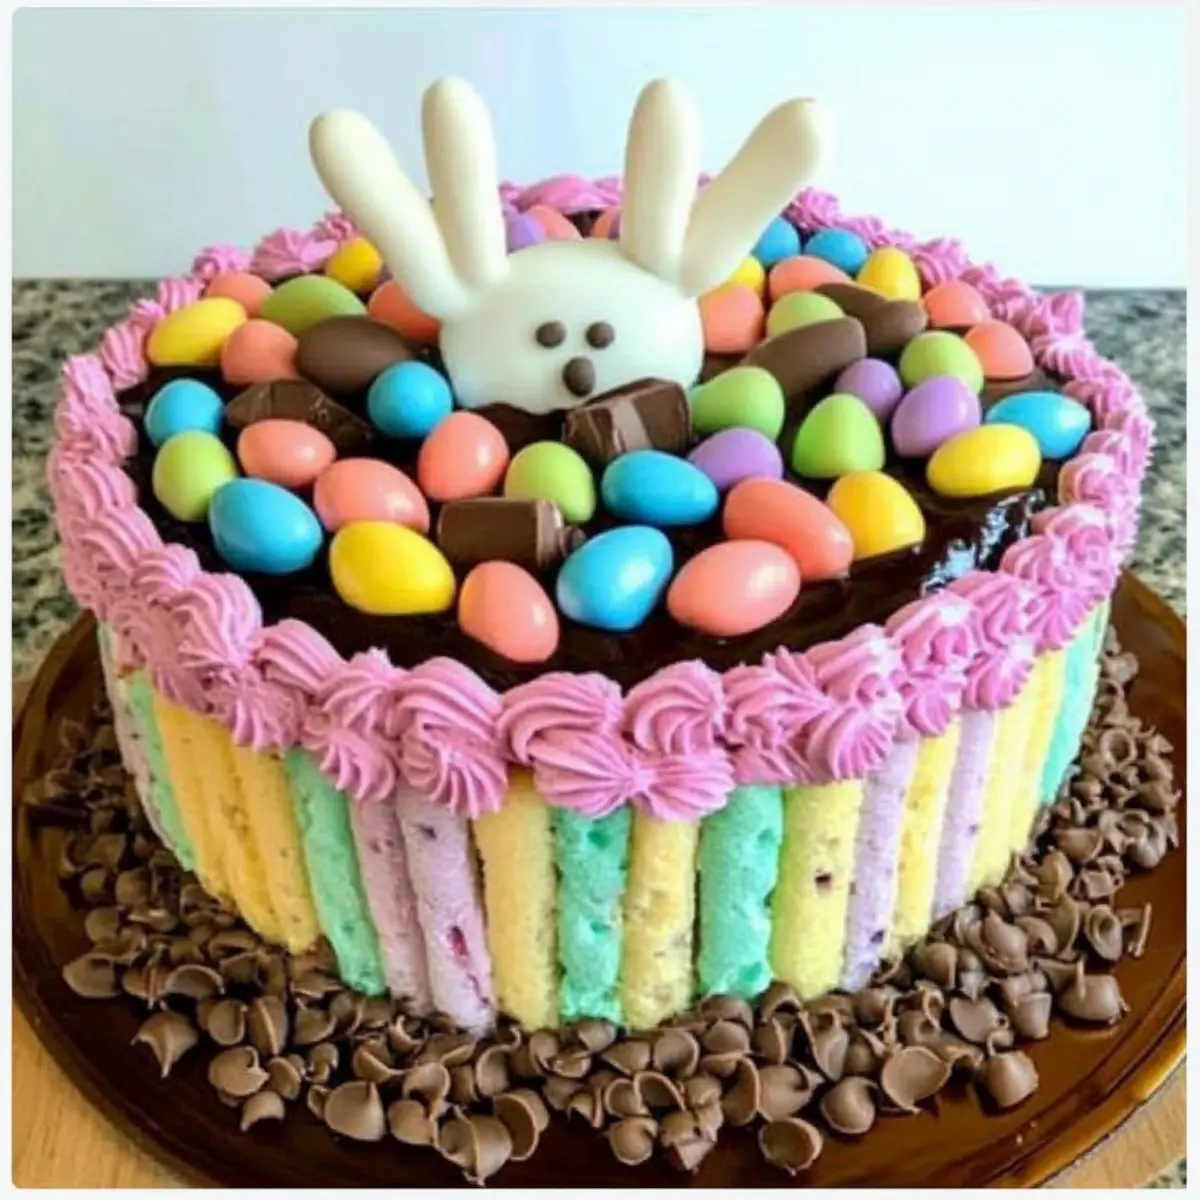
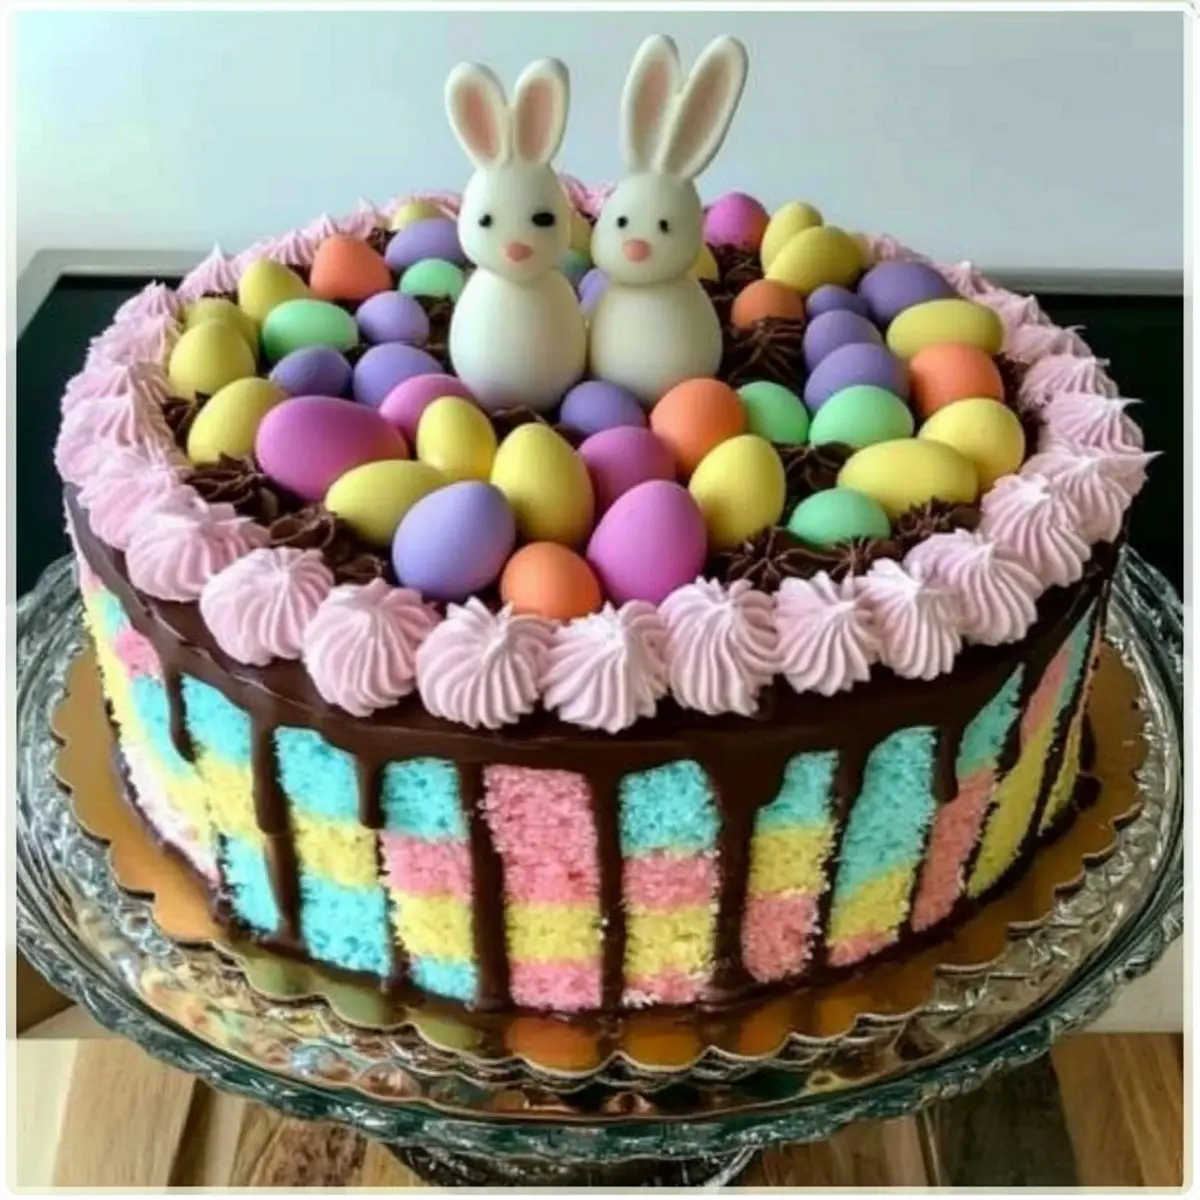
- Kit Kat Bars – The star of the show! Use them to create a fun, crunchy exterior.
- Pastel Chocolate Eggs – Add vibrant colors; they can easily replace jelly beans for a festive flair.
- Peep Marshmallows – Make your cake pop with color and whimsy; choose any fun marshmallow variety.
- Shredded Coconut – For a playful nest effect; dye with green food coloring for a grassy look.
- Chocolate Fudge Icing – To add rich flavor and hold decorations in place; can substitute with vanilla icing for variety.
For the Filling
- Chocolate Pudding – Enhances moistness and indulgence; vanilla pudding is a great alternative if preferred.
Now you’re all set to bring your Kit Kat Easter Cake to life! Let’s make this Easter celebration truly unforgettable.
Step‑by‑Step Instructions for Kit Kat Easter Cake
Step 1: Choose Your Cake Base
Start by selecting your cake base for the Kit Kat Easter Cake. If you’re opting for a store-bought cake, simply remove it from packaging and place it on a serving platter. For a homemade base, bake a chocolate cake according to package instructions, allowing it to cool completely on a wire rack for at least 30 minutes to ensure it’s stable for decorating.
Step 2: Prepare Decorations
While the cake cools, gather your decorations. If you’re using chocolate fudge icing, gently warm it in the microwave for 10–15 seconds until it’s spreadable. Set aside your Kit Kat bars, pastel chocolate eggs, and Peeps, arranging them on a decorative plate for easy access as you assemble your cake.
Step 3: Assemble the Cake
Once your cake is cooled, take your chocolate pudding and spread a layer evenly on top of the cake to create a moist filling. This will also help the decorations adhere better. Place the cake on a serving plate, ready for fun decoration. Use a spatula to create a smooth surface.
Step 4: Frost the Cake
Spread a generous layer of chocolate fudge icing over the top and sides of your cake, smoothing it out with a spatula or knife. Aim for an even coat that will hold your decorations. The icing not only adds flavor but also provides the perfect sticky base for your Kit Kats, so be generous!
Step 5: Decorate with Kit Kats
Begin placing your Kit Kat bars around the perimeter of the cake, standing them upright and pushing them slightly into the icing for support. The crunch of the Kit Kats brings a delightful texture to your Kit Kat Easter Cake, making it both visually striking and a treat to eat.
Step 6: Add Colorful Toppings
Now it’s time for the fun part! Sprinkle pastel chocolate eggs on top of the cake and between the Kit Kats. For a festive twist, use shredded coconut to create a nest effect around the candies. If desired, place Peeps strategically on top for a whimsical touch that’s sure to catch everyone’s eye.
Step 7: Chill the Cake
If you’ve made a no-bake version or added cream elements, refrigerate the completed Kit Kat Easter Cake for about 1–2 hours. This chilling time allows the flavors to meld beautifully and guarantees that your decorations stay intact as they set.
Step 8: Serve and Enjoy
Finally, when ready to impress your guests, present your Kit Kat Easter Cake on a festive platter. Slice into this beautiful creation and celebrate Easter with your family and friends! The vibrant colors and delicious flavors will surely leave everyone asking for seconds.
Kit Kat Easter Cake Variations
Feel free to get creative with your Kit Kat Easter Cake, exploring flavors and fun toppings that will suit your festive celebrations.
- Lemon Cake Base: Swap the chocolate cake with a lemon cake mix for a zesty twist that’s refreshing and unexpected.
- Fruit Infusion: Add layers of fresh strawberries or raspberries between the cake layers for a burst of juicy sweetness that complements the chocolate.
- Nutty Crunch: Incorporate chopped nuts, like almonds or hazelnuts, between the Kit Kat layers for an added crunch that’s sure to delight.
- Decadent Chocolate Layers: Use chocolate mousse in place of pudding for a rich, luxurious filling that will make your cake extra indulgent.
- Spiced Cookies: Layer crushed spiced cookies (like gingersnaps or cinnamon) into your filling for a seasonal twist reminiscent of holiday flavors.
- Vegan-Friendly: Replace the chocolate pudding with a plant-based option and choose dairy-free Kit Kats to create a vegan version everyone can enjoy.
- Hot Fudge Drizzle: Drizzle warm chocolate or caramel sauce over the top for an extra decadent touch that takes the dessert over the top.
- Colorful Candies: Mix in other candy options like M&Ms or Skittles to the cake top or layers for vibrant color and flavor variety—like sprinkles, they add a playful touch.
By experimenting with these variations, your Kit Kat Easter Cake can become a unique showstopper, just like our other delightful recipes such as Easter Dirt Cake or No-Bake Easter Swirl Pie. Enjoy making this sweet masterpiece your own!
Expert Tips for Kit Kat Easter Cake
• Cool Your Cake: Make sure the cake is completely cooled before decorating to prevent the icing and decorations from melting and sliding off.
• Choose Sturdy Cake: If opting for store-bought, select a firm cake that can support the weight of the decorations, ensuring your Kit Kat Easter Cake stays intact.
• Use a Heatproof Bowl: When warming the chocolate icing, use a microwave-safe bowl to avoid burns and ensure easy handling as you spread it on your cake.
• Creative Decoration: Get playful with your toppings! Incorporate seasonal candies, nuts, or fruits to customize your Kit Kat Easter Cake to your family’s preferences.
• Set Time is Key: Allow the cake to chill after decorating; this helps the icing and toppings set perfectly, enhancing the presentation while keeping everything in place.
Storage Tips for Kit Kat Easter Cake
Fridge: Keep your Kit Kat Easter Cake in an airtight container in the fridge for up to 3 days to maintain its freshness and prevent it from drying out.
Room Temperature: If you plan to serve the cake within a few hours, it can be kept at room temperature, but avoid direct sunlight to preserve the decorations.
Freezer: For longer storage, you can freeze individual slices wrapped tightly in plastic wrap and then in foil for up to 2 months. Thaw overnight in the fridge before serving.
Reheating: There’s no need to reheat! This cake is best enjoyed chilled, allowing the flavors to shine. Just slice and serve directly from the fridge.
What to Serve with Kit Kat Easter Cake?
Your Easter celebration will truly shine when you complement this delightful centerpiece with a medley of flavorful accompaniments.
- Vanilla Ice Cream: The creamy texture balances the crunch of the Kit Kats while providing a classic, comforting pairing.
- Fresh Berries: Add some strawberries or blueberries for a fresh, tart contrast that brightens every bite, enhancing the festive appeal.
- Chocolate-Covered Strawberries: A delightful addition that echoes the chocolate theme, these treats elevate your dessert spread with elegance.
- Cherry Almond Sparkler: A refreshing drink made with cherry juice and sparkling water that perfectly cuts through the richness of the cake.
- Coconut Macaroons: These sweet, chewy bites echo the flavors used in your cake, offering a satisfying texture that guests will love.
- Mini Cheesecakes: Individual cheesecakes provide a creamy counterpart, and they can be topped with seasonal fruits for added flair and flavor.
- Easter Fruit Salad: A rainbow of seasonal fruits adds color and freshness, making a light finish to your festive meal.
- Peeps Milkshake: A fun, frothy shake inspired by the Peeps on your cake, it’ll bring out smiles and laughter from guests of all ages.
- Chocolate Mint Cookies: Their refreshing and indulgent chocolate flavor complements the Kit Kat Easter Cake beautifully, creating a magical pairing.
- Fizzy Lemonade: A zesty beverage that’s perfect for spring, it enhances the dessert experience while offering a tart contrast to the cake’s sweetness.
Make Ahead Options
These Kit Kat Easter Cakes are perfect for busy home cooks looking to save time! You can assemble the cake base and fill it with chocolate pudding up to 24 hours in advance, allowing the cake to develop its flavors while keeping it moist. For added convenience, you can prepare the decorations – Kit Kats, pastel eggs, and marshmallows – the night before and store them in an airtight container to maintain their freshness. When it’s time to serve, simply frost the cake with chocolate fudge icing, layer on your decorations, and chill for 1-2 hours if using no-bake elements. This way, you ensure your stunning Kit Kat Easter Cake is just as delicious and visually appealing with minimal day-of effort!

Kit Kat Easter Cake Recipe FAQs
How do I select the best Kit Kats for the cake?
Absolutely! When choosing Kit Kats, look for fresh bars that have a crisp texture. Ensure the packaging is intact without any dark spots or dents, which can indicate the chocolate has been compromised. For added fun, consider using different flavors of Kit Kats, like strawberry or matcha, to give your cake a unique twist!
What are the best storage methods for leftover Kit Kat Easter Cake?
The best way to keep your Kit Kat Easter Cake fresh is to store it in an airtight container in the refrigerator for up to 3 days. If you’re planning to enjoy it later, individual slices can be wrapped tightly in plastic wrap and then in foil, allowing you to freeze them for up to 2 months. Just remember to thaw overnight in the fridge before indulging again!
Can I freeze the Kit Kat Easter Cake?
Yes, you can! To freeze your Kit Kat Easter Cake, first ensure it’s completely decorated and set. Slice it into individual portions, wrap each slice in plastic wrap, and further wrap them in foil or place in a sealed freezer bag. This keeps the cake fresh and protected. It can be stored for up to 2 months; just thaw them in the refrigerator overnight before serving!
What should I do if my decorations start to slide off the cake?
Very! This can happen if the cake surface is not sufficiently cooled or if the icing is too warm. If you find this happening, don’t panic! Place the cake back in the fridge for about 30 minutes to let the icing set. If the decorations are still sliding, add an extra layer of icing to help them adhere better, or press the candies gently into the icing for better stability.
Is this cake suitable for people with allergies?
Definitely! To make the Kit Kat Easter Cake more allergy-friendly, consider using gluten-free cake mix and chocolate bars. Always check the ingredient labels on each product for allergens, especially if you’re serving guests with dietary restrictions. For those allergic to dairy, opt for dairy-free chocolate and pudding options to keep everyone included in the Easter festivities!
How do I ensure my cake layers are fully cooled before decorating?
To make sure your cake layers are completely cool, I recommend cooling them on a wire rack for at least 30 minutes after baking. This allows air to circulate around the cake, preventing sogginess. When you touch the top of the cake, it should feel firm and not warm to the touch, making decorating a breeze without the risk of melting those delicious Kit Kats!
Delicious Kit Kat Easter Cake That Will Wow Your Guests!
Ingredients
Equipment
Method
- Start by selecting your cake base for the Kit Kat Easter Cake. If using a store-bought cake, place it on a serving platter.
- If making a homemade cake, bake according to package instructions and cool completely.
- Gather your decorations and warm the chocolate fudge icing in the microwave for 10–15 seconds.
- Spread a layer of chocolate pudding evenly on top of the cooled cake to create a moist filling.
- Spread a generous layer of chocolate fudge icing over the top and sides of the cake.
- Place Kit Kat bars around the perimeter of the cake, standing them upright.
- Sprinkle pastel chocolate eggs on top and use shredded coconut for a nest effect.
- Refrigerate for 1–2 hours to set the decorations and meld the flavors.
- Present the cake on a festive platter, slice, and enjoy with family and friends.
Leave a Reply