
As I was whisking together a batch of my favorite brownies one rainy afternoon, the thought struck me: why not elevate these sweet squares into something truly extraordinary? That’s when I decided to create Easy Chocolate Mousse Brownies, a delightful twist on the traditional treat that perfectly combines crispy edges with a luscious, airy mousse topping. This recipe is not only a quick fix for your chocolate cravings, but it also opens the door to customization, letting you use different types of chocolate or even experiment with flavors. Get ready to impress your family or friends with a dessert that promises to be a crowd-pleaser, and it’s simple enough to whip up on a whim! Are you ready to dive into chocolatey bliss?
Why Are These Brownies a Must-Try?
Decadent Indulgence: These Easy Chocolate Mousse Brownies combine the rich flavor of dark chocolate with a creamy mousse, offering a luscious dessert experience.
Quick and Easy: With straightforward steps, this recipe is perfect for busy cooks looking to impress without the fuss.
Crowd-Pleasing Fit: Ideal for gatherings, these brownies are guaranteed to disappear in minutes, leaving your guests raving for more.
Customizable Delight: Feel free to add twists like nuts or different chocolate types, making each batch unique! If you’re feeling adventurous, check out my Decadent Chocolate Peanut Butter Swirl Pie for another delightful dessert option.
Make Ahead: Both the brownie base and mousse can be prepared in advance, saving time ahead of your special occasion.
Chocolate Mousse Brownie Ingredients
For the Brownie Base
- Dark Chocolate – Use high-quality dark chocolate for a rich flavor and velvety texture.
- Butter – Provides moisture and richness; coconut oil can be used as a dairy-free substitute.
- Sugar – Sweetens the brownies and enhances flavor; opt for a sugar alternative for a healthier option.
- Eggs – Essential for binding and achieving a fudgy texture; no substitute works well for a vegan version.
- All-Purpose Flour – Gives structure to the brownies; can be swapped with gluten-free flour if needed.
For the Mousse Topping
- Heavy Cream – Crucial for a light and airy mousse; plant-based cream works for a non-dairy option.
- Extra Dark Chocolate – Adds intense chocolate flavor; feel free to adjust based on your taste preference.
Elevate your dessert game with these Chocolate Mousse Brownies that bring together two beloved treats in one delicious offering!
Step‑by‑Step Instructions for Easy Chocolate Mousse Brownies
Step 1: Preheat the Oven
Begin by preheating your oven to 350°F (175°C). This ensures that it reaches the optimal temperature for baking, allowing your brownies to cook evenly. While the oven is heating, prepare your baking pan by greasing it or lining it with parchment paper to prevent the brownies from sticking.
Step 2: Melt Chocolate and Butter
In a double boiler, combine dark chocolate and butter, stirring gently until melted and smooth. This process typically takes about 5-7 minutes; watch for the chocolate to become glossy and fully incorporate with the butter. Once done, remove from heat and let it cool slightly, ensuring the mixture stays warm but not hot.
Step 3: Mix Wet Ingredients
In a mixing bowl, whisk together the melted chocolate mixture and sugar until well combined. Then, add eggs one at a time, incorporating each fully before adding the next. This step takes around 3-5 minutes; the result should be a rich, glossy batter that smells divine and transforms as you mix.
Step 4: Combine Dry Ingredients
Sift all-purpose flour into the wet mixture, gently folding it in with a spatula until just combined. Be careful not to overmix; this will keep your brownies tender. The batter should be thick and somewhat fudgy, ready for baking, with no visible streaks of flour remaining.
Step 5: Bake Brownies
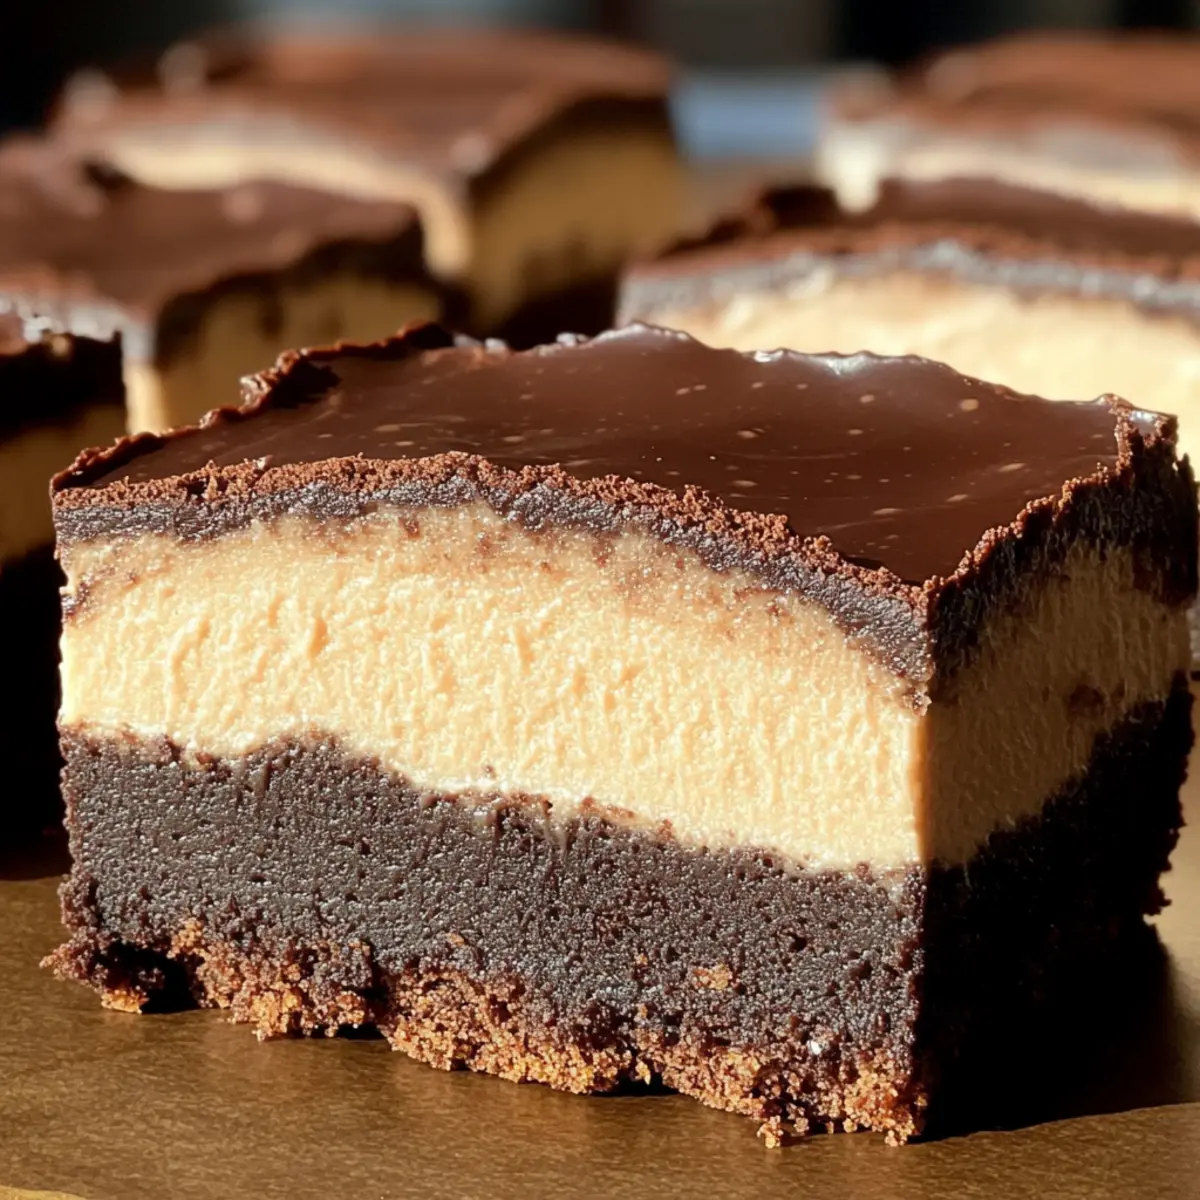
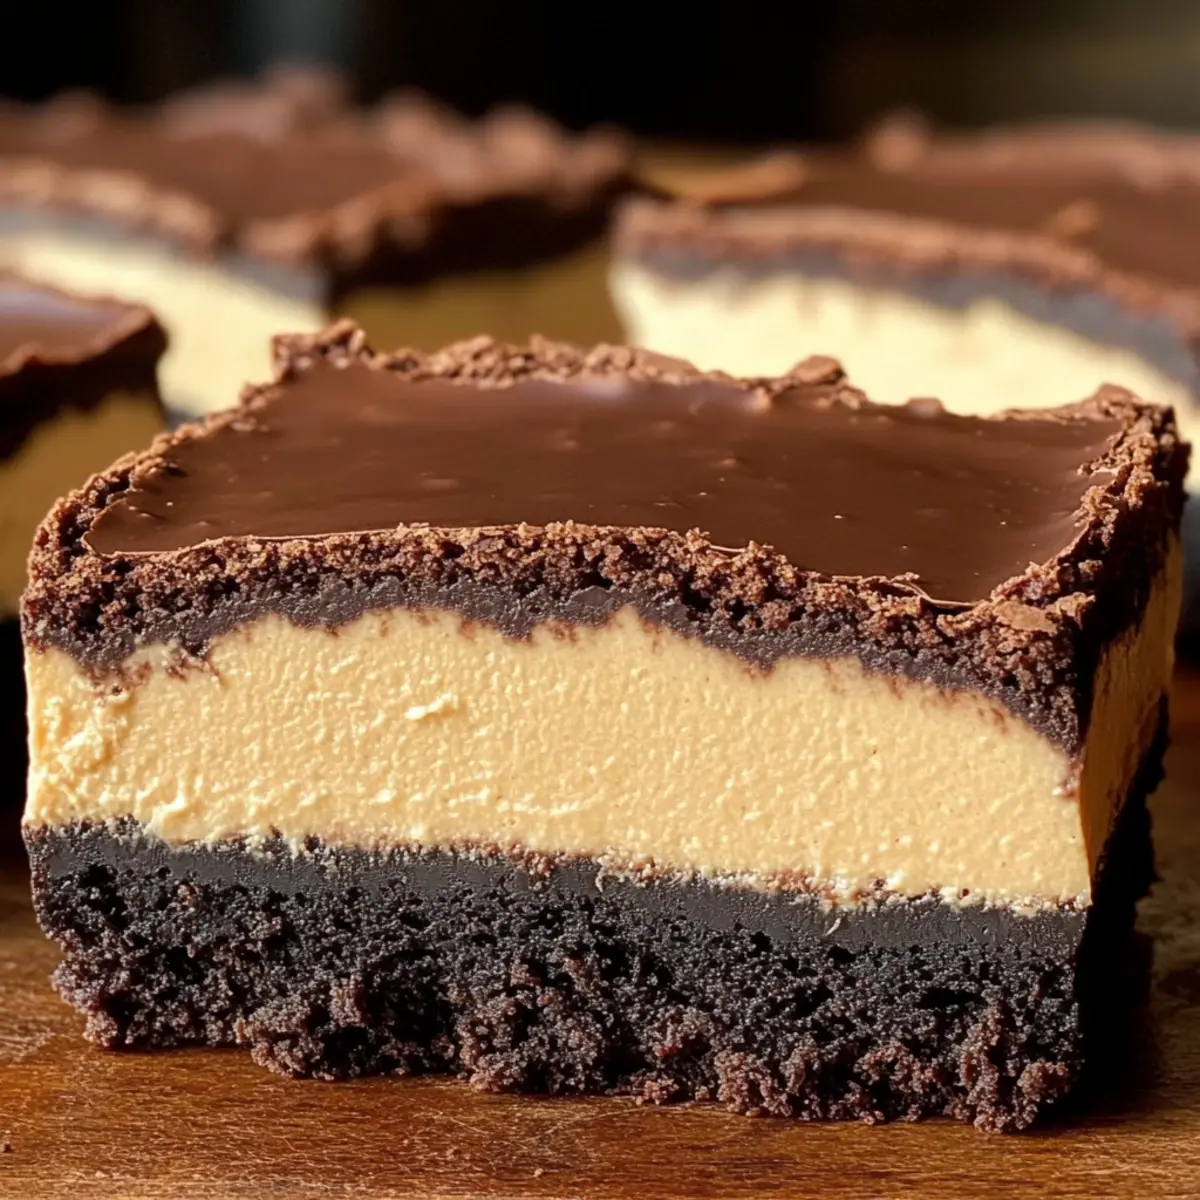
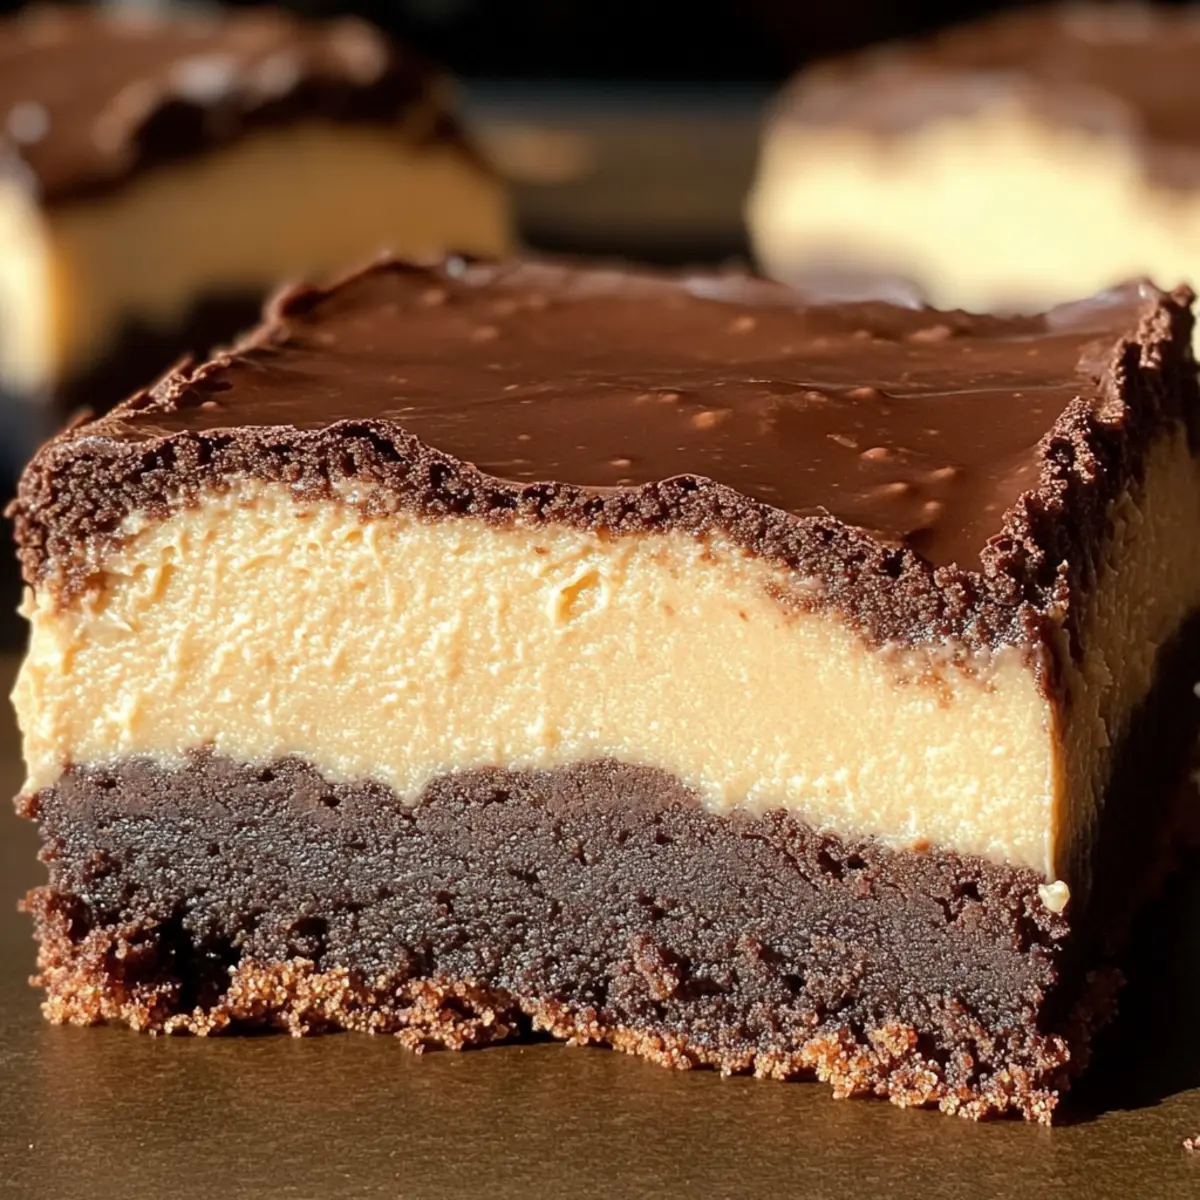
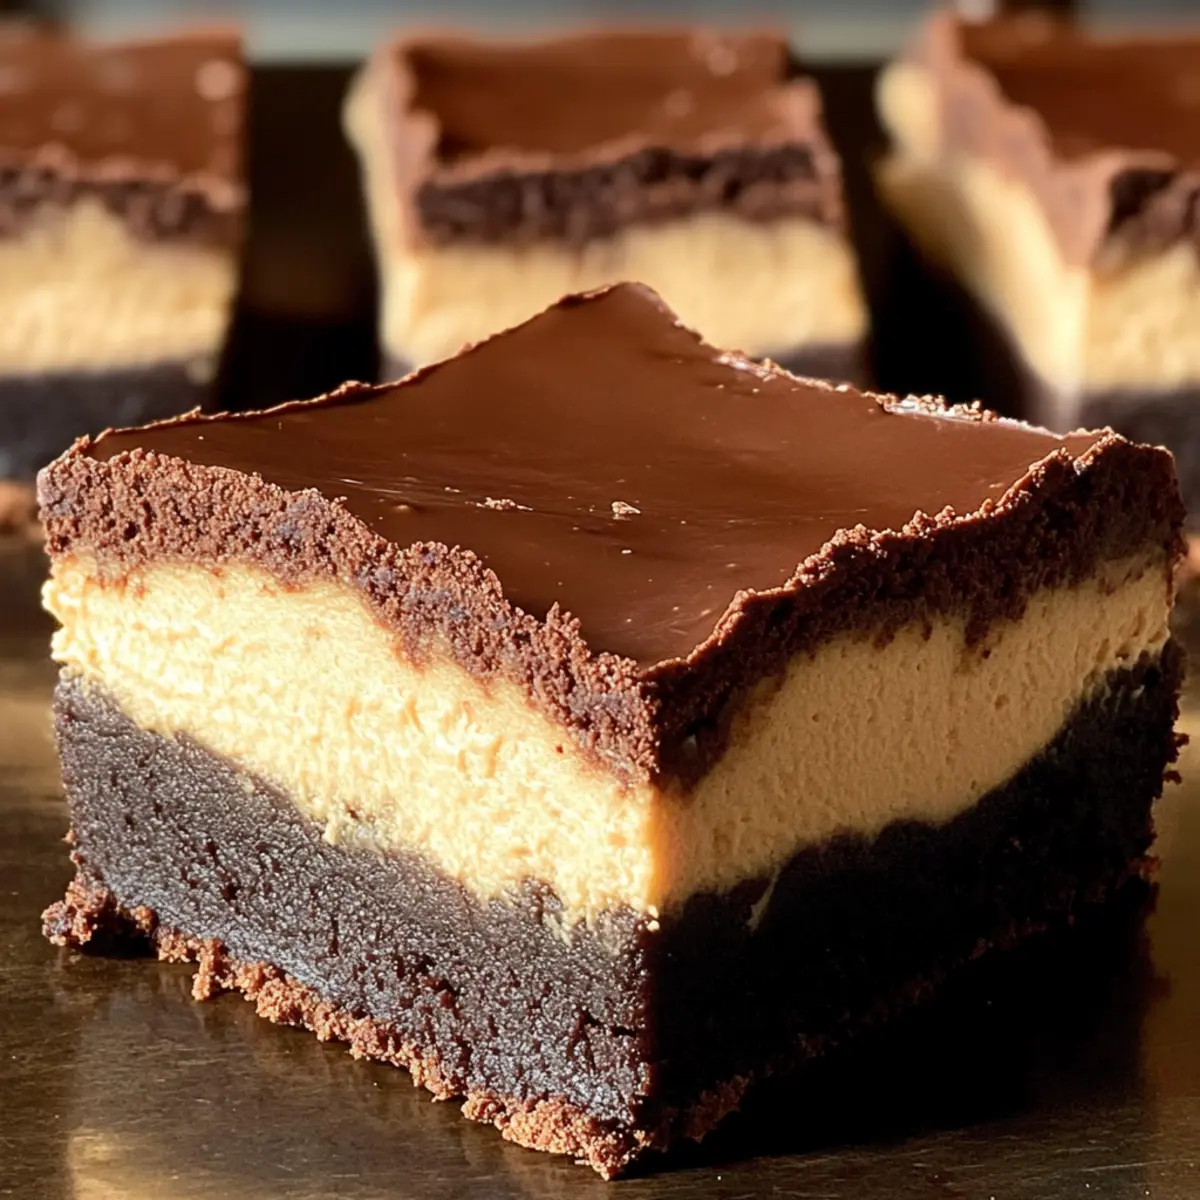
Pour the brownie batter into your prepared pan, spreading it evenly. Bake in the preheated oven for 20-25 minutes; you’ll know they are done when a toothpick inserted in the center comes out with a few moist crumbs. The edges should look set while the center remains slightly soft, offering that perfect fudgy texture.
Step 6: Cool the Brownies
Once baked, remove the brownies from the oven and allow them to cool completely in the pan on a wire rack. This process may take about 30-45 minutes. Cooling is essential, as it allows the brownies to firm up, making it easier to spread the mousse topping later.
Step 7: Prepare Mousse
While the brownies cool, whip heavy cream in a mixing bowl until stiff peaks form, which usually takes 3-5 minutes with an electric mixer. Once whipped, gently fold in melted dark chocolate until the mixture is smooth and creamy, ensuring no lumps remain. This mousse will be light and airy, perfect for topping your brownies.
Step 8: Assemble the Brownies
Carefully spread the prepared mousse over the cooled brownies, using a spatula for an even layer. Make sure to cover the brownies entirely, allowing the mousse to shine as the star of this dessert. After spreading, refrigerate the brownies for at least 1 hour, allowing the mousse to set properly.
Step 9: Serve
Once set, cut the Easy Chocolate Mousse Brownies into squares. Serve them chilled or at room temperature, and savor the delightful contrast of fudgy brownies with luscious mousse. They pair wonderfully with fresh berries or a scoop of vanilla ice cream for an extra special treat!
How to Store and Freeze Chocolate Mousse Brownies
Fridge: Store leftovers in an airtight container for up to 5 days, ensuring the mousse remains fresh and delicious.
Freezer: Individual portions can be frozen for up to 2 months. Wrap them tightly in plastic wrap, then place in a freezer-safe container.
Thawing: When ready to enjoy, thaw in the fridge overnight for a gentle defrost, maintaining the mousse’s texture.
Reheating: While best served chilled, if you prefer them warm, gently warm the brownies in the microwave for 10-15 seconds before serving.
Make Ahead Options
These Easy Chocolate Mousse Brownies are perfect for busy home cooks looking to save time! You can prepare both the brownie base and the chocolate mousse up to 24 hours in advance. First, bake the brownies as directed and let them cool completely. Once cooled, you can store the brownies in an airtight container at room temperature or in the fridge for up to 3 days. For the mousse, whip the heavy cream and fold in the melted chocolate, then refrigerate it separately until you’re ready to serve. When it’s time to impress, simply spread the mousse over the brownies, refrigerate for an additional hour to set, and enjoy these delightful treats that are just as delicious when made ahead!
What to Serve with Easy Chocolate Mousse Brownies
Indulging in these delightful brownies creates a perfect opportunity to elevate your dessert experience with some scrumptious pairings.
-
Fresh Berries: The natural tartness of strawberries or raspberries balances the rich sweetness of the brownies, adding a refreshing contrast. A handful of berries on the side enhances not just flavor, but also visual appeal.
-
Vanilla Ice Cream: Creamy vanilla ice cream melts beautifully over the fudgy brownies, creating a delightful hot-and-cold experience. Drizzle with chocolate sauce for an extra touch of decadence!
-
Espresso or Coffee: A cup of strong coffee complements the intense chocolate flavors, elevating the overall indulgence. The bitterness of the coffee enhances the sweetness while giving a mature twist to your dessert.
-
Chocolate Sauce: For the ultimate chocolate lover, a drizzle of warm chocolate sauce adds an extra layer of richness. Each bite becomes an indulgent experience that feels lavish and satisfying.
-
Whipped Cream: Light and airy whipped cream on top introduces a fluffy texture that contrasts delightfully with the dense brownie base. This classic addition brings a comforting familiarity to every bite, making it feel like a special treat.
-
Mint Leaves: Fresh mint leaves provide a pop of color and refreshing flavor that perfectly balances the richness of the brownies. Just a few scattered leaves can elevate the presentation while adding a delightful aroma.
-
Malibu Rum or Kahlua: A splash of these delightful liqueurs can take your dessert game to the next level. Enjoy a small glass alongside your brownies for a truly indulgent experience.
-
Chilled Milk: A glass of cold milk is a classic pairing that never disappoints. The creaminess of the milk complements the rich chocolate flavors, making every mouthful even more delightful.
Expert Tips for Chocolate Mousse Brownies
-
Quality Matters: Use high-quality dark chocolate and fresh ingredients for the best flavor in your chocolate mousse brownies. This significantly enhances the final taste.
-
Avoid Overmixing: Be careful while mixing the batter, especially after adding flour; overmixing can lead to tough brownies. Just mix until combined for that perfect fudgy texture.
-
Cooling Time: Don’t rush the cooling process! Make sure your brownies are completely cool before adding the mousse to prevent it from melting or sliding off.
-
Whipping Technique: When whipping cream for the mousse, stop as soon as stiff peaks form. Overwhipped cream can become grainy and lose the light texture that makes it delightful.
-
Layering Mousse: For an attractive presentation, spread the mousse carefully and evenly over the brownies, taking care to fully cover without disturbing the brownie base beneath.
-
Storage Tips: Store leftover chocolate mousse brownies in an airtight container in the fridge for up to 5 days. This helps maintain the freshness of the mousse topping!
Chocolate Mousse Brownies Variations
Feel free to get creative with your Easy Chocolate Mousse Brownies and make them truly yours!
-
Dairy-Free: Substitute heavy cream with coconut cream for a luscious, non-dairy mousse layer. The flavor remains rich, while keeping it vegan-friendly.
-
Nutty Twist: Fold in chopped walnuts or pecans into the brownie batter for added crunch. Their earthy notes harmonize beautifully with the richness of chocolate.
-
Flavor Boost: Add orange zest to the mousse for a refreshing citrus twist that brightens the rich chocolate flavor. It’s a delightful surprise that’s sure to impress!
-
Sweetness Shift: Use white chocolate instead of dark for a sweeter, creamier mousse topping. This variation creates a completely different dessert experience that’s also visually stunning.
-
Gluten-Free: Swap all-purpose flour for a gluten-free blend to make your brownies accessible to everyone. You won’t compromise on taste or texture with this adjustment.
-
Minty Fresh: Incorporate a few drops of peppermint extract into the mousse for a refreshing, mint-chocolate flavor combination. It’s the perfect complement to the fudgy base.
For something decadent, consider pairing these brownies with a scoop of ice cream or serve them alongside my Texas Chocolate Pecan Pie to elevate the dessert experience!
Easy Chocolate Mousse Brownies Recipe FAQs
How do I choose the right dark chocolate for the brownies?
Absolutely! Opt for high-quality dark chocolate with at least 60-70% cocoa content for that rich flavor and velvety texture. Look for brands that list cocoa as the first ingredient, and avoid those that have too many additives.
What’s the best way to store my Chocolate Mousse Brownies?
Store your brownies in an airtight container in the fridge, and they’ll stay fresh for up to 5 days. If you’re looking for the best flavor and texture, keep them sealed to prevent the mousse from absorbing any odors from the fridge.
Can I freeze Chocolate Mousse Brownies, and how do I do it?
Yes, you can freeze these brownies! Simply cut them into individual portions and wrap each piece tightly in plastic wrap. Then, place the wrapped brownies in a freezer-safe container. They’ll keep well for up to 2 months. When you’re ready to enjoy them, thaw them in the fridge overnight for a gentle defrost.
What should I do if my brownies turn out too dense?
If your brownies come out too dense, it may be due to overmixing or using too much flour. Always fold the dry ingredients gently and just until combined. If you suspect that you’ve added too much flour, you can try adding a bit of melted butter or cream to loosen the texture slightly. Baking times can also affect density; make sure to test your brownies with a toothpick for doneness.
Are these brownies suitable for people with allergies?
Excellent question! The standard recipe contains eggs and dairy, which may not be suitable for those with allergies. For a dairy-free option, substitute the butter with coconut oil and use plant-based cream for the mousse. Unfortunately, if you’re looking for a vegan version, we recommend using egg replacers specifically designed for baking to maintain texture, but the brownies won’t have the same fudgy quality.
How can I make these brownies gluten-free?
Very easily! You can swap the all-purpose flour in the recipe with a gluten-free flour blend. Look for a product that contains xanthan gum, which helps mimic the texture of traditional flour. When using gluten-free flour, follow the package instructions for the best results, but you may find that it works perfectly well with a 1:1 substitution.
Decadent Chocolate Mousse Brownies for Ultimate Indulgence
Ingredients
Equipment
Method
- Preheat your oven to 350°F (175°C). Grease or line your baking pan.
- Melt dark chocolate and butter in a double boiler, stirring until smooth.
- Whisk together melted chocolate mixture and sugar, then add eggs one at a time.
- Sift and fold all-purpose flour into the wet mixture until just combined.
- Pour batter into pan and bake for 20-25 minutes until a toothpick comes out with moist crumbs.
- Cool brownies completely on a wire rack before adding mousse.
- Whip heavy cream until stiff peaks form, then gently fold in melted dark chocolate.
- Spread the mousse evenly over the cooled brownies and refrigerate for at least 1 hour.
- Cut brownies into squares and serve chilled or at room temperature.
Leave a Reply