
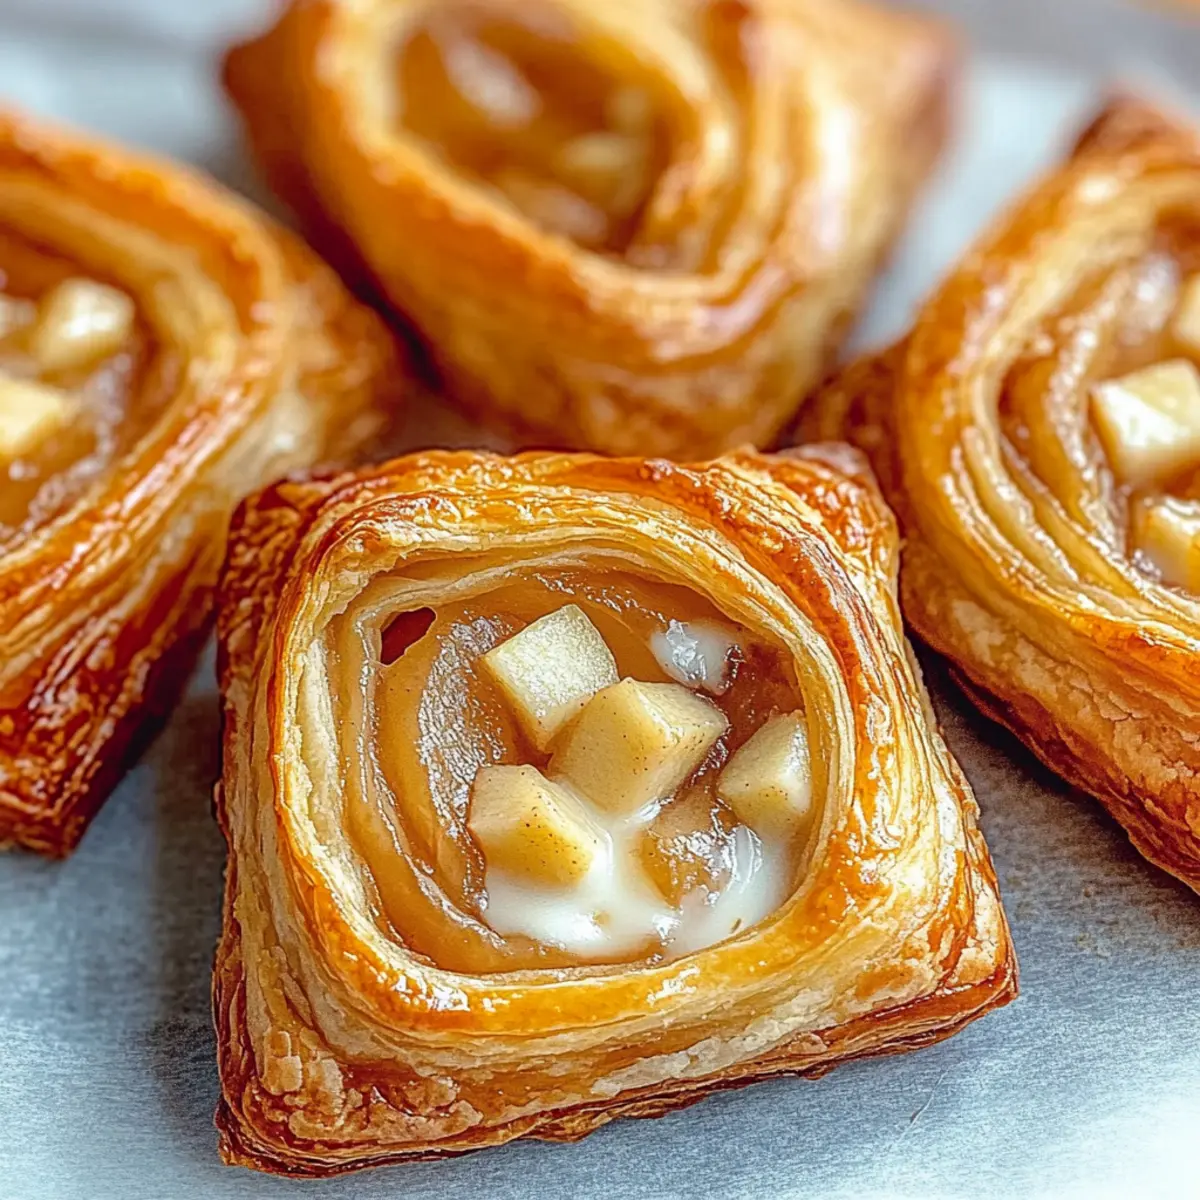
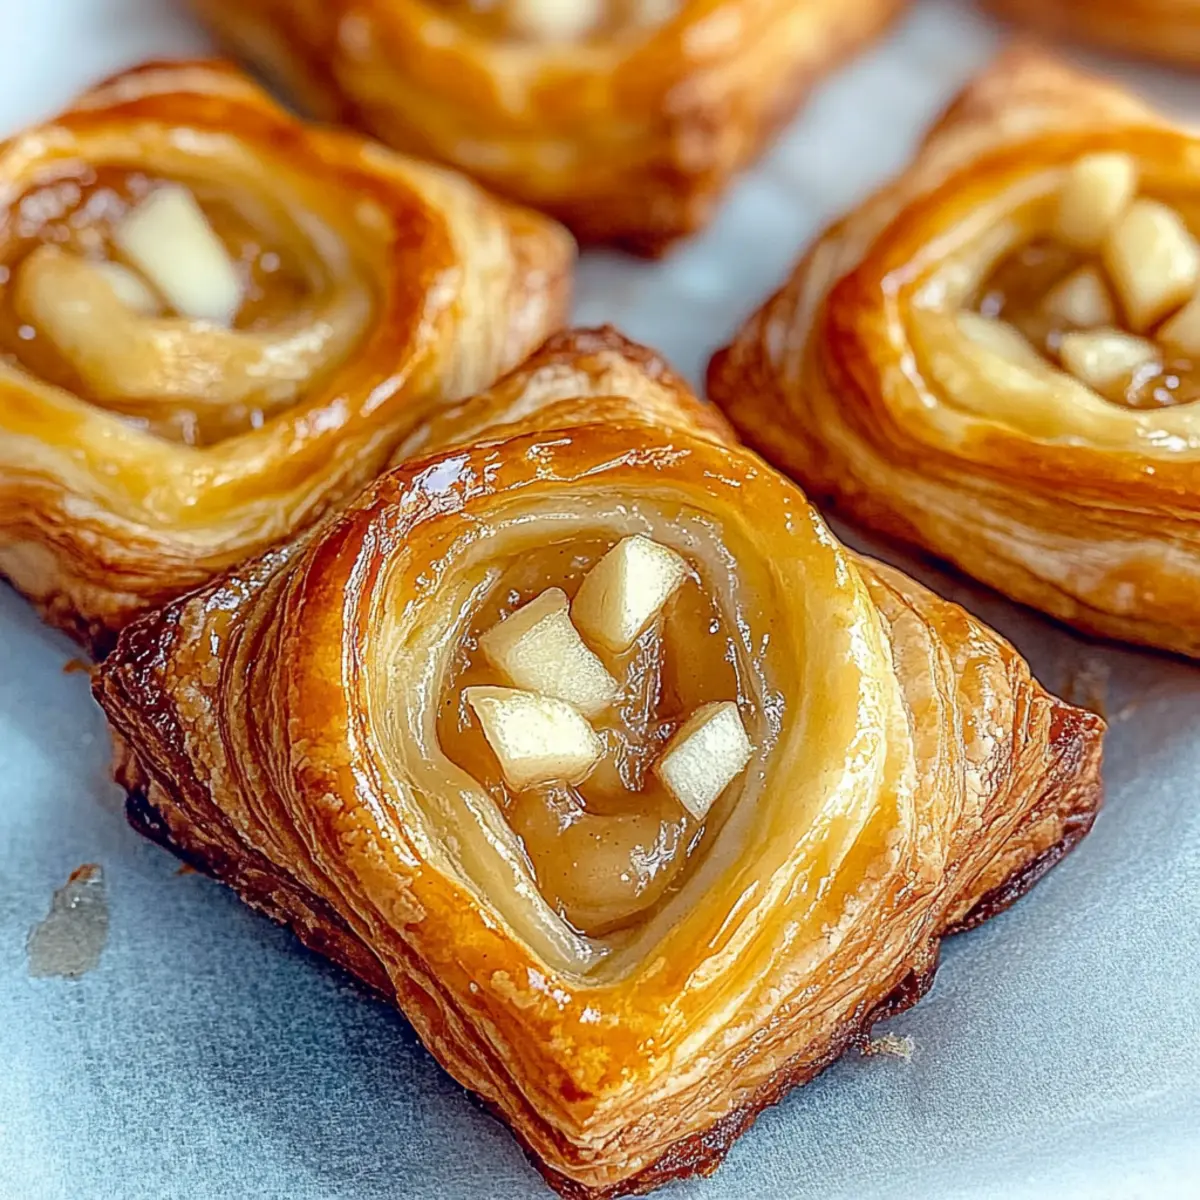
As I unroll a sheet of puff pastry, the anticipation builds—nothing quite compares to the bliss of freshly baked treats wafting through the kitchen. Today, I’m whipping up Easy Apple & Cheese Danishes, a delightful fusion of sweet, tart apples and creamy cheese all nestled in a flaky embrace. This recipe isn’t just a feast for the senses; it’s a quick and simple choice for brunch or dessert that will have your loved ones asking for seconds! Imagine serving these golden pastries warm, each bite revealing a harmonious blend of flavors, perfect for cozy gatherings or solo indulgences. Curious about how to capture this comforting experience in your own home? Let’s dive into the world of danishes that are sure to keep the fast food at bay!

Why are these Apple & Cheese Danishes special?
Simplicity at Its Finest: This recipe uses store-bought puff pastry, making preparation a breeze.
Flavor Fusion: The blend of sweet, tart apples and rich cream cheese creates a mouthwatering experience everyone will love.
Quick to Make: With just 30 minutes from prep to plate, these danishes are ideal for those busy mornings or spontaneous brunches.
Crowd-Pleasing Treat: Perfect for gatherings, these danishes are sure to impress your guests and keep them coming back for more.
Versatile Options: Feel free to swap in ricotta or mascarpone for a unique twist, or add nuts for extra crunch! Enjoy them alongside a warm beverage or as a delightful dessert after a hearty meal like Apple Cider Chicken.
Apple & Cheese Danishes Ingredients
• Discover the essential elements needed to create these delightful pastries.
For the Pastries
- Puff Pastry – This flaky layer is the heart of your danishes; store-bought makes it incredibly easy.
- Egg (for egg wash) – Achieve a beautiful golden finish on your pastries by brushing with an egg wash.
For the Filling
- Cream Cheese – The creamy base that holds it all together; make sure to soften it for smooth mixing.
- Granulated Sugar – Sweetens the filling; adjust to match the tartness of the apples used.
- Ground Cinnamon – Adds warmth and enhances the apple’s flavor; consider a sprinkle of nutmeg for extra depth.
For the Apples
- Apples – Opt for tart varieties like Granny Smith, peeled and diced for evenness; their sharpness beautifully balances the sweetness.
These ingredients come together to create irresistible Apple & Cheese Danishes that will transform your brunch or dessert table into a delightful affair!
Step‑by‑Step Instructions for Easy Apple & Cheese Danishes
Step 1: Preheat the Oven
Begin your journey to delicious Apple & Cheese Danishes by preheating your oven to 400°F (200°C). This step is key as it ensures your pastries will bake evenly to a golden perfection. As the oven heats up, you’ll create the perfect environment for those delightful flaky layers to rise and achieve that coveted crispy texture.
Step 2: Prepare the Puff Pastry
On a lightly floured surface, roll out the thawed puff pastry to about 1/8-inch thickness. This helps create a lovely, flaky texture for your danishes. Once rolled, cut the pastry into squares roughly 4 inches in size. The sight of these squares will mark the beginning of your creative assembly process, so have your cutting board and sharp knife ready!
Step 3: Make the Cream Cheese Filling
In a medium bowl, combine the softened cream cheese, granulated sugar, and ground cinnamon. Use a fork or a whisk to mix until the mixture is smooth and creamy, about 2-3 minutes. This creamy filling is the heart of your Apple & Cheese Danishes, infusing each bite with rich, decadent goodness, so be sure it’s well blended before moving on to the next step.
Step 4: Add the Apples
Fold your diced apples into the cream cheese mixture, ensuring they are evenly coated. The combination of tart apple pieces with the creamy filling creates a delightful contrast in textures and flavors. This fusion of sweetness and richness will make your danishes irresistible, so take a moment to appreciate the delightful mixture before filling your pastry squares!
Step 5: Assemble the Danishes
Place a generous spoonful of the apple and cream cheese filling in the center of each pastry square. Gently fold the corners of the pastry over the filling to create a lovely package, then use a fork to seal the edges tightly. This not only secures your delicious filling inside but also gives your danishes a charming finish. The anticipation of baking them is already building!
Step 6: Apply the Egg Wash
Whisk an egg in a small bowl and brush a thin layer over the tops of each folded danish. This egg wash will provide a beautiful golden-brown finish once baked, enhancing the visual appeal of your Apple & Cheese Danishes. The shiny glaze promises to make them even more tempting, so don’t skip this crucial step!
Step 7: Bake the Danishes
Carefully place the assembled danishes on a baking sheet lined with parchment paper, ensuring they’re spaced out for even baking. Bake in the preheated oven for 15-20 minutes, or until they are puffed up and golden brown. Keep an eye on them—when the aroma fills your kitchen, you’ll know they’re nearly ready to be savored.
Step 8: Cool and Serve
Once baked, remove the danishes from the oven and let them cool for a few minutes on a wire rack. This cooling time allows the flavors to meld beautifully, making each bite even more enjoyable. Serve them warm, dusted with powdered sugar for an elegant touch, and watch as your friends and family delight in these delightful Easy Apple & Cheese Danishes!
Storage Tips for Apple & Cheese Danishes
-
Room Temperature: Store leftover Apple & Cheese Danishes in an airtight container at room temperature for up to 2 days to maintain their delightful texture.
-
Fridge: If you wish to keep them a bit longer, you can also refrigerate the danishes in an airtight container for up to 4 days; just be aware they may lose some crispiness.
-
Freezer: For longer storage, freeze the baked danishes by placing them in a single layer on a baking sheet until frozen solid. Once frozen, transfer to an airtight container or freezer bag for up to 3 months.
-
Reheating: To enjoy them warm again, reheat the danishes straight from the fridge or freezer in the oven at 350°F for 5-10 minutes. This will help regain their flaky goodness, making them taste freshly baked!
Apple & Cheese Danishes Variations
Feel free to make these Easy Apple & Cheese Danishes your own with these fun, delectable twists!
-
Ricotta Swap: Replace cream cheese with ricotta for a lighter, airier filling that still delivers a rich taste.
-
Nutty Crunch: Toss in chopped walnuts or pecans to the filling mixture for a delightful crunch that complements the soft fruit perfectly.
-
Cinnamon Roll Upgrade: Drizzle a bit of your favorite caramel sauce on top of the danishes before baking to create a luscious caramel-apple twist.
-
Berry Addition: Mix in a handful of berries like blueberries or raspberries to add a burst of flavor and color to the filling.
-
Spice Infusion: Add a pinch of nutmeg or cardamom to the cream cheese mixture for an aromatic kick that elevates the overall flavor.
-
Zesty Hint: Grate a little lemon zest into the filling for a refreshing brightness that plays beautifully against the sweetness of the apples.
-
Gluten-Free Option: Use gluten-free puff pastry to make this treat accessible for those with dietary restrictions while keeping it just as delicious!
-
Mini Bites: Cut the puff pastry into smaller squares for bite-sized delights that are perfect for sharing at brunch gatherings or parties!
These variations will not only enhance your danishes but also keep them exciting and fresh, allowing you to customize based on what you have on hand or what flavors you crave. Pair these treats with a comforting cup of coffee and some lovely company, perhaps alongside a slice of Pistachio Mushroom Cheesecake for dessert, to create a truly delightful experience!
What to Serve with Easy Apple & Cheese Danishes
The aroma of freshly baked Easy Apple & Cheese Danishes invites a harmonious dining experience, perfect for any occasion.
- Warm Cinnamon Apples: Serve sautéed warm cinnamon apples alongside for an added layer of sweet spiciness, enhancing the apple flavors in the danishes.
- Creamy Vanilla Ice Cream: A scoop of vanilla ice cream creates a delightful contrast with warm pastries, making each bite indulgent and creamy.
- Fresh Fruit Salad: A refreshing mix of berries and citrus slices brightens up the plate with a burst of color and a balance to the rich danishes.
- Homemade Whipped Cream: A dollop of freshly whipped cream provides a light, airy texture that complements the flaky pastry perfectly.
- Steamy Spiced Tea: Pair with a cup of spiced tea or chai to elevate the cozy atmosphere. The warmth of the spices complements the danishes beautifully.
- Rich Coffee: A fragrant cup of coffee enhances the buttery notes of the pastry while providing a delightful pairing for your brunch or dessert table.
- Chocolate Drizzle: For an extra touch of finesse, drizzle melted chocolate over your danishes; this unexpected twist will surprise and delight.
- Maple Syrup: A small drizzle of warm maple syrup adds a sweet touch that pairs splendidly with the cheese and apple filling, making them even more irresistible!
- Salty Caramel Sauce: For those craving contrast, a drizzle of salty caramel sauce over the warm danishes creates a flavor explosion that’s hard to resist.
- Chilled Sparkling Cider: Offer sparkling cider for a refreshing drink that can cleanse the palate and work well with the sweetness of the danishes.
Make Ahead Options
These Easy Apple & Cheese Danishes are perfect for meal prep, letting you enjoy fresh pastries with minimal fuss on busy mornings! You can prepare the filling—mixing together the softened cream cheese, sugar, and diced apples—up to 24 hours in advance. Store it in an airtight container in the refrigerator to maintain its freshness. Additionally, you can assemble the danishes and keep them unbaked in the fridge for up to 3 days. Just remember to brush them with the egg wash right before baking. When you’re ready to serve, pop them in the preheated oven and bake for the same 15-20 minutes; they will come out just as flaky and delicious!
Expert Tips for Apple & Cheese Danishes
-
Cream Cheese Care: Ensure cream cheese is softened at room temperature for easy mixing and a smooth filling. Cold cream cheese can result in clumps!
-
Size Matters: Cut your puff pastry into uniform squares to ensure even cooking. Irregular sizes can lead to inconsistent baking.
-
Filling Wisely: Be cautious not to overfill your danishes; a spoonful of filling is just right. Too much filling may cause them to burst while baking.
-
Golden Finish: Don’t skip the egg wash! It gives your Apple & Cheese Danishes that lovely golden-brown color and shiny appearance everyone loves.
-
Watch the Bake Time: Every oven is different; keep an eye on your danishes while they bake. They should be puffed and golden, taking around 15-20 minutes.
-
Perfect Pairing: Serve these warm danishes alongside coffee or tea for the ultimate brunch experience. Their comforting flavor makes fast food a distant memory!

Apple & Cheese Danishes Recipe FAQs
What type of apples should I use for the Apple & Cheese Danishes?
Opt for tart apples like Granny Smith or Honeycrisp, as they provide a wonderful contrast to the sweetness of the cream cheese filling. Ensure they’re peeled and diced evenly to create that perfect bite within the danish.
How should I store leftover Apple & Cheese Danishes?
Store any uneaten danishes in an airtight container at room temperature for up to 2 days. If you’d like to enjoy them longer, you can refrigerate them for up to 4 days, though they may lose some of their crispiness.
Can I freeze Apple & Cheese Danishes?
Absolutely! To freeze, place the baked danishes in a single layer on a baking sheet and freeze until solid. Then, transfer them to an airtight container or freezer bag for up to 3 months. This way, you can enjoy a delightful treat anytime!
What if my cream cheese filling is lumpy?
If your cream cheese ends up lumpy, it probably wasn’t softened enough. To fix this, simply let your cream cheese sit at room temperature for about 30 minutes. Then, mix it again, using a mixer or a whisk until smooth. Adding a splash of milk can also help achieve the desired consistency.
Can I use a different cheese in the filling?
Sure thing! You can swap cream cheese for ricotta or mascarpone for a creamy twist in your Apple & Cheese Danishes. Just ensure your replacement cheese is well-blended and softened to mix seamlessly with the other ingredients. Enjoy experimenting with flavors!
Are there any allergies to consider with this recipe?
Yes! The recipe includes dairy products, particularly cream cheese, which may not be suitable for those with lactose intolerance or dairy allergies. To make a dairy-free version, consider using almond or cashew cream cheese, which will still offer a delightful taste and texture.
Delicious Apple & Cheese Danishes Ready in 30 Minutes
Ingredients
Equipment
Method
- Preheat your oven to 400°F (200°C).
- Roll out the thawed puff pastry to about 1/8-inch thickness and cut into squares roughly 4 inches in size.
- In a medium bowl, combine softened cream cheese, granulated sugar, and ground cinnamon until smooth.
- Fold diced apples into the cream cheese mixture until evenly coated.
- Place a spoonful of filling in the center of each pastry square and fold corners over to seal.
- Whisk an egg and brush over the tops of each folded danish.
- Bake for 15-20 minutes until puffed and golden brown.
- Cool on a wire rack for a few minutes before serving warm.
Leave a Reply