
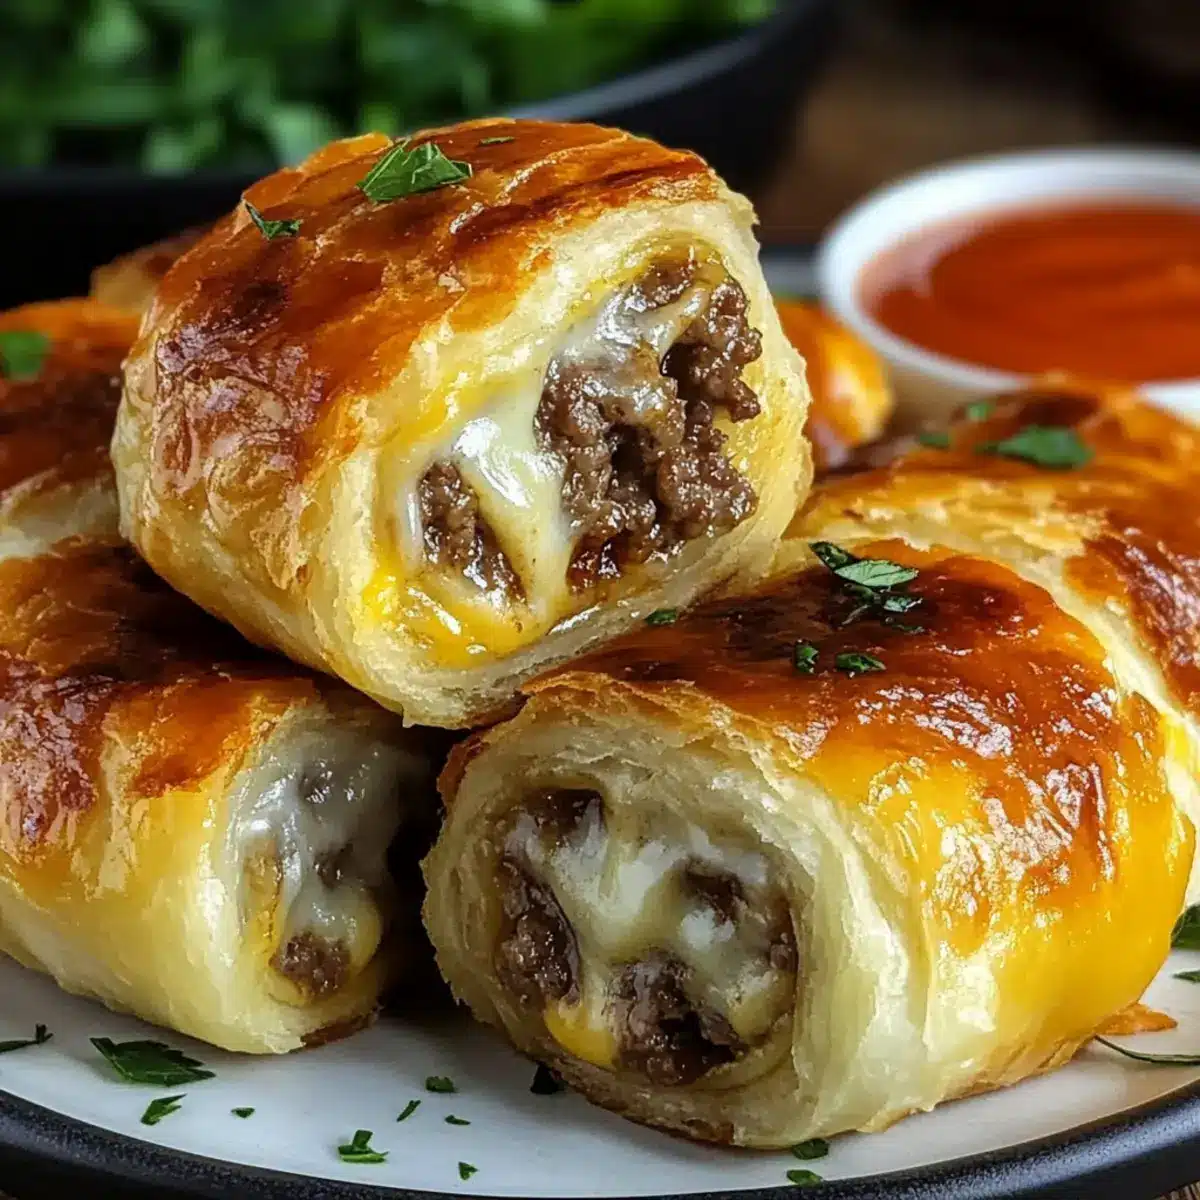
Have you ever found yourself craving that irresistible combination of cheeseburger flavor tucked into a fun, shareable bundle? Enter my Garlic Butter Cheeseburger Rollups, a twist on the classic that brings comfort food vibes right to your table. With a quick prep time of just 35 minutes, these rollups are not only a breeze to make but also perfect for busy weeknights or casual gatherings with family and friends. The cheesy, buttery goodness wrapped in soft dough is sure to win over both kids and adults alike, making them an instant crowd-pleaser. So, are you ready to transform your dinner experience with these mouthwatering rollups? Let’s dive into the deliciousness together!
Why Are These Rollups So Irresistible?
Family-Friendly Delight: The Garlic Butter Cheeseburger Rollups are designed to appeal to everyone around the table, making them a hit with kids and adults alike.
Quick Prep Time: You can whip up this delightful dish in just 35 minutes, perfect for busy weeknights or unexpected guests.
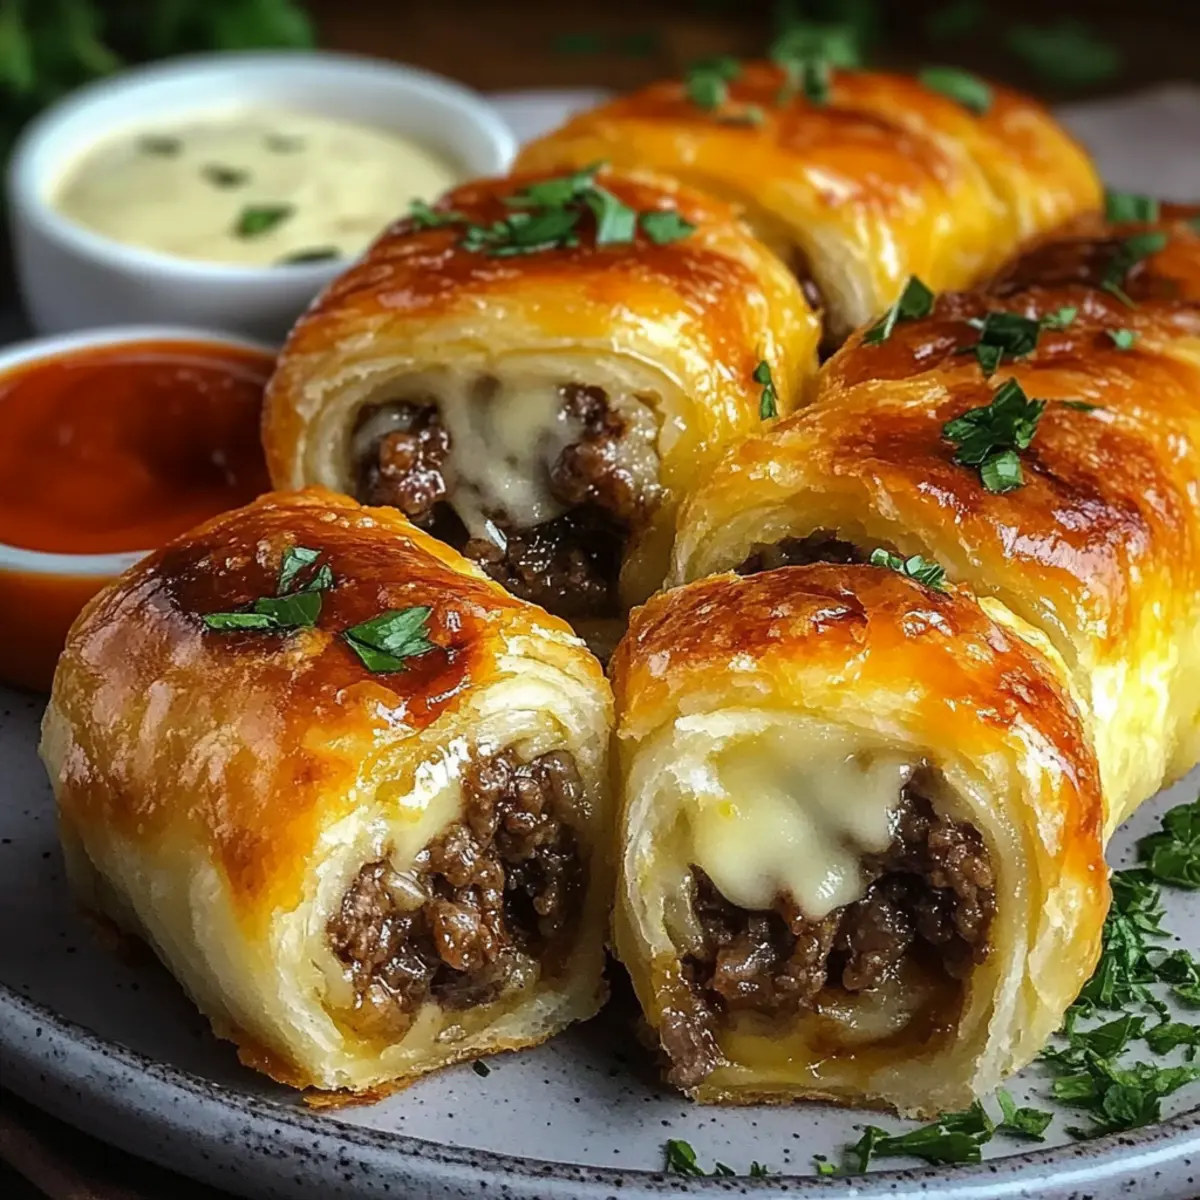
Savory, Cheesy Layers: Each rollup is bursting with gooey cheese and rich flavor, offering a comforting take on a classic cheeseburger that you won’t be able to resist.
Versatile Ingredients: Feel free to customize ingredients based on your family’s preferences; swap ground beef for turkey or even a plant-based option, and indulge in different cheese varieties for extra flair.
Perfect for Sharing: This crowd-pleaser is ideal for game nights or family gatherings, making it a fun dish to serve and enjoy together with dipping sauces like ketchup or ranch! If you’re looking for more deliciousness, check out my Bourbon Garlic Cream for an extra flavor boost!
Garlic Butter Cheeseburger Rollups Ingredients
These rollups are sure to make your taste buds dance!
For the Filling
• Ground Beef – Provides the classic cheeseburger flavor; can be substituted with ground turkey or plant-based meat for variety.
• Cheddar Cheese – Melts beautifully, ensuring a creamy texture; feel free to switch it up with mozzarella or pepper jack for a different kick.
For the Dough
• Rolls (or Pizza Dough) – Serves as the delightful base for the filling; use store-bought or homemade dough to make it your own.
For the Garlic Butter
• Garlic Butter – Adds rich flavor and aroma; use store-bought or whip up a quick homemade version for a personal touch.
For the Toppings
• Ketchup, Mustard, Ranch – Elevate your rollups with these delicious dips; choose your favorites to cater to everyone’s taste.
Step‑by‑Step Instructions for Garlic Butter Cheeseburger Rollups
Step 1: Prepare the Filling
In a skillet over medium heat, crumble and cook 1 pound of ground beef until it’s browned and fully cooked, about 6–8 minutes. Drain any excess fat, then stir in your favorite seasonings such as salt and pepper. Remove the skillet from the heat, allowing the beef mixture to cool for a couple of minutes while you preheat your oven to 375°F (190°C).
Step 2: Blend in Cheese
Once the beef mixture has cooled slightly, sprinkle in 1 cup of shredded cheddar cheese. Stir thoroughly until the cheese melts and combines seamlessly with the beef, creating a luscious filling. The warmth from the beef will help the cheese become gooey and inviting, ensuring each Garlic Butter Cheeseburger Rollup will be packed with flavor.
Step 3: Roll Out the Dough
If you’re using pizza dough, lightly flour a clean surface and roll it out into a large rectangle, about ¼ inch thick. Cut the dough into equal-sized squares or rectangles, then spoon the cheeseburger filling generously onto each piece, keeping it towards the center. This sturdy base will cradle all the deliciousness in your rollups.
Step 4: Form the Rollups
Carefully fold the edges of the dough over the filling and roll it up tightly from one end to the other, ensuring the filling is well encased within the dough. Pinch the seams to seal each rollup, creating a secure package that will puff up beautifully as it bakes. Repeat this process until all your filling is used up.
Step 5: Slice and Bake
Using a sharp knife, slice each rolled dough into bite-sized pieces, about 1–2 inches thick, placing them on a greased baking sheet. Brush the tops with melted garlic butter for that extra flavor and golden finish. Bake in the preheated oven for 15–20 minutes, or until they’re golden brown and the dough is puffed, signaling that your Garlic Butter Cheeseburger Rollups are ready to enjoy.
Step 6: Cool and Serve
Once baked, carefully remove the rollups from the oven and let them cool for a few minutes on the baking sheet. This brief cooling period will enhance their pull-apart texture. Serve warm with your favorite dipping sauces like ketchup, mustard, or ranch, and enjoy the delightful cheeseburger experience that these rollups deliver!

Garlic Butter Cheeseburger Rollups Variations
Feel free to let your creativity shine and customize these rollups to suit your taste buds!
-
Ground Beef Swap: Replace ground beef with turkey or plant-based meat for a lighter option. This keeps the comforting flavor while catering to various dietary preferences.
-
Cheese Variety: Try melting mozzarella or pepper jack cheese instead of cheddar for an exciting twist. The pepper jack adds a lovely spicy kick that elevates the flavor profile.
-
Veggie Boost: Add diced onions, bell peppers, or jalapeños to the filling for an extra crunch and depth of flavor. Each bite becomes a delightful surprise packed with freshness.
-
Dough Alternatives: Use puff pastry or crescent roll dough for a flaky texture that contrasts beautifully with the savory filling. This change adds an elegant touch to your rollups!
-
Herbed Garlic Butter: Mix fresh herbs like parsley or chives into the garlic butter for a fragrant finish. It brightens the dish and makes the rollups even more irresistible.
-
Make It Spicy: Toss in crushed red pepper flakes or hot sauce into the beef mixture to add some heat. Spicy lovers will appreciate this fiery upgrade!
-
Sweet and Savory: Drizzle a touch of barbecue sauce on the filling before rolling up for a sweet and tangy flavor that complements the cheeseburger essence perfectly.
-
Dipping Sauce Ideas: Pair your rollups with rich options like homemade Bourbon Garlic Cream or zesty ranch for a flavor explosion. These sauces elevate your dining experience into a memorable treat!
Expert Tips for Garlic Butter Cheeseburger Rollups
• Choose the Right Meat: Use lean ground beef for a flavorful filling; drain it well to avoid greasy rollups. Substitute with turkey or plant-based meat if preferred.
• Dough Thickness: Roll your dough to about ¼ inch thick to ensure the rollups hold their shape and cook evenly without being too dense.
• Seal Carefully: Pinch and seal the edges tightly to prevent filling from leaking out during baking, ensuring every rollup bursts with flavor.
• Cheese Variations: Experiment with different cheeses like pepper jack for a spicy kick or mozzarella for a milder taste to suit your family’s palate with these Garlic Butter Cheeseburger Rollups.
• Perfect Baking Time: Keep an eye on the rollups while baking; they should be golden brown and puffed up, which indicates they’re done and delicious!
Storage Tips for Garlic Butter Cheeseburger Rollups
Fridge: Store leftover Garlic Butter Cheeseburger Rollups in an airtight container for up to 3 days to keep them fresh and delicious.
Freezer: For longer storage, freeze the cooked rollups in a single layer, then transfer to a freezer-safe bag for up to 2 months.
Reheating: Reheat rollups in the oven at 350°F (175°C) for about 10-15 minutes to maintain their crispy texture. Avoid the microwave to prevent sogginess.
Room Temperature: If serving at a gathering, they can sit out for about 2 hours before needing refrigeration; any longer and they should be stored to keep them safe.
What to Serve with Garlic Butter Cheeseburger Rollups
Kick your meal up a notch with these delectable pairings that will transform your rollups into a full feast.
- Crisp Green Salad: A light salad with fresh greens and a tangy vinaigrette contrasts the richness of the rollups and adds a refreshing crunch.
- Pasta Salad: Colorful pasta salad with cherry tomatoes and olives offers a vibrant side that complements the savory flavors beautifully.
- Sweet Potato Fries: Crispy and slightly sweet, these fries provide a delightful textural balance alongside the cheesy rollups.
- Garlic Mashed Potatoes: Creamy and buttery mashed potatoes enrich the meal, echoing the comforting taste of the garlic butter in the rollups.
- Coleslaw: A crunchy coleslaw brings tangy notes and a satisfying crunch, elevating the overall dining experience with every bite.
- Chili Bites: Spicy chili-stuffed peppers add a kick, offering a flavorful contrast that pairs wonderfully with the cheesy goodness of burger rollups.
- Beer or Cider: For drinks, a cold beer or hard cider perfectly complements the savory flavors, making for a great pairing at game night.
- Chocolate Chip Cookies: End the meal on a sweet note with warm, gooey chocolate chip cookies that will delight both kids and adults alike!
Make Ahead Options
These Garlic Butter Cheeseburger Rollups are a fantastic meal prep solution for busy families! You can prepare the filling (ground beef mixed with cheese) up to 24 hours in advance, storing it in an airtight container in the refrigerator to maintain freshness. Additionally, you can roll up the dough and slice the rollups, refrigerating them for up to 3 days before baking. To retain their deliciousness, brush them lightly with garlic butter just before popping them into the oven. When you’re ready to enjoy, simply bake the rollups as directed, and they will be just as warm and flavorful as if made fresh that day. Enjoy the convenience without sacrificing taste!
Garlic Butter Cheeseburger Rollups Recipe FAQs
How do I choose ripe ingredients for my rollups?
Absolutely! When selecting ground beef, look for lean cuts with a bright red color and minimal fat. For cheese, choose blocks of cheddar rather than pre-shredded versions, as they melt better. Ensure your rolls or pizza dough have a fresh texture and aren’t past their expiration dates for the best results.
How do I store my leftover rollups?
Very simply! Place your leftover Garlic Butter Cheeseburger Rollups in an airtight container in the fridge, where they will stay fresh for up to 3 days. To enjoy them later, just remember to reheat them in the oven for that lovely crispiness everyone loves!
Can I freeze Garlic Butter Cheeseburger Rollups?
Certainly! To freeze, lay the cooked rollups in a single layer on a baking sheet to cool completely. Once they are frozen firm, transfer them into a freezer-safe bag or container, and they’ll stay fresh for up to 2 months. When you’re ready to enjoy them, bake from frozen at 350°F (175°C) for 15-20 minutes until heated through.
What should I do if my rollups become soggy?
If you find your rollups soggy, it’s likely due to excess moisture. Make sure to drain the ground beef well after cooking, and avoid overloading the filling. If you have leftover rollups, reheat them in the oven instead of the microwave to restore that crispy texture!
Are these rollups suitable for different dietary needs?
Absolutely! You can easily swap out ground beef for ground turkey or any plant-based alternatives, making them suitable for many diets. If you’re concerned about lactose, try using dairy-free cheese options, which melt wonderfully! Always check labels for allergens when selecting your ingredients.

Garlic Butter Cheeseburger Rollups That Everyone Will Love
Ingredients
Equipment
Method
- In a skillet over medium heat, crumble and cook the ground beef until browned, about 6–8 minutes. Drain excess fat, stir in seasonings, and cool slightly.
- Sprinkle in shredded cheddar cheese and stir until melted and combined with the beef.
- Roll out pizza dough on a floured surface to about ¼ inch thick and cut into squares. Spoon filling onto dough.
- Fold dough edges over filling and roll tightly. Pinch seams to seal each rollup.
- Slice rollups into bite-sized pieces and place on a greased baking sheet. Brush with melted garlic butter.
- Bake in a preheated oven at 375°F (190°C) for 15–20 minutes until golden brown.
- Let cool for a few minutes, then serve warm with dipping sauces.
Leave a Reply