
As I watched the steam rise from my oven, the aromas of sizzling kielbasa and caramelized cabbage filled my kitchen, instantly making it feel like home. If weeknight dinners have become a scramble with busy schedules, my Easy Sheet Pan Kielbasa and Pierogies with Cabbage is your ticket to reclaiming peaceful evenings. This comforting dish brings together tender pierogies, smoky polska kielbasa, and vibrant cabbage—all cooked conveniently on a single baking sheet in under 45 minutes. Not only is it a straightforward, kid-friendly meal that the whole family will love, but the minimal cleanup means you can spend more time enjoying each other’s company. What’s your favorite way to bring a touch of warmth and happy nostalgia to the dinner table? Let’s dive into this delicious recipe!

Why Is This Recipe So Appealing?
Simplicity: This sheet pan dinner is incredibly easy to whip up, perfect for busy weeknights when time is of the essence.
Flavor-Filled Harmony: The blend of smoky kielbasa, tender pierogies, and crisp cabbage creates a mouthwatering flavor sensation that will satisfy everyone at the table.
Kid-Approved: The fun textures and delicious tastes make it an instant favorite for the little ones, banishing the boredom of repetitive fast food.
Minimal Cleanup: With everything cooked on one pan, you can enjoy a hassle-free dinner without the mountain of dishes afterward.
Versatility: Feel free to switch up veggies or pierogi flavors, making this dish your own while still keeping it simple. Perfect for when you want to try something new!
If you’re looking for more easy meal ideas, try Chicken Gyros with Creamy Feta or the delectable Seafood Boil with Garlic Butter Sauce.
Kielbasa and Pierogies with Cabbage Ingredients
• Get ready for a delicious one-pan meal!
For the Main Dish
- Polska Kielbasa – Provides a rich, smoky flavor to the dish; substitute with smoked sausage if unavailable.
- Cabbage – Adds texture and nutrition; can be swapped with bagged coleslaw mix for quicker prep.
- Pierogies – The main starch in the dish; use any flavor and do not thaw—add directly from the freezer for optimal texture.
For Seasoning
- Olive Oil – Aids in cooking and enhances flavor; can be replaced with vegetable or canola oil if preferred.
- Salt – Essential for seasoning; adjust according to taste for your Kielbasa and Pierogies with Cabbage.
- Black Pepper – Adds a mild heat; can be increased for more spice.
- Granulated Garlic – Gives depth to the flavor profile; fresh minced garlic can be used for a stronger taste.
Now that you have your ingredients, let’s get cooking!
Step‑by‑Step Instructions for Kielbasa and Pierogies with Cabbage
Step 1: Preheat and Prepare the Pan
Begin by preheating your oven to 400°F (200°C). While the oven heats, grease a rimmed cookie sheet with a bit of olive oil or non-stick spray to prevent sticking. This step is essential for achieving that perfect crispiness in your Kielbasa and Pierogies with Cabbage.
Step 2: Season the Cabbage
In a large mixing bowl, combine the shredded cabbage with 3 tablespoons of olive oil, salt, black pepper, and granulated garlic. Toss everything together until the cabbage is well coated, which will enhance its flavor during roasting. The cabbage should glisten with the oil, making it ready for its baking debut.
Step 3: Arrange the Pierogies
Next, spread the frozen pierogies onto the greased cookie sheet in two short rows. Drizzle the remaining olive oil over the pierogies, adding just a pinch of salt for extra flavor. The key is to work quickly to maintain their frozen state for optimal texture as they bake.
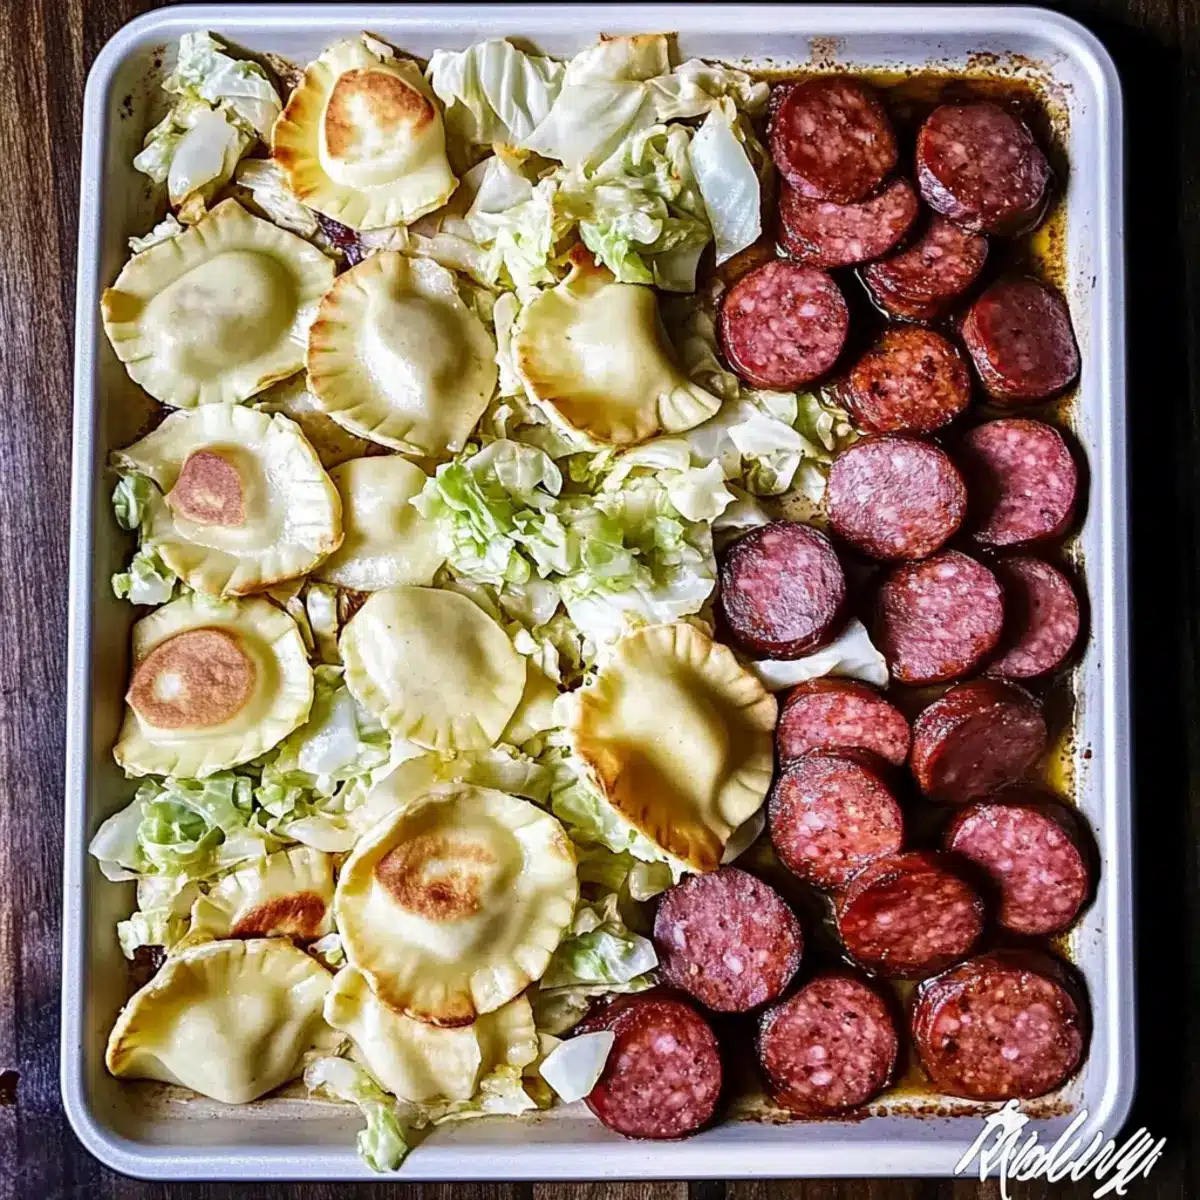
Step 4: Add the Kielbasa and Cabbage
Slice the polska kielbasa into bite-sized pieces and arrange them around the pierogies on the baking sheet. Pile the seasoned cabbage in the remaining space on the sheet, ensuring everything is spread out evenly. This arrangement allows each ingredient to roast beautifully in the oven.
Step 5: Bake and Stir
Place the entire sheet pan in the preheated oven and set a timer for 15 minutes. Once the time is up, carefully stir the cabbage and flip the pierogies to ensure even cooking. You’ll start to see the cabbage wilting and the pierogies beginning to brown.
Step 6: Final Bake for Crispiness
Return the pan to the oven and bake for an additional 15 minutes, watching closely as the ingredients cook. Your Kielbasa and Pierogies with Cabbage is ready when the pierogies turn golden brown and crispy, while the cabbage caramelizes slightly for a delicious finish.
Step 7: Serve and Enjoy
Once everything is cooked through, remove the pan from the oven. Let the dish cool for a minute before serving. This vibrant, hearty meal can be enjoyed straight from the pan, offering a warm, cozy dining experience that the whole family will savor.
Kielbasa and Pierogies with Cabbage Variations
Feel free to make this comforting meal your own with these simple yet delightful twists!
-
Smoked Sausage: Switch out polska kielbasa for any smoked sausage for a different flavor while maintaining that beloved smokiness.
For a heartier version, try adding a touch of spice with a Cajun sausage blend, making it perfect for those who crave a little heat. -
Colorful Cabbage: Replace regular cabbage with vibrant red cabbage or a mix of colorful vegetables like carrots and bell peppers.
Not only do these veggies add a pop of color, but they also bring unique flavors and zest to your dish. -
Different Pierogi Fillings: Explore various pierogi fillings, such as sauerkraut, mushroom, or even sweet potato for a twist!
This change can introduce new tastes while keeping the dish still heartwarming and satisfying. -
Vegetable Medley: Add in chopped zucchini, broccoli, or green beans for extra nutrition and a beautiful presentation.
These additions not only boost the veggie count but also provide lovely textures to your dish. -
Herb Infusion: Toss the cabbage with fresh herbs like thyme, dill, or parsley to elevate the flavor profile.
This addition brightens the dish and adds an aromatic touch that warms the soul. -
Cheesy Upgrade: Melt some sharp cheddar cheese or crumbled feta over the pierogies just before serving for a creamy finish.
What’s not to love about adding a layer of cheesy goodness to every delightful bite? -
Spicy Kick: If you’re feeling bold, sprinkle some red pepper flakes or add sliced jalapeños for heat.
This can create an eye-opening flavor experience that’ll please those who love a bit of spice. -
Quicker Prep: Use pre-shredded coleslaw mix instead of whole cabbage for a super speedy prep.
This option doesn’t sacrifice flavor or freshness, keeping your meal simple and quick!
For more inspiration, check out my recipe for Fiesta Lime Chicken with Avocado Salsa for a flavorful twist or consider making Cheesy Steak and Rice Skillet for a hearty family meal!
What to Serve with Easy Sheet Pan Kielbasa and Pierogies with Cabbage
Looking to complete your comforting meal?
-
Garlic Bread: The buttery, toasted goodness of garlic bread complements the savory flavors beautifully, perfect for mopping up any leftover juices. Add a sprinkle of parsley for an aromatic touch.
-
Creamy Coleslaw: A refreshing contrast, this cool and crunchy side adds great texture while balancing the savory dish on your plate.
-
Roasted Root Vegetables: Sweet carrots and earthy potatoes roasted until caramelized enhance the meal with extra nutrition and a medley of flavors.
-
Sweet Corn on the Cob: Juicy and tender, corn adds a burst of sweetness that harmonizes with the smoky kielbasa while providing a vibrant splash of color.
-
Crisp Garden Salad: Lighten up your meal with a simple salad of mixed greens, cherry tomatoes, and a tangy vinaigrette. It offers a refreshing bite that pairs wonderfully with the heartiness of the dish.
-
Chilled Cucumber Soup: Serve as an appetizer; its coolness offsets the warm dish nicely and adds a unique twist to your dinner.
-
Sparkling Lemonade: A zesty, fizzy drink will brighten your family dinner while providing a refreshing contrast to the robust flavors of the kielbasa and pierogies.
-
Apple Crisp: Finish on a sweet note with this delightful dessert, bringing warmth and comfort after your meal and evoking nostalgic memories of childhood.
Storage Tips for Kielbasa and Pierogies with Cabbage
Fridge: Store any leftovers in an airtight container in the refrigerator for up to 3 days. This will keep your Kielbasa and Pierogies with Cabbage fresh and flavorful for quick meals.
Freezer: If you’d like to save leftovers for later, freeze them in a single-serving airtight container for up to 2 months. Reheat directly from frozen for best texture and taste.
Reheating: To enjoy your leftovers, reheat in the oven at 350°F (175°C) for about 15-20 minutes, or until heated through and slightly crispy. This method keeps the pierogies and cabbage tender without losing that delicious crunch.
Expert Tips for Kielbasa and Pierogies with Cabbage
-
Frozen Pierogies: Always use frozen pierogies directly from the freezer to maintain their texture and prevent them from becoming mushy during baking.
-
Crispy Texture: For a crisper result, space the pierogies and kielbasa apart on the sheet pan rather than crowding them together.
-
Oven Variations: Baking times may vary by oven. Keep a close eye on the cabbage to avoid burning, and adjust cooking time as necessary for your Kielbasa and Pierogies with Cabbage.
-
Flavor Boost: Consider adding a dash of smoked paprika or Italian seasoning to the cabbage mix for an enhanced flavor profile.
-
Fresh Herbs: Don’t forget to garnish with fresh herbs, like parsley or chives, right before serving for a burst of color and freshness!
Make Ahead Options
These Easy Sheet Pan Kielbasa and Pierogies with Cabbage are perfect for meal prep enthusiasts! You can slice the polska kielbasa and prepare the seasoned cabbage up to 24 hours in advance, storing them in an airtight container in the refrigerator. The pierogies can be left in the freezer until you’re ready to bake, ensuring they maintain their ideal texture. When you’re ready to serve, simply lay the frozen pierogies on the pan, add the prepared kielbasa and cabbage, and bake directly from the fridge. This saves you precious time on busy weeknights while still delivering a delicious and comforting meal for your family!

Kielbasa and Pierogies with Cabbage Recipe FAQs
What type of kielbasa works best for this recipe?
I recommend using polska kielbasa for its rich, smoky flavor that complements the other ingredients beautifully. However, if you can’t find it, smoked sausage is a great substitute that will still deliver that wonderful taste.
How should I store leftovers of Kielbasa and Pierogies with Cabbage?
Leftovers can be stored in an airtight container in the refrigerator for up to 3 days. This keeps them fresh and allows you to enjoy a quick meal without hassle! For better longevity, you can freeze individual portions in airtight containers for up to 2 months.
Can I freeze Kielbasa and Pierogies with Cabbage? How do I do it?
Absolutely! To freeze, allow the dish to cool completely after baking, then portion it into airtight containers. Label them with the date, and they should stay fresh for about 2 months. When you’re ready to enjoy them, you can reheat directly from frozen in the oven at 350°F (175°C) for about 15-20 minutes, until heated through.
What should I do if my cabbage is browning too quickly?
If you notice the cabbage browning too quickly, you can simply turn down the oven temperature to 375°F (190°C) and check it every 5 minutes until it’s tender and caramelized to your liking. Remember, every oven is a little different, so keeping an eye on it is essential!
Are there any dietary considerations for allergens in this recipe?
Yes, this dish features common allergens such as wheat (from the pierogies) and can contain gluten if you’re using regular kielbasa. If you need a gluten-free option, consider using gluten-free pierogies and checking the labels of the kielbasa for gluten. Always ensure your ingredients suit your dietary needs.
Can I use fresh pierogies instead of frozen ones?
I usually recommend using frozen pierogies directly from the freezer for optimal texture, but if you have fresh pierogies, you can certainly use them. Just adjust the baking time slightly, since fresh pierogies often require less time to cook through. Bake until golden and heat through!

Kielbasa and Pierogies with Cabbage for Cozy Weeknight Dinners
Ingredients
Equipment
Method
- Preheat your oven to 400°F (200°C) and grease a rimmed cookie sheet with olive oil or non-stick spray.
- In a bowl, combine the shredded cabbage with olive oil, salt, black pepper, and granulated garlic. Toss until well coated.
- Spread the frozen pierogies onto the greased cookie sheet, drizzle with olive oil, and add a pinch of salt.
- Slice the kielbasa and arrange it around the pierogies. Pile the seasoned cabbage in the remaining space.
- Bake for 15 minutes, then stir the cabbage and flip the pierogies for even cooking.
- Return to the oven and bake for an additional 15 minutes until pierogies are golden brown and cabbage caramelizes.
- Remove from the oven, let cool for a minute, and serve warm.
Leave a Reply