
There’s nothing quite like the thrill of summer, especially when it leads to a festive gathering and the chance to showcase your culinary skills. This 4th of July, elevate your dessert game with a no-bake Ice Cream Sandwich Cake. Picture layers of chewy cookies hugging velvety vanilla ice cream, crowned with a vibrant burst of berries—a delightful treat that resonates with both nostalgia and celebration! Not only is this dessert perfect for making ahead of time, but it also promises to keep your kitchen cool, allowing you to relish the holiday fun without the stress of baking. So, are you ready to whip up a delightful showstopper that will have everyone asking for seconds? Let’s dive into this exciting recipe!
Why is This Ice Cream Sandwich Cake a Must-Try?
No-Bake Convenience: Skip the oven and keep your kitchen cool with this effortlessly assembled dessert.
Family-Friendly Fun: Involve kids in layering cookies and ice cream for a memorable kitchen experience!
Vibrant Presentation: Impress guests with the festive colors of fresh berries drizzled with colorful glaze.
Make-Ahead Ease: Prepare components the night before and assemble for a stress-free dessert on the big day.
Endless Variations: Customize with any fruits or ice cream flavors, ensuring it’s perfect for every occasion.
Crowd-Pleasing Delight: Satisfy all ages with this delightful dessert that combines nostalgia with a modern twist, perfect for summer gatherings!
Ice Cream Sandwich Cake Ingredients
For the Cookies
- All-purpose flour – Provides the structure for the cookies; swap for gluten-free flour if needed.
- Unsalted butter – Adds creamy richness; vegan butter makes for a dairy-free option.
- Granulated sugar – Sweetens the cookie dough; consider coconut sugar for a healthier alternative.
- Brown sugar – Contributes moisture and flavor depth; can be substituted with white sugar for lighter cookies.
- Eggs – Acts as a binding agent; use flaxseed meal mixed with water for an egg-free version.
- Vanilla extract – Enhances overall flavor; almond extract gives a unique twist.
- Baking soda – A vital leavening agent for puffiness; no substitutes here!
- Salt – Balances the sweetness; it’s essential for a flavorful cookie.
For the Berry Filling
- Vanilla ice cream – Creamy foundation; opt for dairy-free ice cream for a plant-based treat.
- Strawberries – Provide a fruity flair; swap in raspberries for a different berry experience.
- Blueberries – Adds additional berry goodness; blackberries make a great substitute.
- Lemon juice – Brightens and enhances berry flavors; vinegar can work in a pinch.
- Sugar – Sweetens the filling; reduce the amount if your berries are particularly sweet.
For the Glaze
- White chocolate chips – Creates a luscious glaze; use dairy-free chips to keep it vegan-friendly.
- Coconut oil – Provides a smooth texture when melted; any neutral oil can be used as an alternative.
- Food coloring – Adds festive color; look for natural food dyes for a healthier choice.
Now that we have our ingredients ready, let’s get set to assemble this delightful Ice Cream Sandwich Cake that will surely create wonderful summer memories!
Step‑by‑Step Instructions for Ice Cream Sandwich Cake
Step 1: Prepare the Pan
Line a 9×9-inch square pan with parchment paper, ensuring the edges overhang for easy removal later. This step is crucial for a clean release once your Ice Cream Sandwich Cake is assembled. Set the pan aside while you move on to making the cookie dough.
Step 2: Make Cookie Dough
In a mixing bowl, cream together ¾ cup of unsalted butter with ½ cup each of granulated and brown sugar until light and fluffy, about 2-3 minutes. Add in 2 eggs and 2 teaspoons of vanilla extract, mixing until fully incorporated. In a separate bowl, whisk together 2 cups of all-purpose flour, 1 teaspoon of baking soda, and ½ teaspoon of salt, then slowly combine with the wet ingredients until just mixed.
Step 3: Bake Cookies
Spread the cookie dough evenly into the prepared pan, smoothing the top with a spatula for an even layer. Bake in a preheated oven at 350°F (175°C) for 12-14 minutes, or until the edges are golden brown. Remove from oven and allow the cookie layer to cool completely in the pan before proceeding to the next step.
Step 4: Prepare Berry Filling
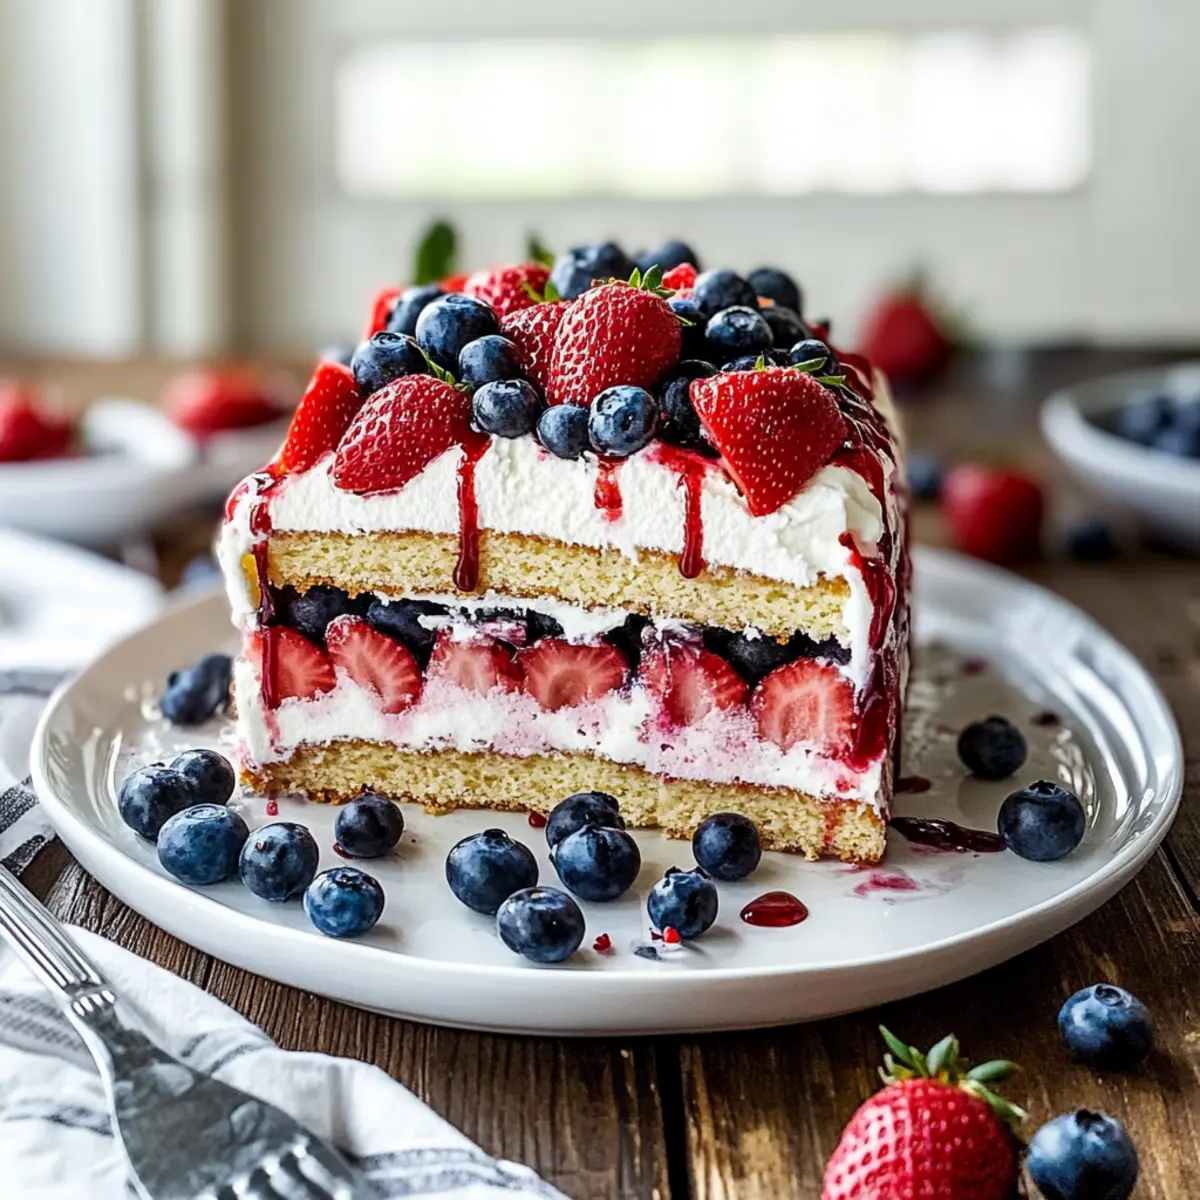
While the cookie layer cools, make the berry filling. In a bowl, mix 1 cup of sliced strawberries with 1 tablespoon of lemon juice and 2 tablespoons of sugar, letting it sit for about 10 minutes to release juices. Gently fold in ½ cup of blueberries, creating a colorful and vibrant mixture ready to layer in your Ice Cream Sandwich Cake.
Step 5: Assemble First Layer
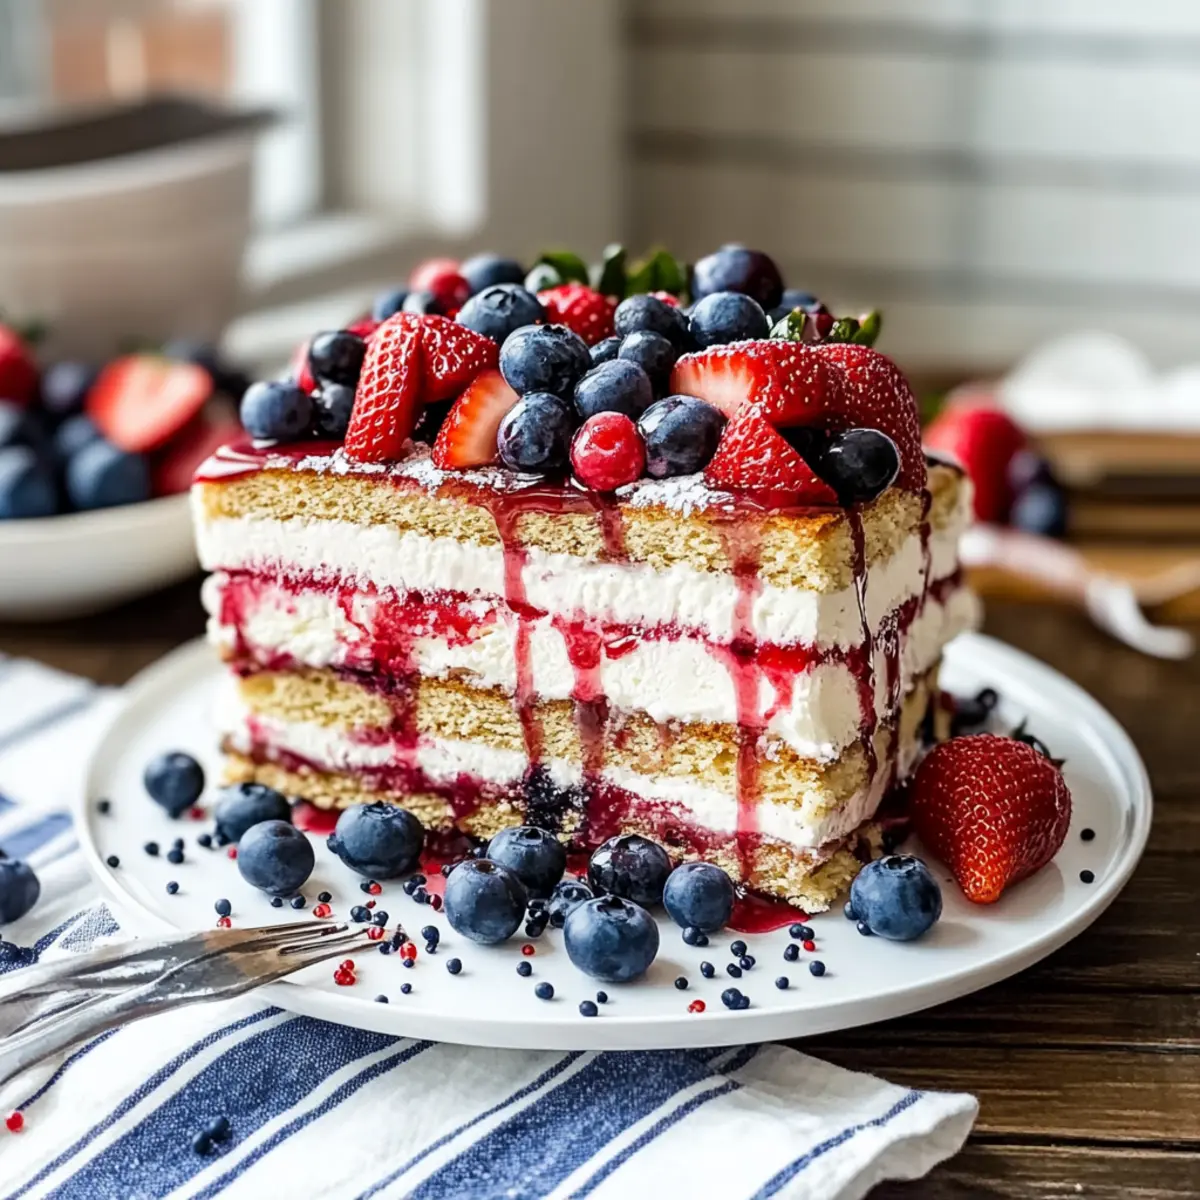
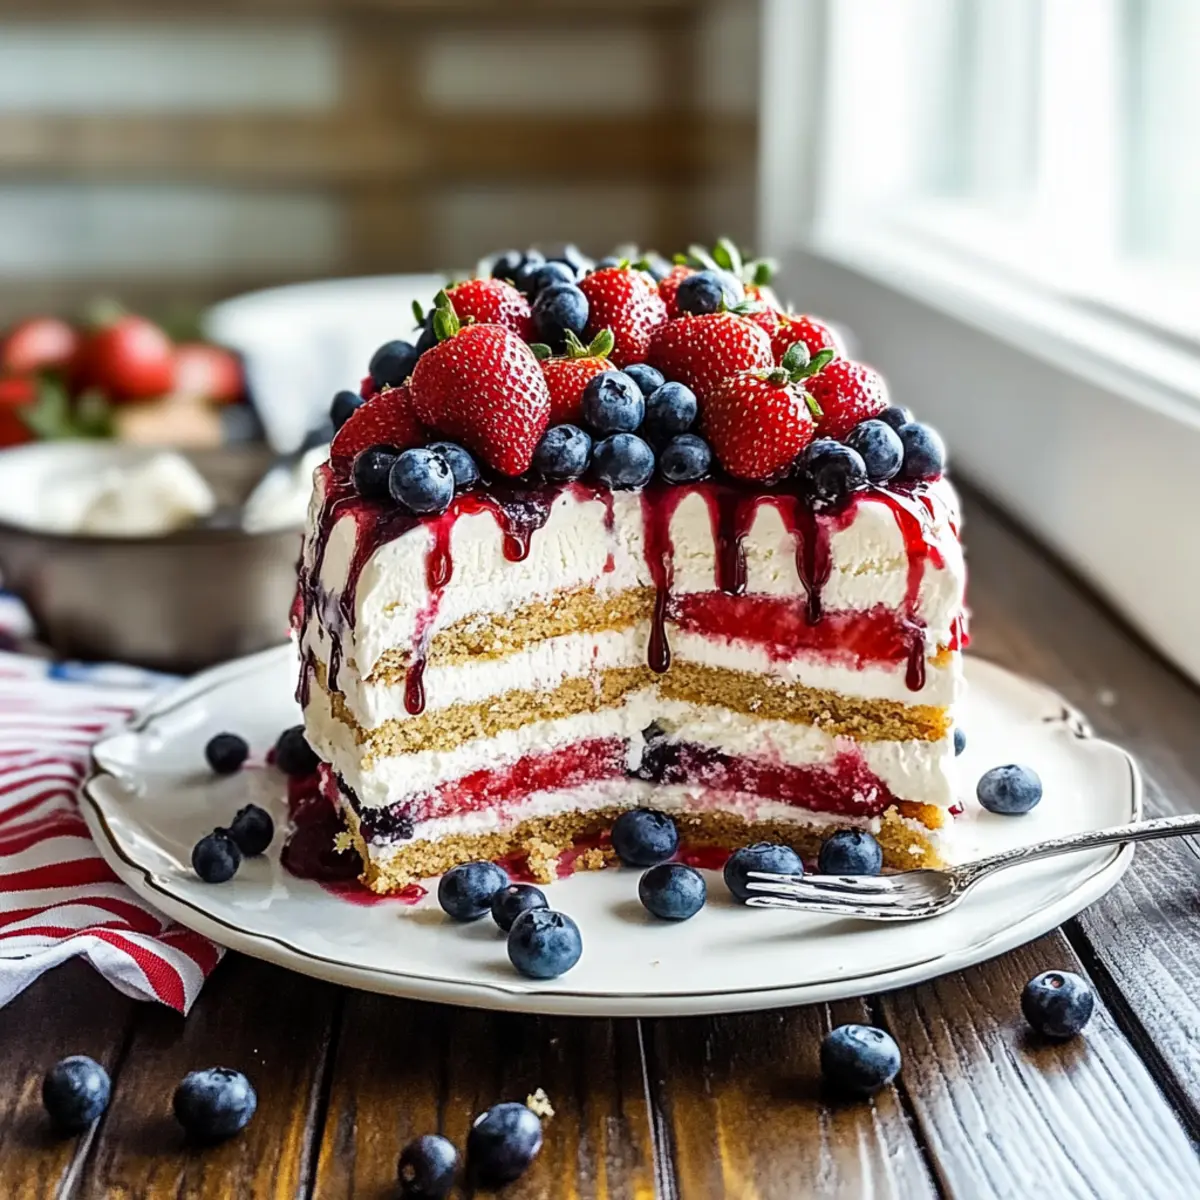
Once the cookies are completely cooled, spread an even layer of softened vanilla ice cream (about 2 cups) over the cookie base. Be gentle to maintain the integrity of the cookie layer beneath. Top it off with the mixed berries, spreading them evenly over the ice cream. Cover and freeze for 1 hour, allowing the layers to firm up nicely.
Step 6: Repeat for Second Layer
Prepare another batch of cookie dough using the same method. After baking and cooling, place this second cookie layer on top of the frozen berry-filled ice cream. Add another layer of softened vanilla ice cream followed by the remaining macerated berries. If desired, repeat layers, ensuring each layer is even and packed before freezing for an hour again.
Step 7: Make Glaze
To create a festive glaze, melt 1 cup of white chocolate chips with 2 tablespoons of coconut oil in a microwave-safe bowl, heating in 30-second intervals until smooth and glossy. Add a few drops of food coloring to create vibrant red or blue hues. Stir well to achieve an even color before drizzling over your assembled Ice Cream Sandwich Cake.
Step 8: Slice and Serve
Allow the cake to chill briefly to set the glaze, then grasp the parchment edges to lift the dessert out of the pan. Slice into squares using a sharp knife, wiping it clean between cuts for neat edges. Serve chilled and watch as your guests delight in this stunning Ice Cream Sandwich Cake, perfect for those summer celebrations!

Ice Cream Sandwich Cake Variations
Invite your creativity into the kitchen and make this delectable dessert even more exciting with these fun spins!
-
Fruit Swap: Use different seasonal fruits like peaches or cherries to adapt this cake for various occasions.
-
Plant-Based Delight: Substitute all dairy ingredients with plant-based options for a delicious vegan-friendly version everyone will love.
-
Chocolate Twist: Incorporate chocolate chip cookies in place of regular cookies, adding a rich flavor that enhances the overall taste.
-
Nutty Crunch: Add chopped nuts like almonds or walnuts between layers for an exciting crunch that complements the soft layers.
-
Different Sizes: Feel free to use a larger pan (9×13-inch) for thinner layers, adjusting ingredient amounts accordingly for a lighter dessert.
-
Swirled Ice Cream: Use different flavors of ice cream, such as chocolate or mint, and create a marbled effect for a stunning visual treat.
-
Minty Fresh: Add a touch of peppermint extract to the ice cream for a refreshing mint-flavored surprise that’s perfect for summer.
-
Gourmet Glaze: Elevate the glaze by incorporating a splash of bourbon extract, adding a sophisticated twist reminiscent of my favorite Bourbon Garlic Cream.
These variations ensure that each time you make this ice cream sandwich cake, it’s a unique celebration of flavors. What will you try first?
Make Ahead Options
This 4th of July Ice Cream Sandwich Cake is perfect for meal prep, allowing you to streamline your holiday preparations! You can prepare the cookie layers up to 24 hours in advance; just bake and cool them completely before storing them in an airtight container at room temperature. The berry filling can also be made ahead—simply mix the strawberries and blueberries, cover, and refrigerate for up to 3 days. When you’re ready to assemble the cake, layer the softened ice cream and prepared berries over the cookie layers. This way, you’ll enjoy a refreshingly delicious dessert with minimal effort on the day of your celebration, just like homemade!
How to Store and Freeze Ice Cream Sandwich Cake
Fridge: Store leftover Ice Cream Sandwich Cake in an airtight container for up to 3 days; however, be mindful that the texture may change as the cookies soften.
Freezer: For longer storage, wrap the cake tightly in plastic wrap and aluminum foil, then freeze for up to 2 weeks. Thaw slightly before slicing for easier cuts.
Reheating: This dessert is best enjoyed cold; there’s no need to reheat. Just let it sit at room temperature for a few minutes before serving if it feels too firm.
Assembly Tips: If you’re planning to make this a make-ahead treat, freeze layers separately. Assemble just before serving to preserve the ideal texture!
Expert Tips for Ice Cream Sandwich Cake
- Work Quickly: Minimize the time the ice cream is out of the freezer to prevent melting during assembly.
- Chill Between Layers: Use the freezer to briefly chill the cake after assembling each layer; this will maintain the structure and prevent any slippage.
- Use Parchment Paper: Lining your pan with parchment paper is essential for easy removal of the ice cream sandwich cake after it’s frozen.
- Smooth the Glaze: For a polished look, let the melted chocolate cool slightly before drizzling—it’ll create a smoother finish on your cake.
- Make it Festive: Use natural food colorings for a vibrant glaze that brightens your presentation and excitement during summer parties.
What to Serve with 4th of July Ice Cream Sandwich Cake
Picture a warm summer gathering filled with laughter, sunshine, and vibrant flavors that elevate your dessert to a whole new level.
- Fresh Fruit Salad: Bright and refreshing, a medley of seasonal fruits offers a light contrast to the richness of the cake.
- Grilled Peaches: Caramelized and juicy, grilled peaches add a warm sweetness that beautifully echoes the berry flavors in the cake.
- Chocolate Chip Cookies: For a delightful twist, serve classic cookies alongside for those who love an extra sweet crunch.
- Minty Lemonade: Cool and revitalizing, this beverage complements the cake’s flavors while keeping everyone refreshed on a hot day.
- Ice Cream Scoops: Offer a scoop of vanilla or berry ice cream on the side for an indulgent experience with every slice.
- Berry Compote: A homemade compote brings a burst of fruity joy, intensifying the cake’s berry filling with each bite.
- Whipped Cream Topping: Light and airy whipped cream adds a velvety touch that enhances the layering of flavors without overwhelming it.
- Sangria: A fruity sangria can be an elegant accompaniment, its flavors mingling delightfully with the cake’s summery notes.
- Chocolate-Covered Strawberries: These delightful bites serve as a romantic touch, echoing the festive spirit while being utterly irresistible.
4th of July Ice Cream Sandwich Cake Recipe FAQs
How do I select the right berries for the filling?
Absolutely! Look for berries that are vibrant and firm. When choosing strawberries, opt for those that have a bright red color and are free from dark spots. For blueberries, ensure they are plump and have a silvery bloom. Avoid berries with mold or excessive soft spots for the freshest taste.
What’s the best way to store the leftover Ice Cream Sandwich Cake?
Leftover Ice Cream Sandwich Cake should be stored in an airtight container in the freezer for up to 2 weeks. If you have multiple layers, you might want to wrap each layer tightly in plastic wrap before placing it in a container to preserve the texture. When you’re ready to enjoy it again, allow it to thaw slightly at room temperature for about 10 minutes for easier slicing.
Can I freeze this cake, and how?
Definitely! To freeze your Ice Cream Sandwich Cake, wrap it tightly in plastic wrap, followed by aluminum foil to prevent freezer burn. It can be stored frozen for up to 2 weeks. When you’re ready to serve, let it sit at room temperature for a few minutes before slicing to ensure smooth cuts. This will help maintain the structure while still giving you that creamy goodness.
What are some common troubleshooting tips if my ice cream melts while assembling?
Very! If you find that your ice cream starts to melt during assembly, try working quickly by assembling the layers one at a time and returning the cake to the freezer after each addition. Alternatively, you can slightly soften the ice cream in the refrigerator rather than letting it sit out, which helps avoid excessive melting. If the ice cream does get too soft, it’s not a lost cause—just freeze the whole cake for an hour before serving to help restore its shape!
Are there any dietary considerations I should take into account?
Absolutely! If you’re serving this to guests with dietary restrictions, consider using gluten-free flour and vegan butter for a gluten-free and dairy-free option. Always check for allergens with chocolate and ensure that the specific brands of ice cream and chocolate you choose meet your guests’ dietary needs. You can also make the dessert nut-free by avoiding almond extract and selecting nut-free chocolate chips.
Can I use different flavors or types of ice cream?
The more the merrier! Feel free to get creative with your Ice Cream Sandwich Cake by swapping in your favorite ice cream flavors. Whether it’s rich chocolate, strawberry, or even mango, you can mix it up based on seasonal fruits or personal preference. Just remember to keep your fillings balanced so the flavors blend harmoniously together!
Delicious Ice Cream Sandwich Cake Perfect for Summer Parties
Ingredients
Equipment
Method
- Line a 9x9-inch square pan with parchment paper, ensuring the edges overhang for easy removal later.
- In a mixing bowl, cream together ¾ cup of unsalted butter with ½ cup each of granulated and brown sugar until light and fluffy, about 2-3 minutes.
- Add in 2 eggs and 2 teaspoons of vanilla extract, mixing until fully incorporated.
- In a separate bowl, whisk together 2 cups of all-purpose flour, 1 teaspoon of baking soda, and ½ teaspoon of salt, then slowly combine with the wet ingredients until just mixed.
- Spread the cookie dough evenly into the prepared pan, smoothing the top with a spatula for an even layer.
- Bake in a preheated oven at 350°F (175°C) for 12-14 minutes, or until the edges are golden brown.
- While the cookie layer cools, make the berry filling by mixing 1 cup of sliced strawberries with 1 tablespoon of lemon juice and 2 tablespoons of sugar, letting it sit for about 10 minutes.
- Gently fold in ½ cup of blueberries to create a colorful and vibrant mixture ready to layer in your Ice Cream Sandwich Cake.
- Once the cookies are completely cooled, spread an even layer of softened vanilla ice cream (about 2 cups) over the cookie base.
- Top it off with the mixed berries, spreading them evenly over the ice cream.
- Cover and freeze for 1 hour.
- Prepare another batch of cookie dough using the same method and proceed to layer again.
- To create a festive glaze, melt 1 cup of white chocolate chips with 2 tablespoons of coconut oil in a microwave-safe bowl, heating in 30-second intervals until smooth.
- Once set, slice into squares and serve chilled.
Leave a Reply