
The warm aroma of golden cornmeal sizzling in the skillet transports me to a cozy kitchen in Venezuela, where the magic of Homemade Arepas comes to life. These crispy cornmeal cakes, filled with a sumptuous Reina Pepiada mixture of creamy chicken and ripe avocado, are more than just a meal; they embody tradition and comfort in every bite. Perfect for busy weeknights or gatherings with friends, this dish is not only a crowd-pleaser but also versatile, allowing you to adapt the filling to suit your taste. Imagine crafting these delightful pockets of flavor that are gluten-free with the right cornmeal, making them ideal for everyone at the table. Are you ready to explore this culinary adventure with me and awaken your taste buds?

Why Are You Going to Love Arepas?
Comforting and Delicious: These Homemade Arepas are a warm hug for your taste buds, blending comfort food with vibrant flavors.
Crispy Texture: The golden, crispy exterior holds its shape perfectly while embracing a creamy filling that melts in your mouth.
Endless Versatility: Whether you’re in the mood for the classic Reina Pepiada or want to experiment with various fillings, the options are limitless!
Quick and Easy to Make: Perfect for busy weeknights, this recipe allows you to whip up satisfying meals in no time.
Gluten-Free Joy: With the right cornmeal, everyone can enjoy these delicious gems, making them a hit for different dietary needs.
Try pairing them with a refreshing salsa or your favorite soup for a complete meal. You can also check out our tips on storage for leftovers to ensure nothing goes to waste!
Homemade Arepas Ingredients
-
For the Arepas
• Pre-cooked white cornmeal – Provides structure and a unique texture for the arepas. Brand suggestion: P.A.N. for authenticity.
• Warm water – Hydrates the cornmeal for a workable dough. Aim for 100°F to 110°F temperature.
• Salt – Enhances flavor in the dough. Essential for a balanced taste.
• Vegetable oil – Adds moisture and promotes browning. Can use olive oil or another neutral oil for health benefits. -
For the Filling
• Cooked chicken (shredded) – Main protein for the filling, providing heartiness. Rotisserie chicken recommended for convenience and flavor.
• Ripe avocado – Contributes creaminess and healthy fats in the filling. Choosing a perfectly ripe avocado ensures a smooth mash.
• Mayonnaise – Binds the filling ingredients and adds creaminess. Use a lighter variety for a healthier option.
• Small onion (finely chopped) – Adds savory depth. Shallots can be a milder substitute.
• Cilantro (finely chopped) – Provides freshness and herbal notes. Can be omitted for a non-cilantro lover alternative.
• Jalapeño (seeded and finely chopped, optional) – Adds a mild heat to the filling. Use bell pepper for a non-spicy version.
• Juice of 1 lime – Brightens and balances the flavors. Adjust based on personal tartness preference.
• Salt and pepper (to taste) – For final seasoning of the filling.
Step‑by‑Step Instructions for Homemade Arepas
Step 1: Prepare the Dough
In a large bowl, combine 2 cups of pre-cooked white cornmeal, 1 teaspoon of salt, and 1 tablespoon of vegetable oil. Gradually mix in 1 ¼ cups of warm water (100°F to 110°F) until the mixture is smooth and free of lumps. Let the dough rest for 5 minutes, allowing the cornmeal to fully hydrate and become easier to shape.
Step 2: Shape the Arepas
Divide the dough into six equal portions and roll each into a ball. Gently flatten the balls into discs approximately 4-5 inches wide and about ½ inch thick. As you shape the arepas, keep your hands slightly damp for easier handling. Aim for a uniform thickness to ensure even cooking throughout your Homemade Arepas.
Step 3: Cook the Arepas
Heat a skillet over medium heat and brush with a thin layer of vegetable oil. Add the arepas to the skillet, cooking each for about 6-7 minutes per side or until they develop a golden-brown, crispy exterior. For an extra crispy texture, transfer the cooked arepas to a preheated oven at 350°F (175°C) and bake for an additional 10-15 minutes.
Step 4: Make the Filling
While the arepas are cooking, prepare the Reina Pepiada filling. In a mixing bowl, combine shredded rotisserie chicken, finely chopped onion, cilantro, and jalapeño (if using). In another bowl, mash a ripe avocado with 2 tablespoons of mayonnaise and the juice of one lime. Mix both mixtures together, seasoning with salt and pepper to taste for a burst of flavor.
Step 5: Assemble
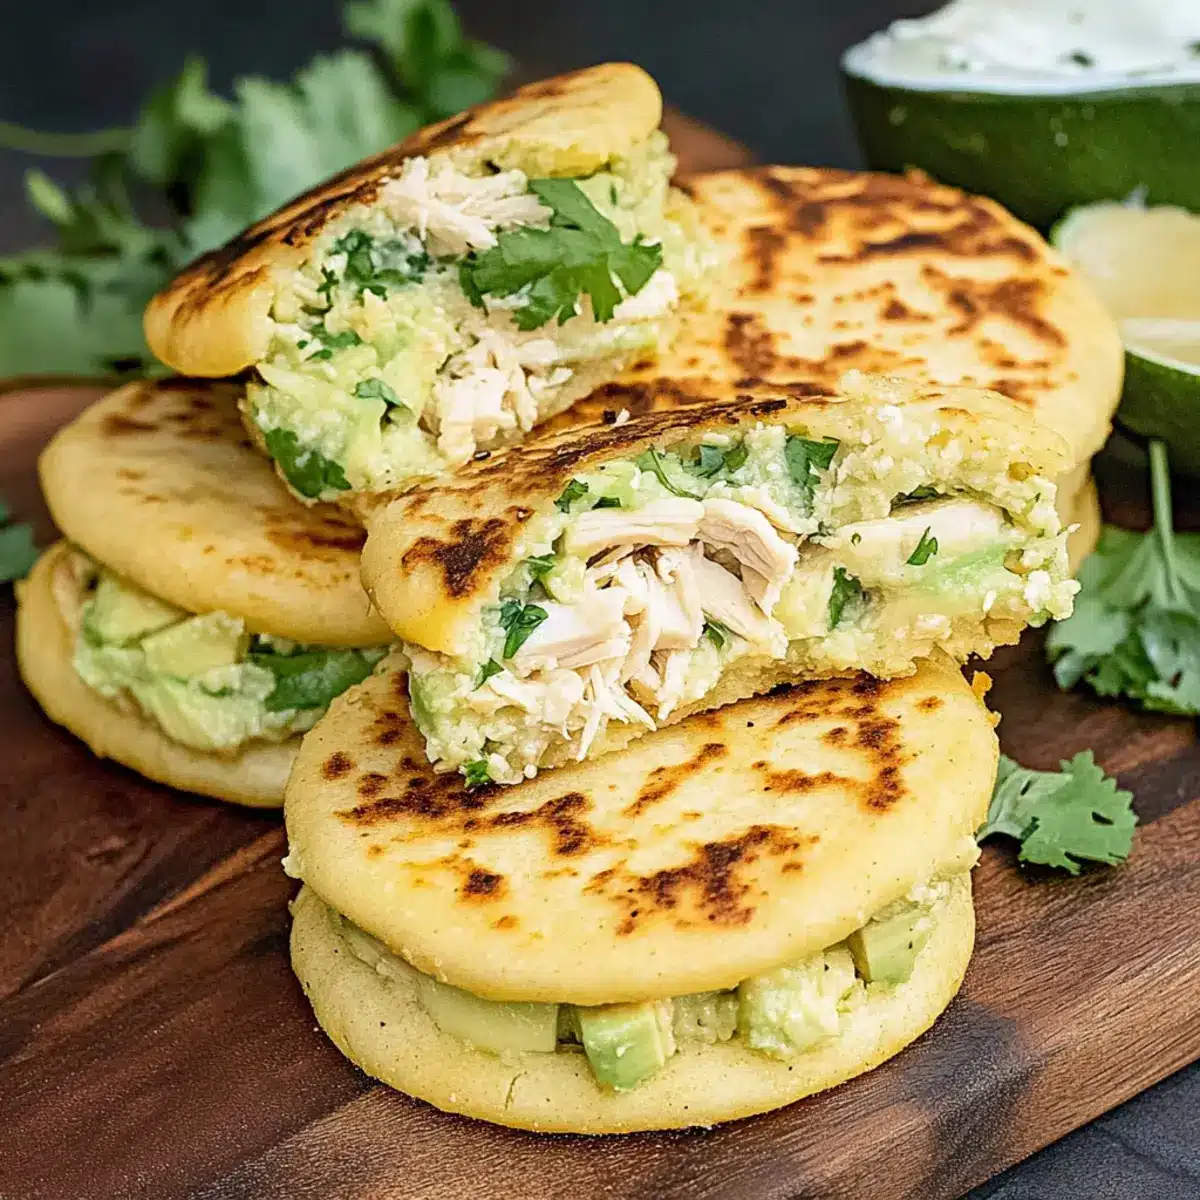
Once your Homemade Arepas are golden and crispy, carefully slice open one side to create a pocket. Generously fill each arepa with the creamy chicken and avocado mixture, making sure to stuff them to your preferred level of fullness. Serve immediately while warm, savoring each delightful bite of this comforting dish.

Homemade Arepas: Customization Ideas
Feel free to get creative with these delicious Homemade Arepas – let’s explore how you can make them truly yours!
-
Vegetarian Delight: Replace the chicken with your favorite cheese for a melty, gooey filling. Consider using a combination of queso blanco and mozzarella for that authentic Colombian flavor.
-
Herb Infusion: Add fresh basil or parsley to the filling for a pop of freshness. These herbs can elevate the flavor profile, making each bite even more delightful.
-
Spicy Kick: Mix in diced jalapeños or crushed red pepper flakes to add a spicy kick to the filling. Adjust the heat level to your preference and delight your taste buds!
-
Bean Power: For a hearty and nutritious twist, swap out the chicken for black beans or pinto beans. This not only adds texture but also makes the dish even more filling and delicious.
-
Roasted Goodness: Want to elevate your filling? Include roasted vegetables like bell peppers, zucchini, or corn. The sweetness from the vegetables paired with the creamy avocado makes a wonderful combination.
-
Smoky Flavor: Add a dash of smoked paprika to the filling for a subtle smokiness that enhances the richness. It’s a simple adjustment that can transport your taste buds!
-
Citrusy Zest: Amp up the flavor with lime or lemon zest in your filling. Just a teaspoon can brighten it up and add a refreshing touch.
Don’t forget to try pairing your arepas with a delightful mango salsa for a burst of tropical flavors, or explore other ideas in our guide on what to serve with arepas to complete your culinary experience!
Make Ahead Options
These Homemade Arepas with Reina Pepiada are fantastic for meal prep, saving you time on busy weeknights! You can prepare the arepa dough up to 24 hours in advance; simply wrap it tightly in plastic wrap and refrigerate to keep it fresh. For the filling, mix the shredded chicken, onion, cilantro, and jalapeño, then combine it with the mayonnaise and mashed avocado—this can be done up to 3 days ahead. Just remember to add lime juice right before serving to prevent browning. When you’re ready to enjoy, shape the arepas and cook them, then fill them with your prepped mixture for a delicious meal that feels freshly made!
Expert Tips for Homemade Arepas
-
Right Cornmeal Choice: Use pre-cooked white cornmeal like P.A.N. for the best texture. Regular cornmeal won’t yield the same results.
-
Dough Consistency: Make sure the dough is smooth and doesn’t stick to your hands. If it’s too dry, add a little more warm water gradually.
-
Even Cooking: Keep the skillet at medium heat to achieve a crispy outside without burning. Adjust the heat as needed while cooking.
-
Rest the Dough: Allowing the dough to rest for 5 minutes is crucial. This helps the cornmeal hydrate fully and makes shaping easier.
-
Fill Generously: Don’t skimp on the creamy chicken filling! Generously fill your Homemade Arepas to make each bite memorable and satisfying.
What to Serve with Homemade Arepas
These vibrant, golden treats are perfect for creating a delightful, full meal that tantalizes your taste buds.
- Mango Salsa: This sweet and tangy salsa bursts with tropical flavors, adding a refreshing contrast to the creamy filling. Just imagine the tropical sweetness dancing on your palate!
- Pico de Gallo: Fresh tomatoes, onions, and cilantro come together in a zesty medley, enhancing each bite of the arepas with a delightful crunch and brightness.
- Hearty Black Bean Soup: A warm bowl of black bean soup brings comfort and a protein punch, creating a satisfying meal that warms the soul on chilly evenings.
- Coconut Rice: This creamy, slightly sweet coconut-infused rice pairs beautifully with the spices in the Reina Pepiada, bringing an exotic flair to your table.
- Avocado Salad: A light salad with sliced avocado, cherry tomatoes, and a sprinkle of lime juice enhances the dish with freshness, balancing the rich filling of the arepas.
- Crispy Plantains: Sweet fried plantains add a delightful crunch and sweetness that complements the savory flavors of the arepas, wrapping your taste buds in a delicious experience.
- Sparkling Water with Lime: A refreshing drink choice, sparkling water with a twist of lime uplifts your meal while cleansing your palate between each scrumptious bite.
- Churros for Dessert: For those with a sweet tooth, light and crispy churros dusted with cinnamon sugar are the perfect finish to your homemade arepas, leaving you happily satisfied.
Storage Tips for Homemade Arepas
-
Room Temperature: Leftover arepas can be kept at room temperature for up to 2 days. Store them in a breathable container to maintain texture.
-
Fridge: Place any unused arepas in an airtight container for up to 5 days. Reheat them on a skillet for a few minutes to restore crispiness.
-
Freezer: Cooked arepas freeze well for up to 3 months. Wrap each individually in plastic wrap and place in a freezer bag. Thaw overnight in the fridge before reheating.
-
Reheating: To reheat, warm directly on a skillet over medium heat for 5-6 minutes per side or pop them in the oven at 350°F (175°C) until heated through. Enjoy your Homemade Arepas at their best!

Homemade Arepas with Reina Pepiada Recipe FAQs
What type of cornmeal should I use for arepas?
Absolutely! For the best results, I recommend using pre-cooked white cornmeal, such as the P.A.N. brand, which gives the arepas their authentic texture. Regular cornmeal won’t yield the same delightful crispness and might lead to a different consistency.
How should I store leftover arepas?
Very good question! Leftover arepas can be kept at room temperature for up to 2 days in a breathable container. For longer storage, place them in an airtight container and refrigerate for up to 5 days. If you want to keep them for an extended period, cooked arepas can be frozen for up to 3 months!
What’s the best way to reheat arepas?
Great news! To reheat, warm them on a skillet over medium heat for about 5-6 minutes per side until they’re heated through and crispy once again. Alternatively, you can place them in a preheated oven at 350°F (175°C) for 10-15 minutes to achieve the same delightful crunch.
Can I customize the filling for dietary needs?
Absolutely! You can easily adapt the filling based on dietary preferences. For a vegetarian option, switch the shredded chicken for cheese or beans. If you’re avoiding certain ingredients, feel free to omit cilantro or jalapeño, and incorporate herbs or spices that you love instead!
How can I tell if my avocado is ripe for the filling?
Choosing the right avocado is key! Look for one that is slightly soft when gently pressed, with no dark spots all over the skin. If it feels hard, it likely needs more time to ripen. You can speed up the process by placing it in a paper bag with a banana. Enjoy your creamy filling with perfectly ripe avocado!
What should I do if my arepa dough is too dry?
No worries here! If your dough feels too dry and crumbly, gradually add a little more warm water, a tablespoon at a time, while kneading. You want it to be smooth and slightly tacky but not sticky to your hands. This small adjustment can really bring your Homemade Arepas to perfection!
Homemade Arepas: Crispy Comfort with Creamy Chicken Filling
Ingredients
Equipment
Method
- In a large bowl, combine 2 cups of pre-cooked white cornmeal, 1 teaspoon of salt, and 1 tablespoon of vegetable oil. Gradually mix in 1 ¼ cups of warm water (100°F to 110°F) until the mixture is smooth and free of lumps. Let the dough rest for 5 minutes.
- Divide the dough into six equal portions and roll each into a ball. Gently flatten the balls into discs approximately 4-5 inches wide and about ½ inch thick.
- Heat a skillet over medium heat and brush with a thin layer of vegetable oil. Add the arepas to the skillet, cooking each for about 6-7 minutes per side until golden brown. Transfer to a preheated oven at 350°F (175°C) and bake for an additional 10-15 minutes for extra crispiness.
- In a mixing bowl, combine shredded rotisserie chicken, finely chopped onion, cilantro, and jalapeño (if using). In another bowl, mash a ripe avocado with 2 tablespoons of mayonnaise and the juice of one lime. Mix both mixtures together, seasoning with salt and pepper to taste.
- Once your Homemade Arepas are golden and crispy, carefully slice open one side to create a pocket. Fill each arepa with the creamy chicken and avocado mixture.
Leave a Reply