
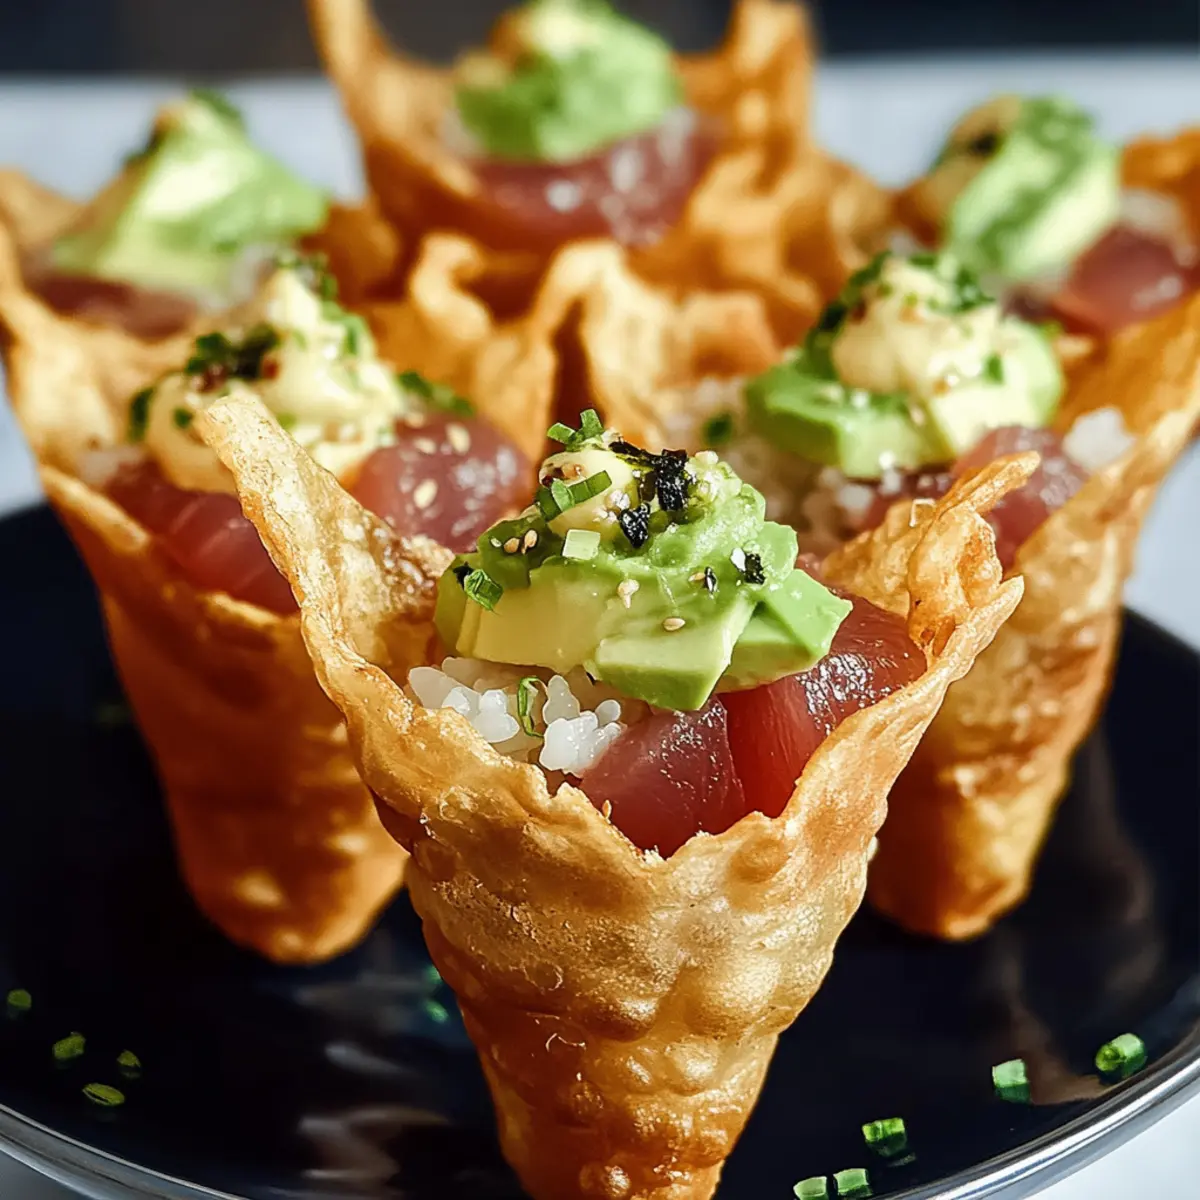
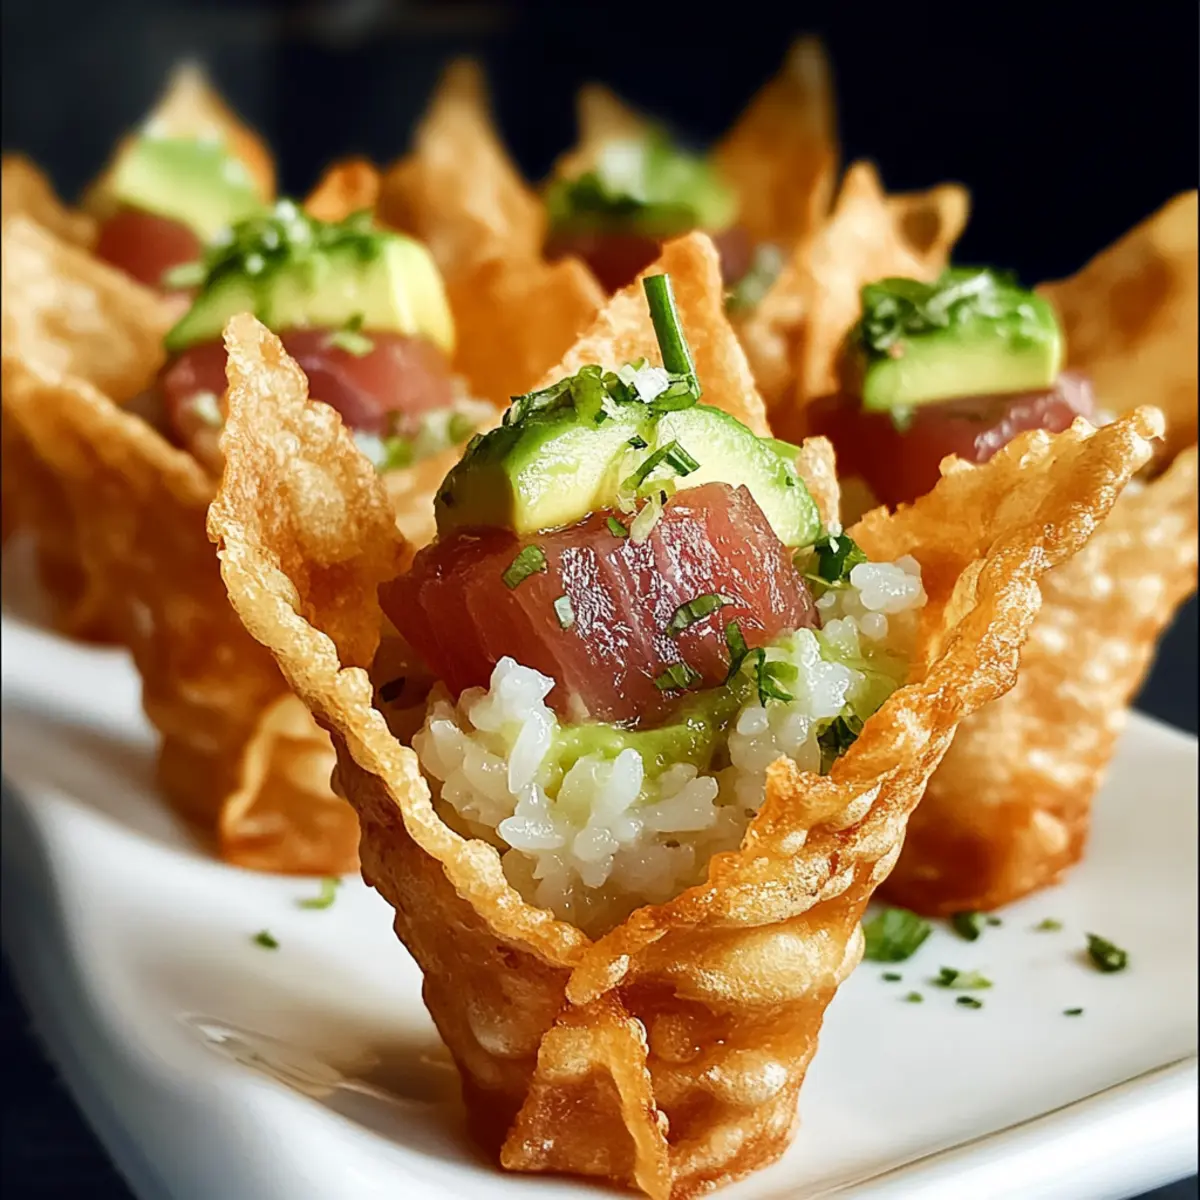
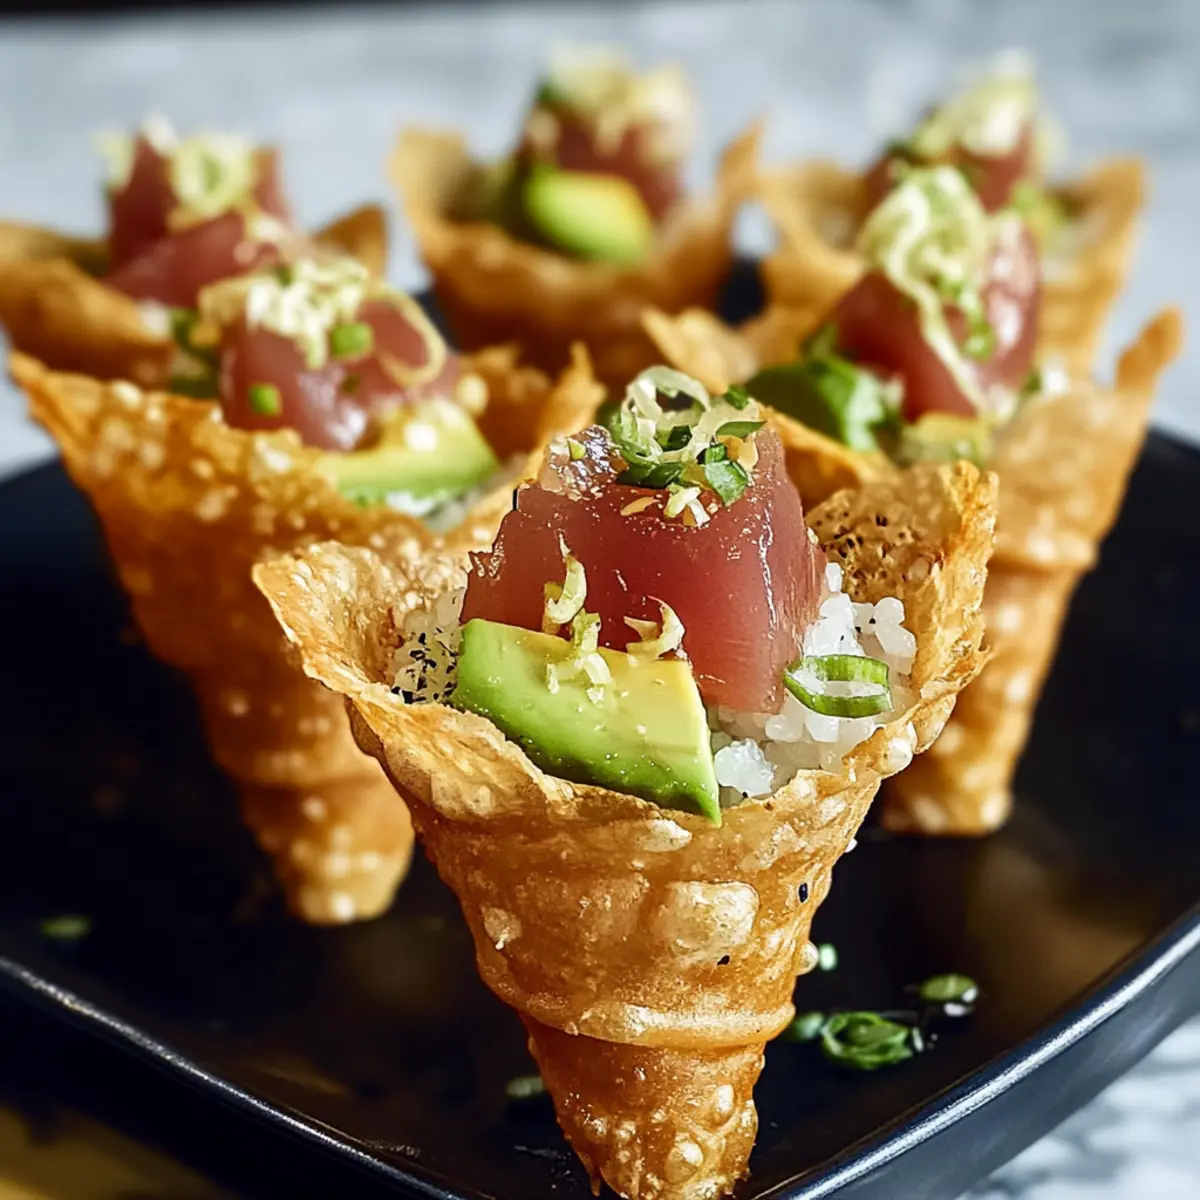
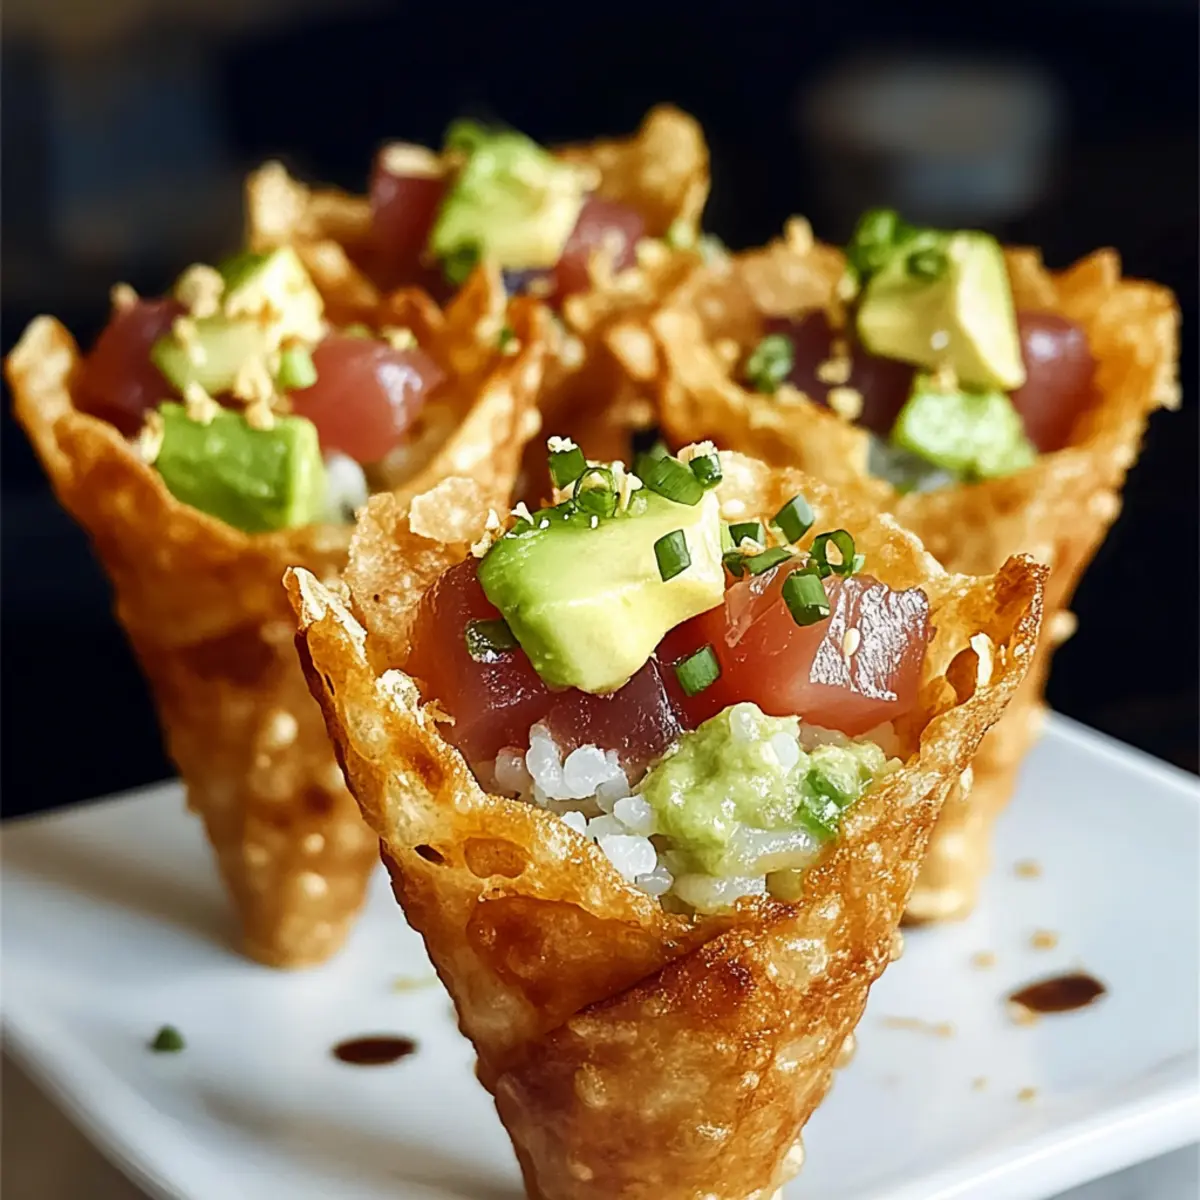
As I pondered how to elevate my next gathering, the idea struck me like a bolt of inspiration—why not turn traditional sushi into a fun, interactive appetizer? Enter the Creative Sushi Wonton Cones! These delightful treats combine the savory taste of sushi-grade tuna, creamy avocado, and seasoned sushi rice cleverly nestled in a crispy wonton cone. Not only are they a hit for parties, but they’re also incredibly customizable, allowing you to tailor fillings for any palate. Plus, their handheld nature means guests can snack and mingle without missing a beat. Whether it’s a cozy get-together or a bustling celebration, these cones will surely spark joy and conversation. So, are you ready to roll up your sleeves and create a memorable dish that’s sure to impress? Let’s dive into this exciting recipe!
Why Are Sushi Wonton Cones Unforgettable?
Interactive dining experience: These cones invite everyone to create their own perfect bite, sparking fun conversations at the table.
Crisp and Crunchy: The golden, fried wonton shells provide an irresistible crunch that perfectly complements the creamy avocado and tender tuna.
Customizable filling options: From spicy tuna to vegetarian tofu, these cones cater to diverse tastes and dietary preferences, making them great for any gathering.
Quick to Make: With simple ingredients and easy preparation, you can whip up a batch of these delectable treats in no time. Perfect for busy hosts!
Stunning Presentation: Serve them upright in mini muffin tins for an eye-catching centerpiece that dazzles guests and elevates your appetizer game. Pair with something refreshing, like iced green tea, for a complete experience.
Creative Sushi Wonton Cones Ingredients
Note: Gather these ingredients to create your delicious Creative Sushi Wonton Cones!
For the Wontons
• Wonton wrappers – Forms the cone structure; ensure they are sealed tightly around the mold.
• Coconut oil (for frying) – Adds crispiness to the cones; can substitute with vegetable oil for a vegan option.
For the Sushi Rice
• Sushi rice (short-grain, sticky) – Provides the characteristic sushi flavor; use quinoa for a gluten-free alternative.
• Rice vinegar – Enhances the flavor of sushi rice; apple cider vinegar can be used instead.
• Sugar – Balances the tang of the vinegar; alternative: honey or agave syrup.
• Salt – Essential for seasoning sushi rice; can be reduced for low-sodium diets.
For the Filling
• Avocado – Adds creaminess and healthy fats; substitute with tofu for a vegan option.
• Tuna steak (sushi-grade) – Key protein source; replace with salmon or cooked shrimp as variations.
• Kewpie mayonnaise – Adds creaminess and umami; regular mayonnaise works in a pinch.
• Tomato ketchup or sauce – Contributes sweetness and moisture; can substitute with sriracha for heat.
• Sriracha (optional, for heat) – Adds spiciness; optional to omit for a milder taste.
• Lime zest – Brightens flavor profiles; substitute with lemon zest if unavailable.
For the Garnish
• Furikake or black sesame seeds (for garnish) – Provides additional flavor and visual appeal; can use chopped nori as an alternative.
With these ingredients, you’re all set to make your Creative Sushi Wonton Cones into a delightful handheld treat that your guests won’t be able to resist!
Step‑by‑Step Instructions for Creative Sushi Wonton Cones
Step 1: Prepare the Wontons
Start by preheating your oven to 200°F (95°C). Lay out the wonton wrappers on a clean surface. Wrap each wonton tightly around a cream horn or cone mold, making sure to seal the edges firmly to avoid leaks during frying. Set aside as you prepare the frying oil for your Creative Sushi Wonton Cones.
Step 2: Heat Oil
In a deep pan, pour enough coconut oil to submerge the wonton cones, about 1-2 inches deep. Heat the oil over medium heat until it reaches a temperature of 175°C (350°F). Use a thermometer to maintain precise heat, ensuring the oil is hot enough to fry the wontons, leading to that satisfying crunch later.
Step 3: Fry Cones
Carefully slide the sealed wonton cones into the hot oil, frying for about 2-3 minutes. Keep an eye on them as they turn a beautiful golden brown and become crisp. Use a slotted spoon to gently turn them to ensure even frying, and then drain on paper towels to absorb any excess oil while you move on to the sushi rice.
Step 4: Prepare Sushi Rice
Rinse the short-grain sushi rice under cold water until it runs clear. Cook the rice according to package instructions, usually around 20 minutes, until it’s fluffy and sticky. Once cooked, transfer it to a bowl, and gently mix in rice vinegar, sugar, and salt. Allow the mixture to cool to room temperature, enhancing the flavor for your Creative Sushi Wonton Cones.
Step 5: Mix Tuna Filling
While the sushi rice cools, take your sushi-grade tuna and finely cut it into cubes or flakes. In a mixing bowl, combine the tuna with Kewpie mayonnaise, a touch of tomato ketchup, optional sriracha for heat, and a sprinkle of lime zest. This mixture will serve as a delicious filling for your cones.
Step 6: Assemble Cones
Once the wonton cones have cooled and the sushi rice is handled comfortably, start the assembly. Gently fill each fried cone with a layer of sushi rice followed by creamy avocado slices, using ripe avocados that can easily be scooped and will enhance the texture. Finish by topping with the flavorful tuna mixture, creating a perfect balance of flavors in your Creative Sushi Wonton Cones.
Step 7: Garnish and Serve
To elevate the presentation, sprinkle some furikake or black sesame seeds over the filled cones for an extra touch. Serve the assembled Creative Sushi Wonton Cones upright in mini muffin tins for a stunning display that will draw eyes at your gathering. They make a lively and delicious appetizer option ready to impress your guests!
What to Serve with Creative Sushi Wonton Cones?
Elevate your gathering with delightful accompaniments that perfectly complement these playful handheld treats.
- Crispy Edamame: Lightly salted and tossed in sesame oil, these snacks provide a satisfying crunch and a mild flavor pairing.
- Miso Soup: A warm, umami-rich broth pairs beautifully with the freshness of sushi cones, creating a comforting contrast.
Served in small cups, this classic soup is not just delicious, but it warms the soul.
- Seaweed Salad: The cool, tangy flavors of this salad add a refreshing balance to the savory cones, enhancing the sushi experience.
- Ginger Soy Dipping Sauce: A zesty twist enhances the flavor; this easy-to-make sauce is perfect for drizzling or dipping.
Adding brightness, fresh ginger cuts through the richness of the tuna and creamy avocado.
- Sake or Sparkling Water: Light, refreshing drinks like these cleanse the palate, enhancing the overall dining experience.
- Matcha Green Tea: Serve this earthy, fragrant drink as a unique pairing, rich in antioxidants and perfectly refreshing.
The vibrant green color is not only beautiful but also sets the stage for a lovely, cohesive meal.
How to Store and Freeze Creative Sushi Wonton Cones
Fridge: Store assembled cones in an airtight container for up to 2 hours to maintain their crunch. After that, the wontons can become soggy.
Freezer: If you have leftover unassembled cones, wrap them tightly in plastic wrap and freeze for up to 1 month. Fry them fresh for the best texture.
Reheating: For reheating fried cones, preheat your oven to 375°F (190°C). Place them on a baking sheet and heat for 10-12 minutes to restore their crispness.
Make-Ahead Tips: Prepare sushi rice and filling ahead of time, but assemble the Creative Sushi Wonton Cones just before serving for the best flavor and texture.
Make Ahead Options
These Creative Sushi Wonton Cones are perfect for meal prep enthusiasts looking to save time during busy gatherings! You can prepare the wonton cones and fry them up to 24 hours in advance; simply store them in an airtight container to maintain their crunch. Additionally, the sushi rice can be cooked and seasoned up to 3 days ahead; store it in the refrigerator in a sealed container. For the tuna filling, mix it a few hours before serving and keep it chilled for freshness. When you’re ready to serve, simply assemble the cones with sushi rice, avocado, and the tuna mixture—creating delicious, restaurant-quality bites with minimal effort!
Creative Sushi Wonton Cones Variations
Feel free to personalize your sushi wonton cones with these delightful twists and swaps that will elevate your flavor experience!
-
Spicy Tuna: Substitute standard tuna with spicy tuna mix for a fiery kick that tantalizes your taste buds. You could even add extra sriracha for those who adore heat!
-
Vegetarian Delight: Use marinated tofu and an array of vibrant veggies instead of seafood. A mix of bell peppers, carrots, and cucumbers will offer a refreshing crunch and plenty of color.
-
Quinoa Base: For a gluten-free option, replace sushi rice with fluffy quinoa, seasoned just like the rice for a unique texture and flavor without sacrificing the core essence.
-
Savory Shrimp: Cooked shrimp makes a fantastic swap with tuna; toss them in a bit of lime and sriracha for an added flavor boost that will keep your guests coming back for more!
-
Mayo Twist: Replace Kewpie mayonnaise with avocado crema for a rich, creamy alternative that adds an exciting twist to each bite. Blend ripe avocado with lime juice for the perfect consistency.
-
Garnish Remix: Enjoy experimenting with various garnishes; drizzle glossy teriyaki glaze on top or replace furikake with crispy fried onions to mix up the texture and flavor dynamics.
-
Zesty Lemon: If lime zest isn’t available, use fresh lemon zest instead to brighten up the flavors. It’ll give your cones a delightful freshness that resonates beautifully with seafood.
-
Nori Crunch: Instead of traditional garnishes, sprinkle chopped nori or crispy seaweed for an umami kick and a pleasant crunch that reassures you of that sushi experience in every bite.
While customizing, don’t hesitate to explore more exciting combinations. You could try serving these alongside a refreshing light drink, like Iced Green Tea for a delightful pairing!
Expert Tips for Creative Sushi Wonton Cones
- Oil Temperature: Maintain the oil at 175°C (350°F) for perfectly crisp cones; if too hot, they may burn and become oily.
- Seal Tight: Ensure wonton wrappers are tightly sealed around the mold; loose seams can lead to leaks during frying.
- Sushi Rice Cooling: Allow the sushi rice to cool to room temperature after seasoning—it absorbs flavor better and prevents sogginess.
- Fill Smartly: Avoid overfilling the cones; they should be easy to hold and eat, so keep the filling balanced.
- Chill Ingredients: Keep the sushi-grade tuna chilled until assembly for the freshest taste in your Creative Sushi Wonton Cones.
Creative Sushi Wonton Cones Recipe FAQs
How do I select the best avocado for my cones?
Absolutely! Look for avocados that yield slightly to gentle pressure when squeezed, indicating ripeness. Avoid those with dark spots all over or hard ones that aren’t ready to eat. Perfect avocados for your Creative Sushi Wonton Cones should be smooth, creamy, and at their peak ripeness.
What is the best way to store leftover cones?
Very! Store the assembled cones in an airtight container for up to 2 hours to enjoy their crunch. After this, the wontons can become soggy, so it’s best to eat them fresh. If you have unassembled cones, wrap them tightly in plastic wrap and freeze for up to 1 month
Can I prepare the sushi rice and filling in advance?
Absolutely! You can prepare the sushi rice and tuna filling a day ahead and store them in the fridge. Just remember, assemble the Creative Sushi Wonton Cones right before serving to maintain that delightful crunch and flavor balance.
How do I freeze the wonton cones?
Of course! If you’re planning to make them ahead of time, wrap unassembled wonton cones tightly in plastic wrap, then place them in an airtight bag or container to avoid freezer burn. They can stay frozen for about 1 month. When you’re ready to enjoy, simply fry them fresh for the best texture.
Are there any dietary concerns I should consider with this recipe?
Absolutely! For those with seafood allergies, consider substituting sushi-grade tuna with marinated tofu or cooked shrimp. Additionally, if you have guests with a gluten intolerance, you can use gluten-free soy sauce for a tasty dip to accompany your cones, making them safe for more dietary preferences.
Creative Sushi Wonton Cones for a Fun Twist on Appetizers
Ingredients
Equipment
Method
- Preheat your oven to 200°F (95°C). Lay out the wonton wrappers and wrap each tightly around a cream horn, sealing edges.
- In a deep pan, pour enough coconut oil to submerge the cones. Heat to 175°C (350°F).
- Carefully fry the cones for 2-3 minutes until golden brown, then drain on paper towels.
- Rinse and cook sushi rice according to package instructions, usually around 20 minutes. Mix with rice vinegar, sugar, and salt.
- Finely cut the tuna and mix with Kewpie mayonnaise, tomato ketchup, sriracha, and lime zest.
- Fill each fried cone with sushi rice and avocado slices, then top with the tuna mixture.
- Garnish with furikake or sesame seeds, and serve upright in mini muffin tins.
Leave a Reply