
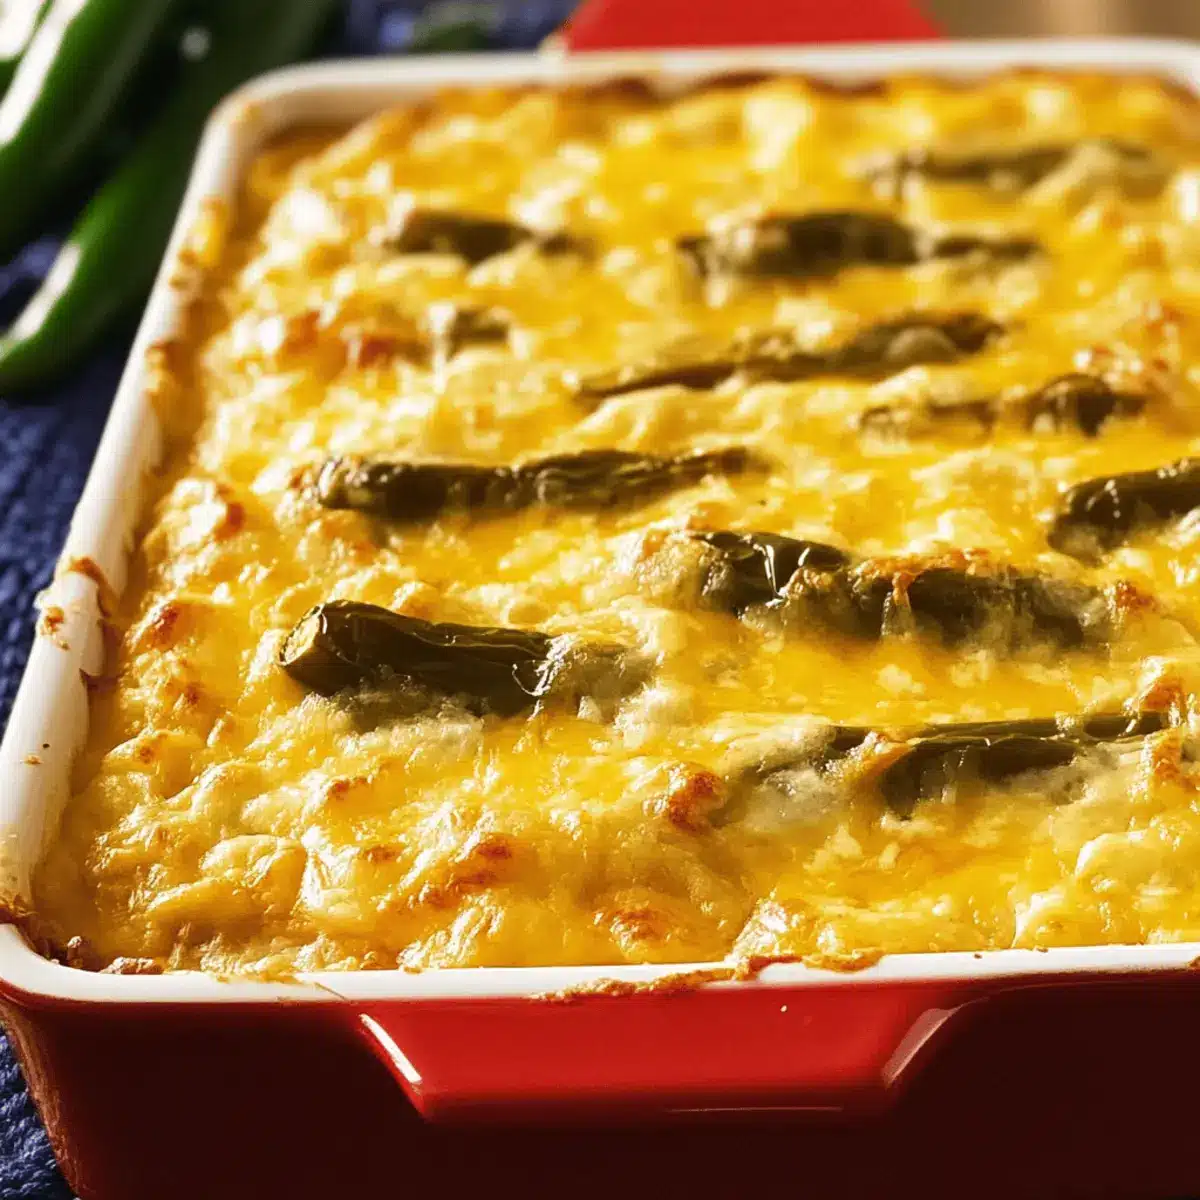
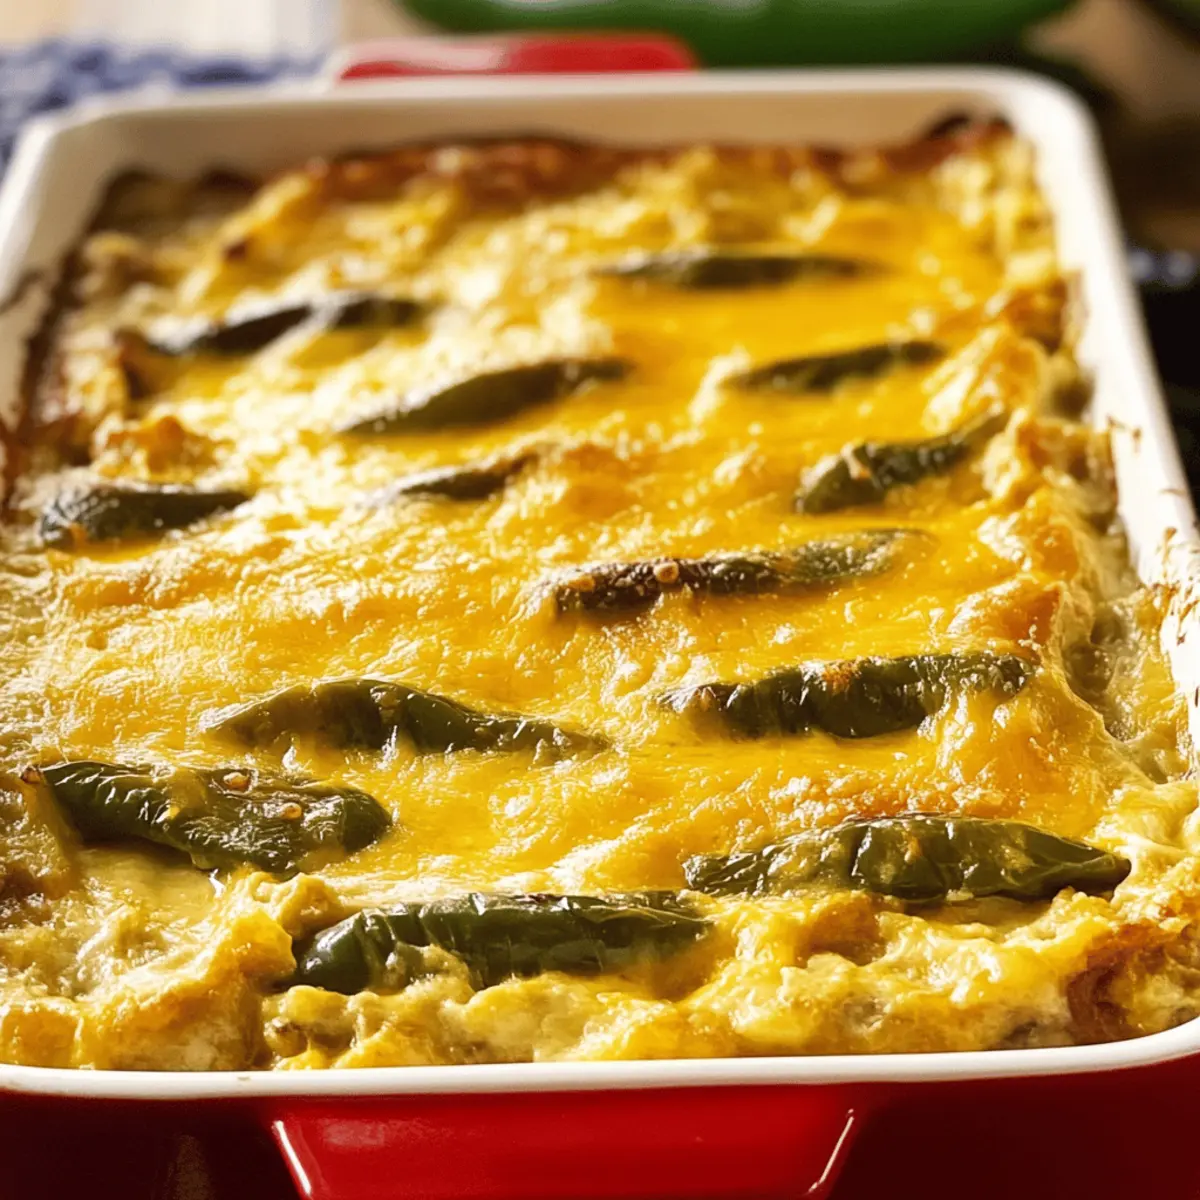
As I nestled into a cozy evening, the warmth of roasted green chiles and bubbling cheese filled my kitchen with scents that felt like a warm embrace. This Creamy Chile Rellenos Casserole is my go-to for satisfying comfort food that offers a delightful twist on a classic Mexican favorite. Not only is it an easy, oven-baked dish that requires minimal prep time, but it’s also a budget-friendly option that pleases everyone around the table. Perfect for meal prep or serving on special occasions, this casserole delivers hearty flavors and countless customization possibilities. What fun toppings will you add to make it your own?
Why is Chile Rellenos Casserole a Must-Try?
Comforting Warmth: This casserole wraps you in a cozy embrace with its rich, cheesy layers and roasted chiles, making it perfect for those chilly nights.
Easy to Prepare: With straightforward steps, it’s a hassle-free dish that even beginner cooks can master.
Budget-Friendly Delight: Packed with flavor without breaking the bank, it’s ideal for families or meal prep enthusiasts.
Customizable Goodness: From adding proteins like chicken or beans to experimenting with different cheeses, the options are endless!
** Crowd-Pleaser:** This dish guarantees smiles at the dinner table, making it a favorite for family gatherings or celebrations.
Elevate your experience with fresh toppings like sliced avocado or crema to create a delightful feast that everyone will love!
Chile Rellenos Casserole Ingredients
• Here’s what you need to create this delicious dish!
For the Casserole
- Roasted Green Chiles – Provides smoky, slightly spicy flavor; substitute with canned fire-roasted chiles if fresh are unavailable.
- Monterey Jack Cheese – Offers exceptional meltability and creamy texture; mozzarella or pepper jack can be used for added spice.
- Cheddar Cheese – Adds a sharp contrast to the dish; swap for Colby or a Mexican cheese blend if preferred.
- Whole Milk – Contributes to the creaminess of the casserole; half-and-half yields a richer texture, while unsweetened almond milk suits dairy-free diets.
- All-Purpose Flour – Acts as a thickener for the egg mixture; a gluten-free flour blend can serve as a great substitute.
- Eggs – Essential for structure and fluffiness; ensure they are well blended for a smooth mixture.
Explore the warm and fulfilling journey of making this Chile Rellenos Casserole that everyone will adore!
Step‑by‑Step Instructions for Chile Rellenos Casserole
Step 1: Preheat the Oven
Begin by preheating your oven to 350°F (175°C). This crucial first step ensures that your Chile Rellenos Casserole bakes evenly, with a beautifully golden top. While the oven warms up, gather your ingredients to streamline the cooking process.
Step 2: Whisk the Eggs and Milk
In a large mixing bowl, whisk together the eggs and whole milk until the mixture is smooth and uniform. This should take about 1-2 minutes. The combination of eggs and milk is essential for the creamy texture you’re aiming for in your casserole, so be sure to blend well before moving on.
Step 3: Prepare the Baking Dish
Grease a 9×13 inch baking dish lightly with cooking spray or butter. This step helps prevent the casserole from sticking, making for easier serving. Once your dish is prepped, layer half of the roasted green chiles evenly across the bottom, creating a colorful base for your Chile Rellenos Casserole.
Step 4: Add the First Cheese Layer
Sprinkle half of the Monterey Jack and cheddar cheese blends over the chiles, ensuring an even distribution. This cheese layer will melt beautifully as the casserole bakes, enhancing the overall flavor. Visualize a lovely mixture of cheeses dripping throughout the dish as it cooks.
Step 5: Pour the Egg Mixture
Next, pour half of your egg and milk mixture evenly over the chiles and cheese. This will help bind the layers together and create that delightful custardy texture. Take a moment to admire how the liquid seeps into the layers, preparing them for the oven.
Step 6: Repeat the Layers
Now, repeat the layering process using the remaining roasted chiles, cheeses, and egg mixture. This second round of layers not only enhances the taste but also creates a robust structure for the casserole. Be sure to layer evenly for the best cooking results.
Step 7: Bake the Casserole
Place your assembled Chile Rellenos Casserole in the preheated oven and bake for approximately 35 minutes. Keep an eye on it; the top should turn a lovely golden brown, and a knife inserted into the center should come out clean when done.
Step 8: Cool Before Serving
Once your casserole is perfectly baked, remove it from the oven and allow it to cool slightly for about 10 minutes. This resting period helps the layers firm up a bit, making for easier slicing. Get ready to indulge in a warm slice of comfort!
Chile Rellenos Casserole Variations
Feel free to add your own personal touch to this delightful casserole, letting your creativity shine through!
- Protein-Packed: Add cooked chorizo, sausage, or black beans for a heartier meal. They’ll infuse the casserole with extra flavor and make it even more satisfying.
- Vegetable Bonanza: Toss in some sautéed bell peppers or zucchini for a vibrant veggie twist. This not only boosts nutrition but also adds depth to each delicious bite.
- Spicy Kick: Spice things up with hotter chiles or even jalapeños for those who crave heat. The extra warmth will keep your taste buds dancing!
- Cheesy Varieties: Try swapping in gouda or feta cheese for a unique flavor experience. Each cheese offers a new dimension, turning your casserole into an entirely different dish.
- Herb Infusion: Enhance with fresh herbs like cilantro or green onions sprinkled on top before serving. Their aromatic notes create a fresh finish complementing the richness of the casserole.
- Gluten-Free Twist: Substitute all-purpose flour with a gluten-free blend or cornstarch. This ensures everyone can enjoy the creamy goodness without worry.
- Breakfast Style: Transform into a breakfast casserole by adding scrambled eggs or breakfast potatoes. It’s a great way to start the day or serve as a brunch option.
- Layered Surprise: Experiment with sliced avocados or fresh tomatoes in the middle layers for a refreshing surprise. Each forkful will deliver a delightful crunch alongside the creaminess!
Whether you’re raising the spice level or going for a veggie twist, personalize your Chile Rellenos Casserole to create something truly unique! Pair your casserole with some refried beans or warm tortillas for a complete meal experience. Happy cooking!
Expert Tips for Chile Rellenos Casserole
- Layer Evenly: Ensuring all ingredients are layered evenly promotes consistent cooking throughout your Chile Rellenos Casserole, preventing soggy or undercooked spots.
- Bake from Frozen: If preparing ahead, cover and freeze the casserole. When ready to bake, add extra cooking time for delicious results.
- Avoid Over-Mixing: Mix the eggs just until blended to maintain the fluffiness of the casserole. Over-mixing can lead to a dense texture, which we don’t want!
- Choose Quality Ingredients: Using fresh roasted chiles and good cheese makes a huge difference in flavor. Opt for whole ingredients when possible for the best experience.
- Customize Wisely: While adding proteins or extra veggies, ensure they are cooked before layering. This helps maintain the proper baking time and avoids a watery casserole.
What to Serve with Chile Rellenos Casserole
Cozy up your dinner table with delightful sides that enhance the comforting flavors of this creamy casserole.
-
Fresh Avocado Slices: Creamy and rich, avocado adds a buttery texture that balances the warmth of the casserole perfectly.
-
Zesty Crema: A drizzle of crema brings a tangy sharpness that contrasts beautifully with the cheesy layers, enhancing every bite just perfectly.
-
Refried Beans: Creamy refried beans serve as a hearty, protein-packed side that creates a traditional Mexican dining experience.
-
Corn Tortillas: Serve warm corn tortillas alongside to scoop up that delicious casserole, adding a soft, sweet texture that complements the richness.
-
Mexican Street Corn Salad: This vibrant salad offers a burst of fresh sweetness, with juicy corn and zesty lime, brightening the meal.
-
Pico de Gallo: Fresh tomatoes and cilantro give a lively kick that enhances each creamy mouthful, while also providing a pop of color on your plate.
-
Cilantro Lime Rice: Fluffy rice with a hint of lime adds a tangy freshness, rounding out the flavors and making for an enjoyable meal.
-
Chilled Margaritas: For a refreshing drink, a crisp margarita brings a tart, citrusy note that pairs beautifully with the rich, savory casserole.
-
Chocolate Flan: Cap off the meal with the creamy sweetness of chocolate flan. Its light, airy texture is the perfect dessert to finish your comforting dinner on a high note.
Make Ahead Options
These Creamy Chile Rellenos Casserole are perfect for meal prep enthusiasts! You can prepare the entire casserole up to 24 hours in advance by assembling all the layers but holding off on baking it. Simply cover the dish tightly with plastic wrap or foil and refrigerate until you’re ready to bake. If you want to prep even further ahead, you can freeze the casserole for up to 2 months; just add about 15-20 extra minutes to the baking time when cooking from frozen. When you’re ready to serve, bake it directly from the refrigerator or freezer, and enjoy the same delicious, creamy flavors without the last-minute hassle!
How to Store and Freeze Chile Rellenos Casserole
Fridge: Store your Chile Rellenos Casserole in an airtight container for up to 4 days. Make sure it’s completely cooled before wrapping to avoid condensation.
Freezer: If you want to prepare in advance, freeze it in a tightly sealed container for up to 2 months. Thaw in the refrigerator overnight before baking for best results.
Reheating: To reheat, preheat your oven to 350°F (175°C) and cover the casserole with foil. Bake for about 20-30 minutes, until heated through. Enjoy its creamy comfort all over again!

Chile Rellenos Casserole Recipe FAQs
What type of chiles should I use for the best flavor?
Absolutely! Fresh roasted green chiles contribute the most authentic smoky flavor. However, if they’re not in season, you can easily substitute with canned fire-roasted chiles for a similar taste. Just be sure to drain them well to avoid excess moisture in your casserole.
How should I store leftovers of my Chile Rellenos Casserole?
Very! Store your leftovers in an airtight container in the fridge for up to 4 days. Make certain the casserole is completely cooled before wrapping it up to prevent condensation. If you happen to have a lot leftover, freezing is a great option too.
Can I freeze Chile Rellenos Casserole? If so, how?
Definitely! You can freeze your Chile Rellenos Casserole for up to 2 months. To do this, prepare and cool the casserole completely, then wrap it tightly in plastic wrap and aluminum foil. Thaw in the refrigerator overnight before baking. When you’re ready, just pop it directly in a preheated oven at 350°F (175°C) and bake for about 35-40 minutes, adding foil if it browns too quickly.
What if my casserole turns out too watery?
If your Chile Rellenos Casserole is watery, it could be due to excess moisture from the chiles or eggs not being well blended. To prevent this, make sure to use roasted chiles that are fully drained and don’t skip blending your eggs until they’re smooth. If you experience watery results, you can also drain off any excess liquid after it bakes.
Can I make this casserole dairy-free?
Absolutely! To make a dairy-free version of your Chile Rellenos Casserole, simply swap out the whole milk for unsweetened almond milk or any plant-based milk of your choice. For cheese, look for dairy-free cheese alternatives that melt well, ensuring you still enjoy that creamy texture without dairy.
Is this casserole safe for pets?
No, it’s best to avoid sharing Chile Rellenos Casserole with your pets. Ingredients such as cheese and onions can cause digestive issues in animals. As a rule of thumb, always keep meals intended for humans away from furry friends, opting for pet-safe treats instead.

Savor Comfort with This Easy Chile Rellenos Casserole
Ingredients
Equipment
Method
- Preheat your oven to 350°F (175°C).
- Whisk together the eggs and whole milk in a large mixing bowl until smooth.
- Grease a 9x13 inch baking dish lightly and layer half of the roasted green chiles evenly across the bottom.
- Sprinkle half of the Monterey Jack and cheddar cheese blends over the chiles.
- Pour half of your egg and milk mixture evenly over the chiles and cheese.
- Repeat the layering process with the remaining roasted chiles, cheeses, and egg mixture.
- Bake for approximately 35 minutes until the top is golden brown.
- Remove from the oven and allow to cool slightly for about 10 minutes before serving.
Leave a Reply