
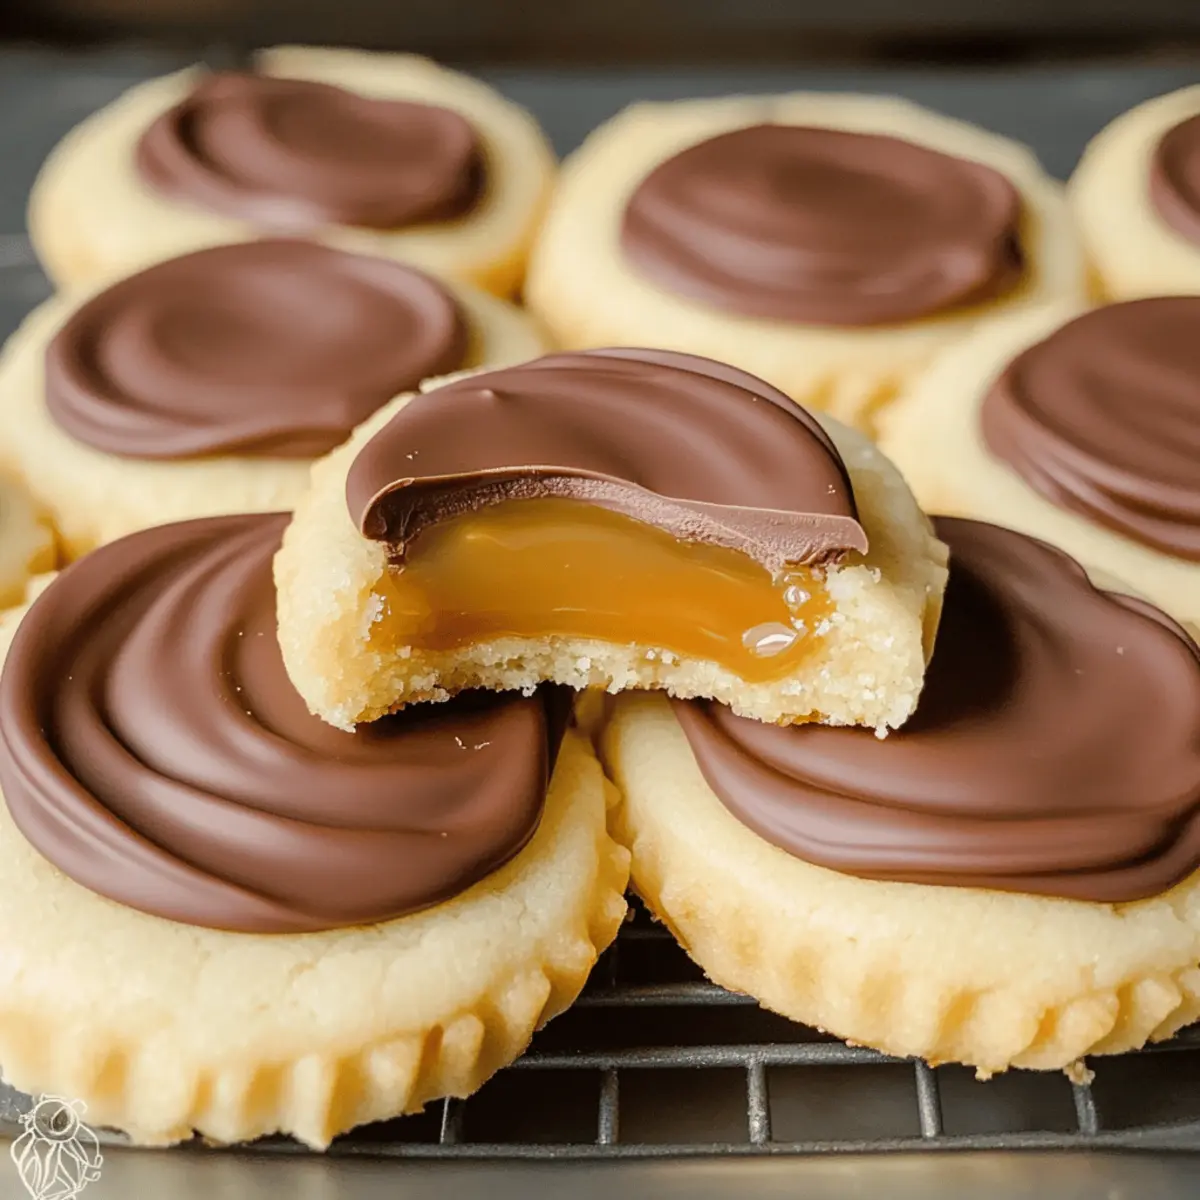
As I stood in my kitchen, the tantalizing scent of buttery sugar cookies filled the air, whisking me back to joyful afternoons spent baking with my grandmother. Today, I’m thrilled to share my twist on a beloved indulgence: Homemade Twix Cookie Cups. These delightful treats combine a soft, chewy cookie base with a luscious layer of creamy caramel, all topped with rich milk chocolate. Not only are they incredibly fun to make, but they also serve as a fantastic crowd-pleaser for any gathering, ensuring that no one will miss the candy aisle! Plus, they come together in a flash, making them the perfect solution for those last-minute dessert cravings. Are you ready to elevate your baking game with these irresistible Twix Cookies? Let’s dive in!
Why are Twix Cookies so irresistible?
Heavenly flavors: The combination of buttery sugar cookies, creamy caramel, and rich chocolate creates a taste that’s hard to resist. Quick to bake: These Twix Cookie Cups come together in no time, making them a perfect choice for spontaneous dessert cravings. Versatile options: Feel free to customize with toppings like crushed nuts or flavored chocolate chips for an extra flair. Nostalgic appeal: They offer a homemade spin on the classic candy bar that delights both kids and adults alike! Impressive presentation: Their dainty cookie cup form makes them ideal for dessert parties or special occasions, ensuring you leave a lasting impression. If you enjoy these, check out my delicious Cinnamon Roll Cookies or Chocolate Oatmeal Cookies for more sweet inspiration!
Twix Cookies Ingredients
For the Cookie Base
• Salted butter – Provides richness and moisture; use unsalted for a less salty flavor.
• Granulated sugar – Adds sweetness and improves texture; no direct substitution.
• Vanilla extract – Enhances the flavor; almond extract is a delightful substitute.
• Egg white – Binds and helps the cookies rise; replace with a flax egg for a vegan option.
• All-purpose flour – Offers structure; a gluten-free blend works as an alternative.
• Baking powder – Ensures the cookies rise properly; always check for freshness.
For the Caramel Layer
• Unwrapped caramels – Provides a luscious, creamy topping; consider homemade or store-bought sauce as a swap.
• Milk – Aids in melting the caramels for a smooth consistency; any milk alternative is fine for a dairy-free version.
For the Chocolate Topping
• Milk chocolate chips – Adds a rich chocolate layer on top; dark chocolate can create a deeper flavor profile for your Twix cookies.
Step‑by‑Step Instructions for Homemade Twix Cookie Cups
Step 1: Preheat the Oven
Begin by preheating your oven to 350°F (175°C). This crucial step ensures your Twix Cookies bake uniformly and achieve a delightful texture. While the oven warms up, grab a large mixing bowl and combine the salted butter and granulated sugar. Using an electric mixer, cream them together for about 2-3 minutes until the mixture is light and fluffy, resembling a pale yellow cloud.
Step 2: Add Wet Ingredients
Once your butter and sugar are beautifully blended, mix in the egg white and vanilla extract. Beat them together until fully combined, which should take another minute. You’ll want to see a smooth, cohesive mixture that nearly doubles in volume. This mixture lays the foundation for your delicious cookie cups, ensuring they have that soft and chewy texture we all love.
Step 3: Mix the Dry Ingredients
In a separate bowl, whisk together the all-purpose flour and baking powder. Gradually add this dry mixture into your wet ingredients, mixing on low speed until a soft dough forms. This should only take about 1-2 minutes. Be careful not to overmix, and watch for the dough to come together without any dry ingredients lingering on the sides of your bowl.
Step 4: Shape the Cookies
Next, on a floured surface, roll the dough out to about 1/4 to 1/2 inch thick. Using a 2.5-inch round cookie cutter, cut out shapes and place them on a lined cookie sheet. Space them about an inch apart. You should see a lovely, soft dough that’s easy to handle. This step is key to achieving the perfect shape for your homemade Twix Cookie Cups.
Step 5: Bake the Cookies
Pop your cookie sheet into the preheated oven and bake for 6-7 minutes. Keep an eye on them; they should appear puffy and no longer glossy when done. Once baked, remove the sheets from the oven and let the cookies cool completely on a wire rack. This cooling period is vital as it allows the cookies to set, making them easier to handle for the next steps.
Step 6: Prepare the Caramel Layer
While your Twix Cookies cool, it’s time to create that luscious caramel layer. In a microwave-safe bowl, combine the unwrapped caramels with a splash of milk. Heat in the microwave for about 1 minute, stirring halfway through until the mixture is smooth and creamy. Be cautious not to overheat, as you want a velvety consistency to top your cookies perfectly.
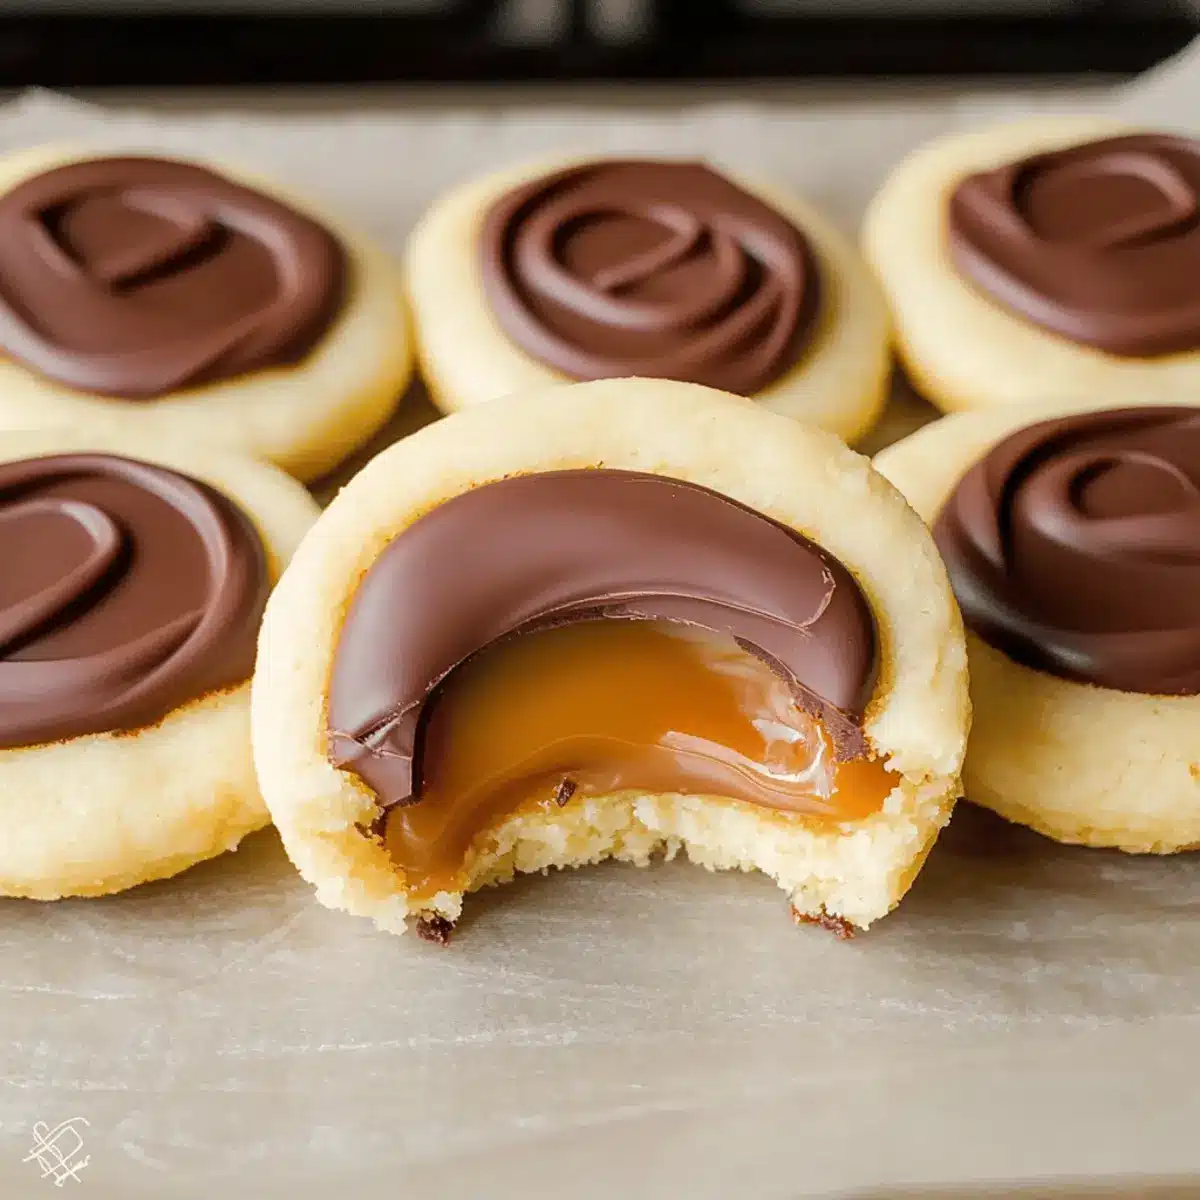
Step 7: Assemble the Cookie Cups
Once the cookies are cool and the caramel is ready, spoon a generous dollop of caramel onto each cookie. Using the back of a spoon, spread it evenly across the top. For the best results, refrigerate them for about 10-15 minutes to allow the caramel to set, transforming your delicious base into an even more irresistible treat.
Step 8: Top with Chocolate
Finally, melt the milk chocolate chips in a microwave-safe bowl, heating in intervals of 30 seconds until completely smooth. Once melted, spread a layer of chocolate over each caramel-topped cookie cup. Allow the chocolate to cool and set before indulging in your homemade Twix Cookie Cups. The glossy finish will make these treats look as fabulous as they taste!
How to Store and Freeze Twix Cookies
- Room Temperature: Store cookies in an airtight container at room temperature for up to 5 days to maintain their soft, chewy texture.
- Fridge: If you prefer a longer shelf-life, refrigerate them for up to 10 days. Just ensure they’re sealed tightly to avoid drying out.
- Freezer: For even longer preservation, freeze your Twix Cookies by wrapping them individually or stacking them with parchment paper between layers in an airtight container. They can last for up to 3 months.
- Reheating: When ready to enjoy, thaw at room temperature or gently warm them in the microwave for 10-15 seconds to revive the delicious caramel and chocolate topping.
What to Serve with Twix Cookie Cups?
Indulging in these luscious treats opens up a world of delightful pairing possibilities, making every bite even sweeter.
-
Vanilla Ice Cream: A scoop of creamy vanilla ice cream contrasts perfectly with the rich flavors, creating a blissful dessert experience.
-
Fresh Berries: The tartness of strawberries or raspberries cuts through the sweetness, adding a refreshing note to your dessert plate.
-
Coffee or Espresso: The bold flavors of coffee complement the sweet cookie cups, making for an exquisite after-dinner combination.
-
Chocolate Milkshake: For an extra decadent treat, serve Twix Cookie Cups alongside a thick chocolate milkshake that enhances the indulgent experience.
A balanced meal is all about textures and flavors. Each item reflects harmony without overwhelming the palate, making your dessert moment utterly memorable.
-
Nutty Caramel Dip: A side of nutty caramel dip invites an exciting twist, enhancing the cookie’s caramel flavor while adding crunchy texture.
-
Whipped Cream: Light and airy whipped cream offers a delightful contrast, softening the richness of the cookie while creating a sumptuous bite.
Make Ahead Options
These Twix Cookie Cups are perfect for meal prep enthusiasts looking to save time during busy weeknights! You can prepare the cookie base up to 24 hours in advance by baking them and storing them in an airtight container at room temperature. The caramel layer can also be made ahead and refrigerated for up to 3 days; simply reheat gently to ensure it’s spreadable. When you’re ready to enjoy your homemade Twix Cookies, spoon the caramel onto the cooled cookies and top with melted chocolate. Allow the chocolate to set, and you’ll have a delightful dessert that’s just as delicious as when freshly made!
Twix Cookies: Sweet Variations Await!
Feel free to get creative with these Twix Cookies, transforming each bite into your personal sweet masterpiece!
-
Nutty Bliss: Add crushed peanuts or pecans on top of the chocolate layer for a delightful crunch and nutty flavor. It’s a wonderful way to enhance texture and take your Twix Cookie Cups to the next level.
-
Flavored Chocolates: Swap out the milk chocolate chips for dark or white chocolate to create a different flavor experience. Dark chocolate offers a rich depth, while white chocolate lends a creamy sweetness that pairs perfectly with caramel.
-
Brownie Base: For a fudgier twist, use brownie batter as the base instead of the sugar cookie dough. This will give your Twix Cookies a decadent, gooey texture that chocolate lovers will adore.
-
Spicy Kick: Try adding a pinch of cayenne pepper or chipotle powder to the cookie dough for a slight heat that complements the sweetness beautifully. This unexpected flavor combination is sure to surprise and delight your taste buds!
-
Fruit Fusion: Top with dried cranberries or cherries after drizzling chocolate for a tangy-sweet burst. The tartness of the fruit cuts through the richness, creating a harmonious balance of flavors.
-
Caramel Upgrade: Elevate the caramel layer by mixing in a splash of bourbon or rum to add depth and warmth to the flavor. Just a small amount will create a lovely, elevated taste experience!
-
Cookie Sandwich: Make mini sandwich cookies by using two Twix Cookie Cups with a layer of flavored frosting or extra caramel in between for a delightful treat that’s even more indulgent.
For more dessert inspiration, don’t miss my delicious Cannoli Cookies or dive into the rich flavors of Chocolate Chip Cookies!
Tips for the Best Twix Cookies
-
Ingredient Quality Matters: Use high-quality salted butter and milk chocolate chips to enhance the overall flavor of your Twix Cookies.
-
Chill the Dough: If your dough feels sticky or difficult to handle, refrigerate it for about 30 minutes before rolling and cutting. This helps keep the shapes intact during baking.
-
Microwave with Care: When melting caramels, heat slowly in short intervals to avoid burning. Stir often for a smooth, creamy finish to your caramel layer.
-
Don’t Overmix: When combining your dry ingredients with the wet mixture, mix just until incorporated. Overmixing can lead to tough cookies instead of soft, chewy Twix Cookies.
-
Cool Completely: Ensure cookies are completely cooled before adding caramel and chocolate. This prevents melting and creates the perfect layering effect.
Twix Cookies Recipe FAQs
What kind of butter should I use for Twix Cookies?
I recommend using salted butter for that rich, creamy taste, but if you prefer a milder flavor, unsalted butter works wonderfully too. Ultimately, it’s about your taste preference!
How should I store leftover Twix Cookies?
Store your Twix Cookies in an airtight container at room temperature for up to 5 days. This helps maintain their soft and chewy texture. If you want them to last longer, refrigerate for up to 10 days, ensuring they are sealed to prevent drying out.
Can I freeze Twix Cookies, and how do I do that?
Absolutely! To freeze your Twix Cookies, wrap each one individually or stack them with parchment paper in between layers inside an airtight container. They can be stored in the freezer for up to 3 months. When you’re ready to indulge, simply thaw them at room temperature or warm them in the microwave for 10-15 seconds to bring back that delicious gooey caramel topping.
What if my cookies puff up too much during baking?
If your Twix Cookies puff up more than expected, it may be a sign to mix the dough a bit longer when incorporating the flour. Proper mixing allows the ingredients to blend better, preventing excessive puffiness. Just remember, a little puff is okay, but you want them to stay cup-shaped!
Can I make these Twix Cookies vegan or gluten-free?
Definitely! For a vegan option, replace the egg white with a flax egg by mixing 1 tablespoon of ground flaxseed with 3 tablespoons of water. For a gluten-free version, simply substitute all-purpose flour with a gluten-free blend that measures 1:1. Enjoy the flexibility of these cookie cups!
Irresistible Twix Cookies That Taste Like Candy Bar Heaven
Ingredients
Equipment
Method
- Preheat the oven to 350°F (175°C). Cream butter and sugar for 2-3 minutes until light and fluffy.
- Mix in the egg white and vanilla extract until fully combined.
- Whisk flour and baking powder together. Gradually add to wet ingredients and mix until a soft dough forms.
- Roll dough to 1/4 to 1/2 inch thick. Cut shapes with a 2.5-inch cookie cutter and place on a lined cookie sheet.
- Bake for 6-7 minutes until puffy and no longer glossy, then cool completely on a wire rack.
- Combine unwrapped caramels with milk in a microwave-safe bowl and heat for 1 minute until smooth.
- Spoon caramel onto each cookie and refrigerate for 10-15 minutes to set.
- Melt chocolate chips in intervals of 30 seconds, then spread over caramel layer and allow to cool.
Leave a Reply