
The aroma of warm rice and baked salmon filled my kitchen, instantly transporting me to my favorite sushi bar. But here’s the twist: I’m whipping up these irresistible Salmon Sushi Cups that eliminate the fuss of rolling! Ready in just 30 minutes, this recipe is perfect for quick weeknight dinners or impressing guests at your next gathering. Each bite combines the savory goodness of salmon with a delightful crunch, making it a gluten-free, easy sushi alternative that everyone will adore. Whether you keep traditional ingredients or play around with shrimp or crab, these cups promise flavor without the stress of sushi-making. Are you ready to dive into a new way to enjoy sushi?

Why You’ll Adore These Salmon Sushi Cups
Quick preparation makes these cups a lifesaver for busy weeknights! Whip them up in just 30 minutes, freeing you from fast food. Unique flavors blend savory salmon with spicy mayo, providing a delightful twist on classic sushi. Versatile ingredient swaps mean you can play with proteins like shrimp or crab. Gluten-free and baked, they cater to a variety of dietary needs without skimping on taste. Serve warm as an appetizer or snack, and don’t forget to dip into some soy sauce or spicy mayo! For even more delicious seafood options, check out these Bang Bang Salmon bites or try your hand at Cajun Shrimp Salmon.
Salmon Sushi Cups Ingredients
For the Rice
• Rice – Use jasmine, sushi, or short-grain rice for a perfect base; instant rice is a quick option.
• Salt – Sprinkle in to enhance the flavor; adjust to your taste preferences.
• Seasoned Rice Vinegar – Adds a nice acidity and depth; can be omitted if preferred.
For the Salmon Filling
• Salmon – It’s the star of your cups; ensure it’s skinless and bone-free, using raw or thoroughly thawed salmon.
• Coconut Aminos – Gives a wonderful umami flavor; swap with soy sauce or tamari if not avoiding gluten.
• Spicy Mayo – Brings creaminess and a spicy kick; regular mayo or Japanese ‘Kewpie’ mayo works too.
For the Nori Cups
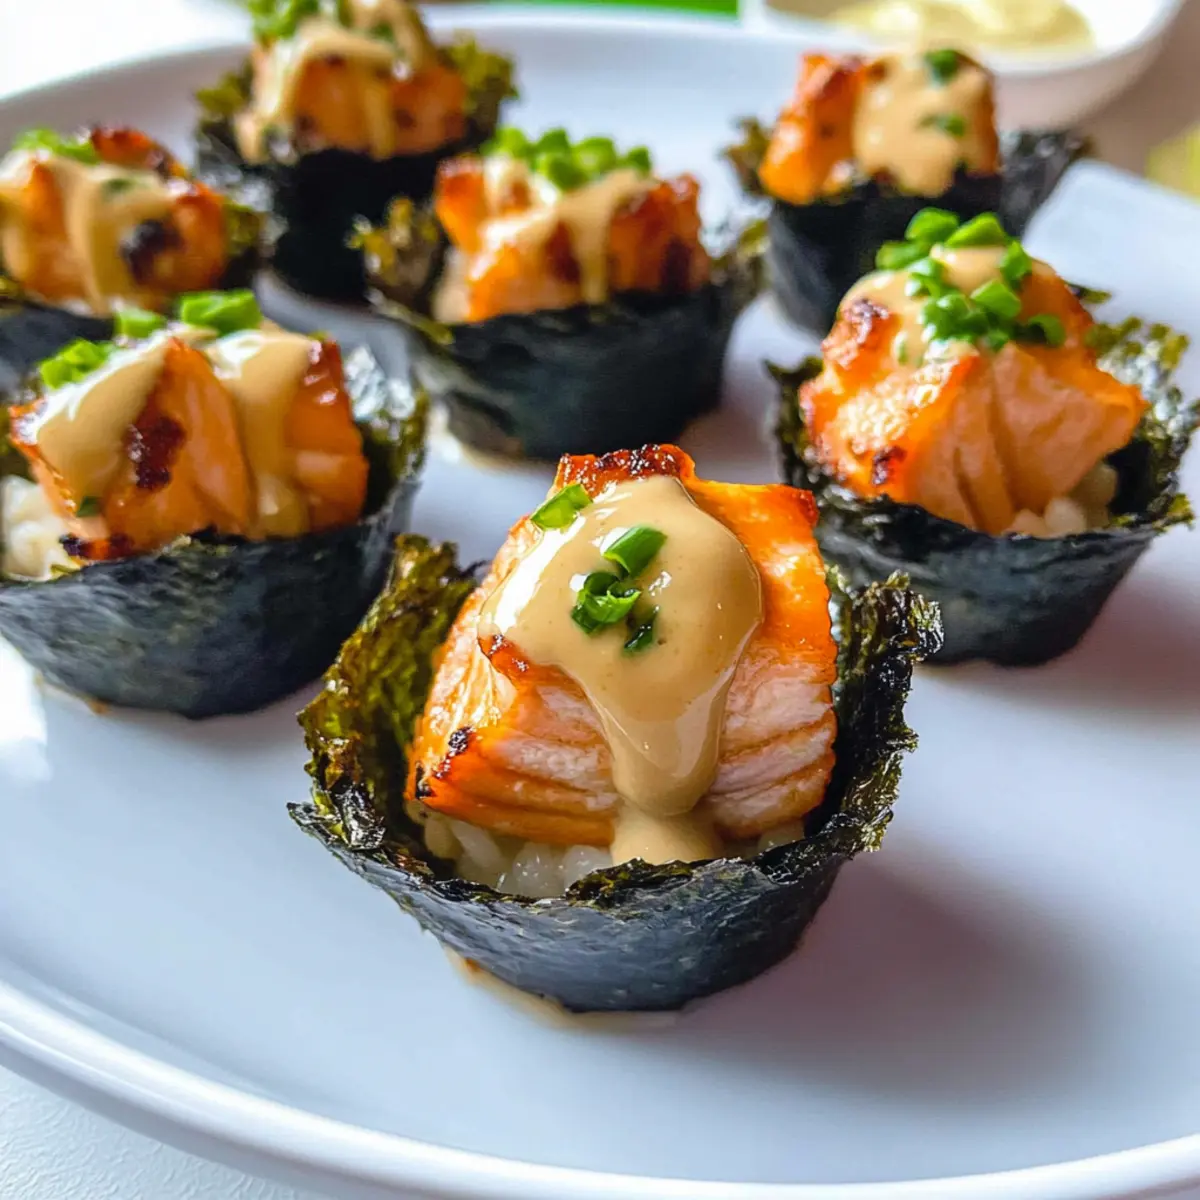
• Nori – This seaweed holds everything together; cut into squares to fit your muffin tins.
For Garnishing
• Fresh Chives – Adds a touch of freshness and flavor; feel free to substitute with green onions if needed.
Get ready to create these irresistible Salmon Sushi Cups that are not only delicious but also a fun twist on sushi!
Step‑by‑Step Instructions for Salmon Sushi Cups
Step 1: Preheat the Oven
Begin by preheating your oven to 400°F (200°C). This temperature ensures the perfect crispiness for your Salmon Sushi Cups. While the oven heats, gather your ingredients, including muffin tins and a pot for cooking the rice. The anticipation of warm, flavorful sushi cups will fill your kitchen as the oven reaches its target temperature.
Step 2: Cook the Rice
Rinse your chosen rice under cold water until the water runs clear, then cook it according to the package instructions. Add a pinch of salt for enhanced flavor during cooking. As the rice cooks, take note of its texture; it should be sticky and tender, making it ideal for forming into cups later.
Step 3: Prepare the Salmon Mixture
While the rice is cooking, take your salmon and pat it dry with a paper towel. Cut the salmon into small cubes and place them in a mixing bowl. Add coconut aminos and spicy mayo to the bowl, stirring gently until the salmon is coated. The salmon mixture should look glossy and evenly combined, ready to crown your sushi cups.
Step 4: Cut the Nori Sheets
Cut the nori sheets into squares that will fit comfortably into the cups of your muffin tin. Press one tablespoon of the cooked rice into each nori square, forming a small base. Make sure the rice is warm; this will help soften the nori and secure its shape during baking.
Step 5: Assemble the Sushi Cups
Carefully place the nori rice squares into the muffin tin, ensuring they hold their shape. Spoon a tablespoon of the salmon mixture on top of each rice base. The cups should be filled generously but avoid overfilling to maintain their structure while baking. They should resemble tiny sushi stacks, ready for the oven.
Step 6: Bake to Perfection
Place the muffin tin in the preheated oven and bake for 15 minutes. This baking process will create golden brown edges and crisp textures. For an extra touch, switch to broil for the last minute to achieve a lightly charred top, making your Salmon Sushi Cups irresistible and appealing to the eye.
Step 7: Cool and Garnish
Once baked, carefully remove the muffin tin from the oven and allow the sushi cups to cool slightly. They will be hot to the touch, so let them set for a few minutes. Garnish each cup with a drizzle of spicy mayo and a sprinkle of freshly chopped chives, adding a vibrant touch and a burst of flavor to your Salmon Sushi Cups.
Expert Tips for Salmon Sushi Cups
- Use Warm Rice: Assemble the sushi cups while the rice is still warm; it helps soften the nori, making it easier to shape.
- Layer for Stability: If your nori feels fragile, consider using two layers for added structure; this prevents breakage when filling.
- Keep Portions Balanced: Avoid overfilling the cups; too much filling can cause them to collapse during baking.
- Check Salmon Freshness: Always use fresh, properly thawed salmon to ensure best flavor; avoid fish with an off smell or color.
- Avoid Sticking: Lightly grease your muffin tins to prevent the salmon sushi cups from sticking; this will help with easy removal after baking.
Make Ahead Options
These Salmon Sushi Cups are perfect for meal prep, allowing you to enjoy a gourmet experience with minimal last-minute effort. You can prepare the rice and the salmon mixture up to 24 hours in advance—store them separately in airtight containers in the refrigerator to maintain their freshness and prevent sogginess. The nori cups can be cut and kept in a dry place for up to 3 days. When you’re ready to serve, simply assemble the cups by layering the rice and salmon mixture and bake them as directed. This way, you’ll have delicious, homemade salmon sushi cups ready to impress, without the stress of last-minute preparation!
Salmon Sushi Cups Variations
Feel free to explore these delicious tweaks to elevate your salmon sushi cups, adding unique flair to each bite!
-
Protein Swap: Try substituting salmon with shrimp, chicken, or crab for a different protein experience. Each option brings its own delightful flavor and texture.
-
Rice Type: Use jasmine or sushi rice instead of short-grain for a distinct taste. Instant rice is also a quick choice that won’t compromise the dish.
-
Gluten-Free Boost: If avoiding gluten, replace traditional soy sauce with coconut aminos or tamari. This ensures flavor without the gluten.
-
Crispy Texture: Bake the nori cups for a few extra minutes for added crunch. The crispy edges make each bite even more satisfying.
-
Flavor Infusion: Add diced jalapeño or sriracha to the salmon mixture for an exciting kick. It’s a lovely twist for those who crave heat!
-
Veggie Options: Throw in chopped peppers or cucumbers into the salmon mix for a refreshing crunch. This not only adds texture but also makes the dish even healthier.
-
Herb Variation: Swap fresh chives for dill or cilantro to enhance the flavor profile. Each herb brings its own aromatic character, making it a fun exploration!
For more creative seafood ideas, take a look at these Spicy Salmon Sushi treats or whip up some Healthy Tuscan Salmon. The possibilities are endless!
What to Serve with Quick & Easy Baked Salmon Sushi Cups
Elevate your salmon sushi cups with these delightful side dishes and drinks that complement their fresh, vibrant flavors.
-
Creamy Avocado Salad: This refreshing salad adds a smooth texture and healthy fats, which balance the savory flavors of the sushi cups beautifully. Toss in cherry tomatoes and lime juice for extra zing!
-
Seaweed Salad: The umami and subtle crunch of seaweed salad pairs perfectly with the sushi theme, providing a light contrast to the crispy cups.
-
Cucumber Pickles: Crunchy and tangy, pickled cucumbers cleanse the palate wonderfully and enhance your sushi experience, making each bite even more enjoyable.
-
Miso Soup: A warm bowl of miso soup delivers comforting flavors and depth, making it the perfect companion to your salmon sushi cups. The rich broth complements the dish’s ingredients beautifully.
-
Sparkling Sake: Pair your meal with chilled sparkling sake to complement the umami richness of the salmon and add a celebratory touch to the dining experience.
-
Coconut Rice: Sweet coconut rice offers a flavorful synergy, enhancing the tropical notes of your sushi cups. Its sweetness contrasts deliciously with the spicy mayo.
-
Chilled Green Tea: Refreshing green tea is not only a classic sushi pairing but also aids digestion, making it the perfect beverage choice to complement your meal.
-
Fruit Sorbet: For dessert, citrus-flavored sorbet serves as a light and refreshing end to the meal, cleansing your palate after the rich salmon cups.
How to Store and Freeze Salmon Sushi Cups
Fridge: Store leftover salmon sushi cups in an airtight container for up to 2 days. Reheat in the oven at 350°F (175°C) for about 10 minutes to retain their crispiness.
Freezer: You can freeze the uncooked salmon sushi cups by assembling them and covering them tightly with plastic wrap and aluminum foil. They’ll stay fresh for up to 2 months.
Reheating: For best results, thaw overnight in the fridge before reheating in the oven. This helps keep the salmon sushi cups tasty and crispy.
Freshness Tip: These salmon sushi cups are best enjoyed fresh, so prepare only what you expect to eat.

Salmon Sushi Cups Recipe FAQs
How do I choose the right rice for my Salmon Sushi Cups?
Absolutely! For the best results, I recommend using sushi or short-grain rice, as they provide the perfect sticky texture. Jasmine rice can also work well for a lighter flavor. Instant rice is a quick option if you’re pressed for time, but make sure to adjust the cooking method accordingly to maintain the cup’s structure.
How should I store leftover Salmon Sushi Cups?
To store your delicious salmon sushi cups, place them in an airtight container in the refrigerator for up to 2 days. When you’re ready to enjoy them again, simply reheat in the oven at 350°F (175°C) for about 10 minutes to keep them crispy and warm.
Can I freeze Salmon Sushi Cups for later?
Yes! You can freeze uncooked salmon sushi cups. After assembling, wrap them tightly in plastic wrap, then cover with aluminum foil to prevent freezer burn. They’ll stay fresh for up to 2 months. When you’re ready to enjoy, thaw overnight in the fridge and reheat in the oven to maintain crispiness.
What if my salmon has skin or bones?
No worries! Make sure to remove the skin and check for pin bones; this ensures a smooth texture when you mix the salmon. If you’re unsure, ask your fishmonger to prepare the salmon for you, or use pre-packaged skinless and boneless salmon for convenience.
Are these Salmon Sushi Cups suitable for gluten-free diets?
Very! By using coconut aminos instead of soy sauce, you’ll keep these salmon sushi cups gluten-free. Always check the labels on your ingredients to ensure they meet your dietary needs, especially for the mayonnaise and rice vinegar.

Delicious Salmon Sushi Cups You Can Make in 30 Minutes
Ingredients
Equipment
Method
- Preheat your oven to 400°F (200°C) and gather your ingredients.
- Rinse your rice under cold water and cook it according to package instructions with a pinch of salt.
- Pat salmon dry, cut into small cubes, and mix with coconut aminos and spicy mayo in a bowl.
- Cut nori sheets into squares that fit into your muffin tin and press cooked rice into each square.
- Assemble the sushi cups with nori rice squares and spoon salmon mixture on top.
- Bake in the oven for 15 minutes until golden brown, and broil for 1 minute for a charred top.
- Remove from oven, cool slightly, and garnish with spicy mayo and chives.
Leave a Reply