
The moment I first tasted a silky chocolate mousse at a quaint French café, I was hooked. Fast forward to today, and I’m thrilled to share my own simplified take with these Easy Mini Chocolate Mousse Cups. Not only do these delightful bites bring elegance to any dessert table, but they also require no baking, making them a stress-free addition to your culinary repertoire. Whether you’re planning for a cozy night in or hosting friends for a festive gathering, this recipe adapts perfectly to suit your tastes, allowing for variations like dairy-free or gluten-free options. The ease of preparation means you’ll have more time to savor the moment. What unique twist will you add to elevate your own mousse cups?
Why are Mini Chocolate Mousse Cups a Must?
Indulgent flavor awaits with these Easy Mini Chocolate Mousse Cups, where rich chocolate meets fluffy texture in every bite. No-Bake convenience means you can whip these up in no time! Versatile options allow for dietary needs, making it easy to customize for all guests. Whether you’re dreaming of a dairy-free treat or a gluten-free delight, there’s a twist for everyone. Elegant presentation makes them perfect for gatherings, ensuring your dessert table shines, while make-ahead simplicity allows you to prep with ease ahead of time. Ready to impress? Don’t forget to check out our Decadent Chocolate Peanut and Texas Chocolate Pecan treats for more delightful desserts!
Mini Chocolate Mousse Cups Ingredients
• Discover what you need to create these decadent treats!
For the Mousse
- Dark Chocolate – vital for the rich flavor and the foundation of your mousse; choose high-quality for best results.
- Heavy Cream – essential for a smooth, creamy texture; ensure it’s cold for proper whipping.
- Eggs – the yolks add richness, while whipped egg whites provide lightness to the mousse.
- Sugar – balances the richness of the chocolate; adjust based on your sweetness preference.
- Vanilla Extract – adds a delightful warmth and enhances the chocolate flavor.
For the Base
- Cookie Crumbs – gives a crunchy texture that complements the mousse; feel free to substitute with crushed pretzels or gluten-free options.
These Mini Chocolate Mousse Cups come together effortlessly, allowing you to create a stunning dessert that everyone will love!
Step‑by‑Step Instructions for Easy Mini Chocolate Mousse Cups
Step 1: Melt Chocolate
Begin by chopping high-quality dark chocolate into small pieces for even melting. Place the chocolate in a microwave-safe bowl and melt in 30-second intervals, stirring in between until smooth and glossy, which should take about 1-2 minutes. Alternatively, use a double boiler, ensuring that the bottom bowl doesn’t touch the simmering water. Once melted, set aside to cool slightly.
Step 2: Separate Eggs
Carefully crack the eggs, placing the yolks in one mixing bowl and the whites in another. Make sure no yolk gets into the egg whites, as this can prevent them from whipping properly. This step is crucial for creating the airy texture of the mousse. The egg whites should be free of any fat or moisture for the best results.
Step 3: Whip Cream
In a chilled mixing bowl, pour the cold heavy cream. Use an electric mixer to whip the cream on medium speed until it forms stiff peaks, which usually takes about 3-5 minutes. Keep an eye on it, as over-whipping can turn it into butter. Once done, set the whipped cream aside, gently folding it into the mousse later.
Step 4: Combine Yolks and Chocolate
In the bowl with the egg yolks, add sugar and whisk vigorously until the mixture becomes pale and creamy, roughly 2 minutes. Gradually incorporate the slightly cooled melted chocolate along with a splash of vanilla extract, whisking until the mixture is smooth and well combined, creating a rich chocolate base for your Easy Mini Chocolate Mousse Cups.
Step 5: Fold in Egg Whites
Using a clean whisk, whip the egg whites until soft peaks form, which should take around 2 minutes. Gently fold a third of the whipped egg whites into the chocolate mixture, being careful not to deflate them. This technique ensures your mousse remains light and airy. Then, fold in the remaining egg whites until no white streaks remain.
Step 6: Add Cream
Now, it’s time to incorporate the whipped cream into the chocolate mixture. Carefully fold the whipped cream into the chocolate mixture using a spatula, ensuring that the lightness is preserved. This step blends the creaminess with the chocolate while maintaining a fluffy texture vital for the Easy Mini Chocolate Mousse Cups.
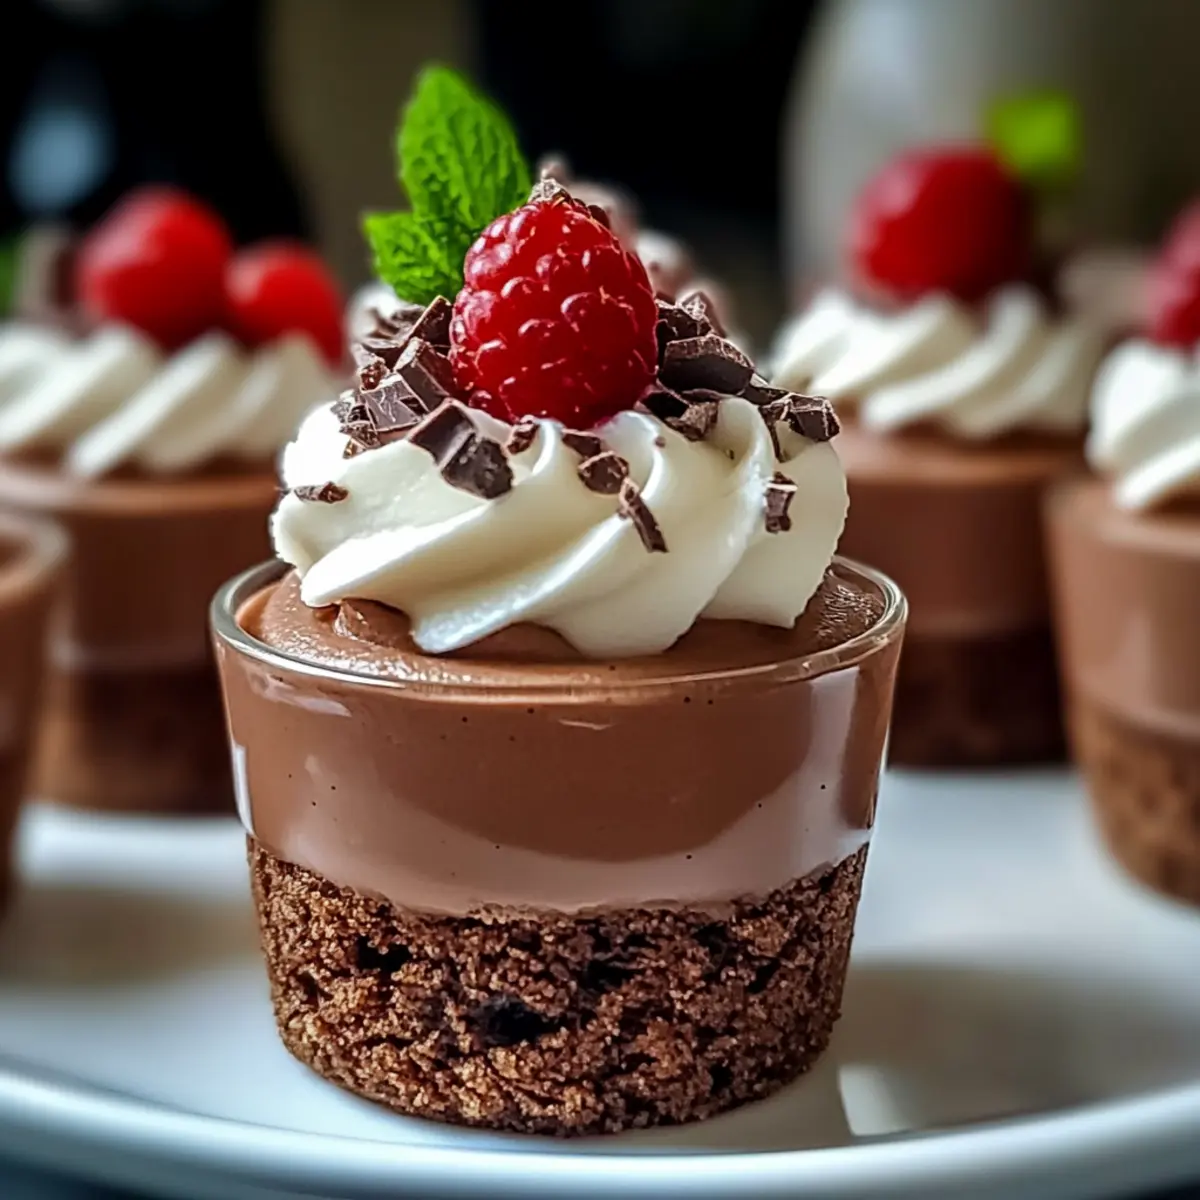
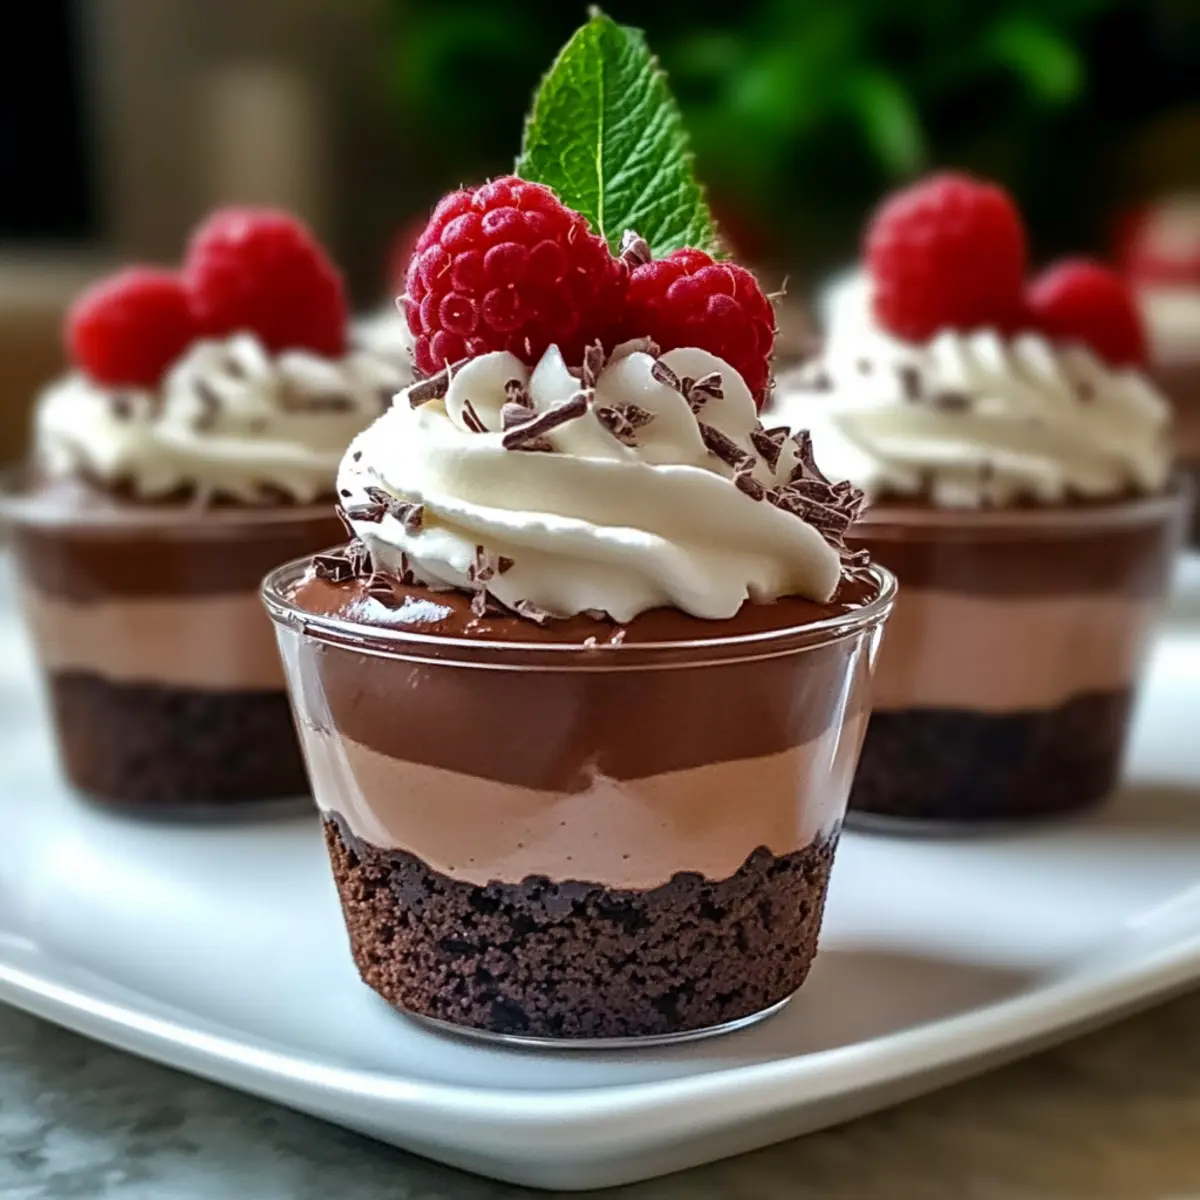
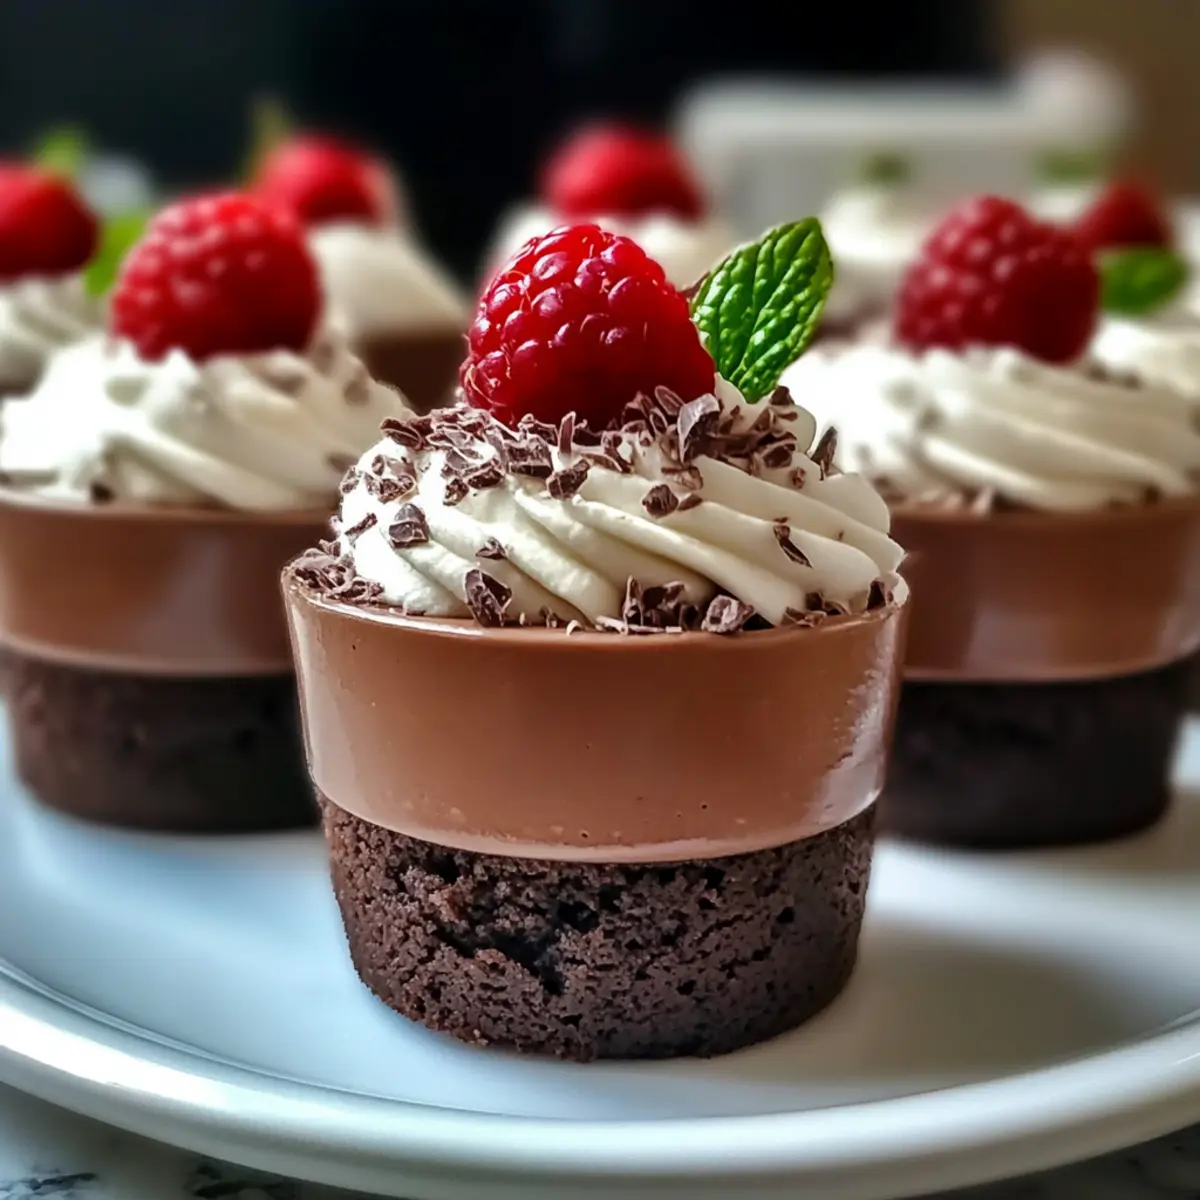
Step 7: Layer in Cups
Grab your mini dessert cups and begin by spooning a layer of cookie crumbs at the bottom of each one, about 1 tablespoon. This adds a delightful crunchy texture that will complement the silky mousse. Then, gently spoon the mousse mixture on top of the cookie layer, filling each cup about three-quarters full to allow room for toppings later.
Step 8: Chill
Place the filled cups in the refrigerator and let them chill for at least 2 hours, which allows the mousse to set properly and develop its rich flavors. This step is essential for achieving the perfect consistency, ensuring that every bite of your Easy Mini Chocolate Mousse Cups is rich and satisfying.
Step 9: Serve
When ready to serve, take the mousse cups out of the refrigerator. You can enhance each cup with a dollop of freshly whipped cream, fresh berries, or a sprinkle of chocolate shavings for added elegance. These final touches elevate your Easy Mini Chocolate Mousse Cups, transforming them into an impressive dessert for any occasion.

Helpful Tricks for Mini Chocolate Mousse Cups
-
Quality Chocolate: Always choose high-quality dark chocolate for the best flavor. It truly makes all the difference in your Mini Chocolate Mousse Cups.
-
Chill Everything: Ensure your cream is very cold before whipping and let the mousse chill thoroughly. This helps the mousse set to a perfect, light texture.
-
Gentle Folding: Be gentle when folding in the whipped cream and egg whites. Over-mixing can lead to a dense mousse, losing that airy lightness you want.
-
Perfect Portions: Fill your cups about three-quarters full to allow room for any toppings. This practice helps present an elegant look while preventing overflow.
-
Make-Ahead Magic: Prepare these cups ahead of time and store them in the refrigerator, adding toppings just before serving to keep them fresh and appealing.
What to Serve with Easy Mini Chocolate Mousse Cups
Imagine finishing a lovely meal with a sweet, silky bite that melts in your mouth – creating the perfect indulgence for your evening.
-
Fresh Berries: Bursting with tangy flavor, berries like raspberries or strawberries add a vibrant freshness that contrasts beautifully with the rich mousse.
-
Whipped Cream: A dollop of light, fluffy whipped cream enhances the mousse’s decadent nature, making each spoonful a cloud of bliss.
-
Coffee: A rich, bold cup of coffee perfectly balances sweetness, providing a warm, sophisticated touch that enhances the overall dessert experience.
-
Chocolate Shavings: A sprinkle of dark chocolate shavings on top not only looks elegant but also intensifies the chocolate flavor in the mousse cups, adding a delightful crunch.
-
Mint Leaves: Fresh mint leaves offer a burst of refreshing flavor and a pop of color, cutting through the richness of the mousse for a delightful contrast.
-
Mini Fruit Tarts: These add a layer of crispiness and flavor, providing a delightful textural change alongside the silky mousse cups for a charming dessert spread.
-
Moscato: This sweet, bubbly wine complements the chocolate beautifully, making it a lovely pairing for a cozy evening or a celebration.
-
Caramel Sauce: Drizzling caramel atop the mousse cups adds a sweet, buttery note that rounds out the chocolate’s richness with yet another layer of indulgence.
Make Ahead Options
These Easy Mini Chocolate Mousse Cups are a fantastic option for busy cooks looking to save time without sacrificing flavor! You can prepare the mousse mixture up to 24 hours in advance; simply layer it in the cups and refrigerate. For the best quality, remember to keep the cookie crumbs separate until right before serving to maintain their crunch. To finish, just dollop some freshly whipped cream and add any desired toppings like berries or chocolate shavings just before serving, ensuring your mousse cups are as fresh and delightful as if they were made in the moment. These make-ahead tips will make your dessert planning a breeze!
How to Store and Freeze Mini Chocolate Mousse Cups
Fridge: Keep the mousse cups covered in the refrigerator for up to 3 days. They will maintain their light and creamy texture, making them perfect for satisfying cravings.
Freezer: For longer storage, you can freeze the mousse cups for up to 1 month. However, the texture may change; it’s best to freeze without toppings and add them just before serving.
Thawing: To enjoy frozen mousse cups, simply transfer them to the fridge to thaw overnight. This gentle thawing will help preserve their delicious texture.
Reheating: These Mini Chocolate Mousse Cups are best served chilled and do not require reheating. Just allow them to chill in the fridge after preparation for optimal enjoyment!
Mini Chocolate Mousse Cups Variations
Feel free to take these Easy Mini Chocolate Mousse Cups and make them your own; the sky’s the limit with these delightful twists!
-
Dairy-Free: Substitute heavy cream with coconut cream for a rich, tropical flavor that doesn’t compromise on texture.
You’ll love how the lightness of coconut complements the chocolate beautifully! -
Gluten-Free: Opt for gluten-free cookies or crushed nuts for the base layer to cater to dietary needs without sacrificing deliciousness.
This ensures that everyone at your gathering can indulge without worry! -
Lighter Version: Swap some of the dark chocolate with unsweetened cocoa powder mixed with a bit of extra heavy cream.
This offers a guilt-free delight while still maintaining the beloved chocolate flavor we crave. -
Flavor Boost: Add a teaspoon of orange zest or a splash of espresso to the chocolate mixture for a unique flavor twist.
These additions elevate the mousse, adding a surprising depth that chocolate lovers will adore! -
Nutty Variation: Incorporate finely chopped hazelnuts or almonds into the mousse for added texture and crunch.
The nutty flavor pairs beautifully with chocolate, adding a gourmet touch to your dessert. -
Layered Delight: Try layering the mousse with a thin layer of caramel or chocolate ganache for an indulgent treat.
This decadent addition brings sophisticated layers that will impress anyone at your table. -
Spicy Kick: Mix in a pinch of cayenne pepper or cinnamon for a subtle warmth that enhances the chocolate flavor.
This exciting twist leaves a delightful surprise at the end of every bite! -
Fruity Finish: Top with fresh berries or a dollop of berry compote right before serving for a delightful tangy contrast.
The burst of freshness will brighten the rich mousse and make each cup even more delightful.
These variations promise to delight your guests and give you the freedom to customize, ensuring that your Easy Mini Chocolate Mousse Cups are never the same twice! And while you’re at it, why not check out our Chocolate Marshmallow Swirl cookies for another decadent treat or the elegant White Chocolate Raspberry cake for your next gathering?
Easy Mini Chocolate Mousse Cups Recipe FAQs
What type of dark chocolate should I use?
Absolutely! For the best results, opt for high-quality dark chocolate with at least 60% cocoa content. This will ensure a rich and satisfying flavor in your Mini Chocolate Mousse Cups. Brands like Ghirardelli or Scharffen Berger are excellent choices for that luxurious taste.
How should I store the mousse cups, and how long do they last?
You can store your Easy Mini Chocolate Mousse Cups covered in the refrigerator for up to 3 days. Just ensure they are well-covered to prevent any absorption of odd smells from the fridge. I often place a piece of plastic wrap directly on the mousse to keep it fresh!
Can I freeze leftover mousse cups?
Yes, you can freeze these delightful cups for up to 1 month, but I recommend freezing them without toppings. To freeze, simply cover each cup tightly with plastic wrap and place them in an airtight container. When you’re ready to enjoy, thaw them in the fridge overnight before adding your favorite toppings.
What should I do if my mousse doesn’t set properly?
If your mousse turns out runny, it may not have been chilled long enough. To remedy this, simply place the mousse cups back in the refrigerator for a bit longer. Also, ensure that the whipped cream is at stiff peaks before folding, as this helps create a light, airy consistency. If all else fails, you can try adding a bit of gelatin to stabilize it, following package instructions for dissolution.
Are there any allergy considerations for this recipe?
Great question! The main allergens in this recipe are eggs and dairy. For a dairy-free version, substitute heavy cream with coconut cream, and make sure your chocolate is dairy-free as well. If you’re serving guests with egg allergies, you can explore using an egg replacement like aquafaba (chickpea brine) as a substitute for the whipped egg whites!
How do I make these mousse cups gluten-free?
Very easy! Simply replace the cookie crumbs with a gluten-free alternative. You could use gluten-free graham crackers or even crushed nuts for a delicious base. Just ensure to read the labels, as some cookies may still contain gluten!
Decadent Mini Chocolate Mousse Cups for Effortless Elegance
Ingredients
Equipment
Method
- Chop the dark chocolate and melt it in a microwave-safe bowl in 30-second intervals until smooth.
- Separate the egg yolks and egg whites into different bowls.
- Whip the cold heavy cream until stiff peaks form, about 3-5 minutes.
- In the yolks bowl, whisk in sugar and melted chocolate until smooth.
- Whip egg whites until soft peaks form and gently fold into the chocolate mixture.
- Fold the whipped cream into the chocolate mixture carefully.
- Layer cookie crumbs at the bottom of each mini cup, then add mousse filling 3/4 full.
- Chill the cups in the refrigerator for at least 2 hours.
- Serve with whipped cream, fresh berries, or chocolate shavings.
Leave a Reply