
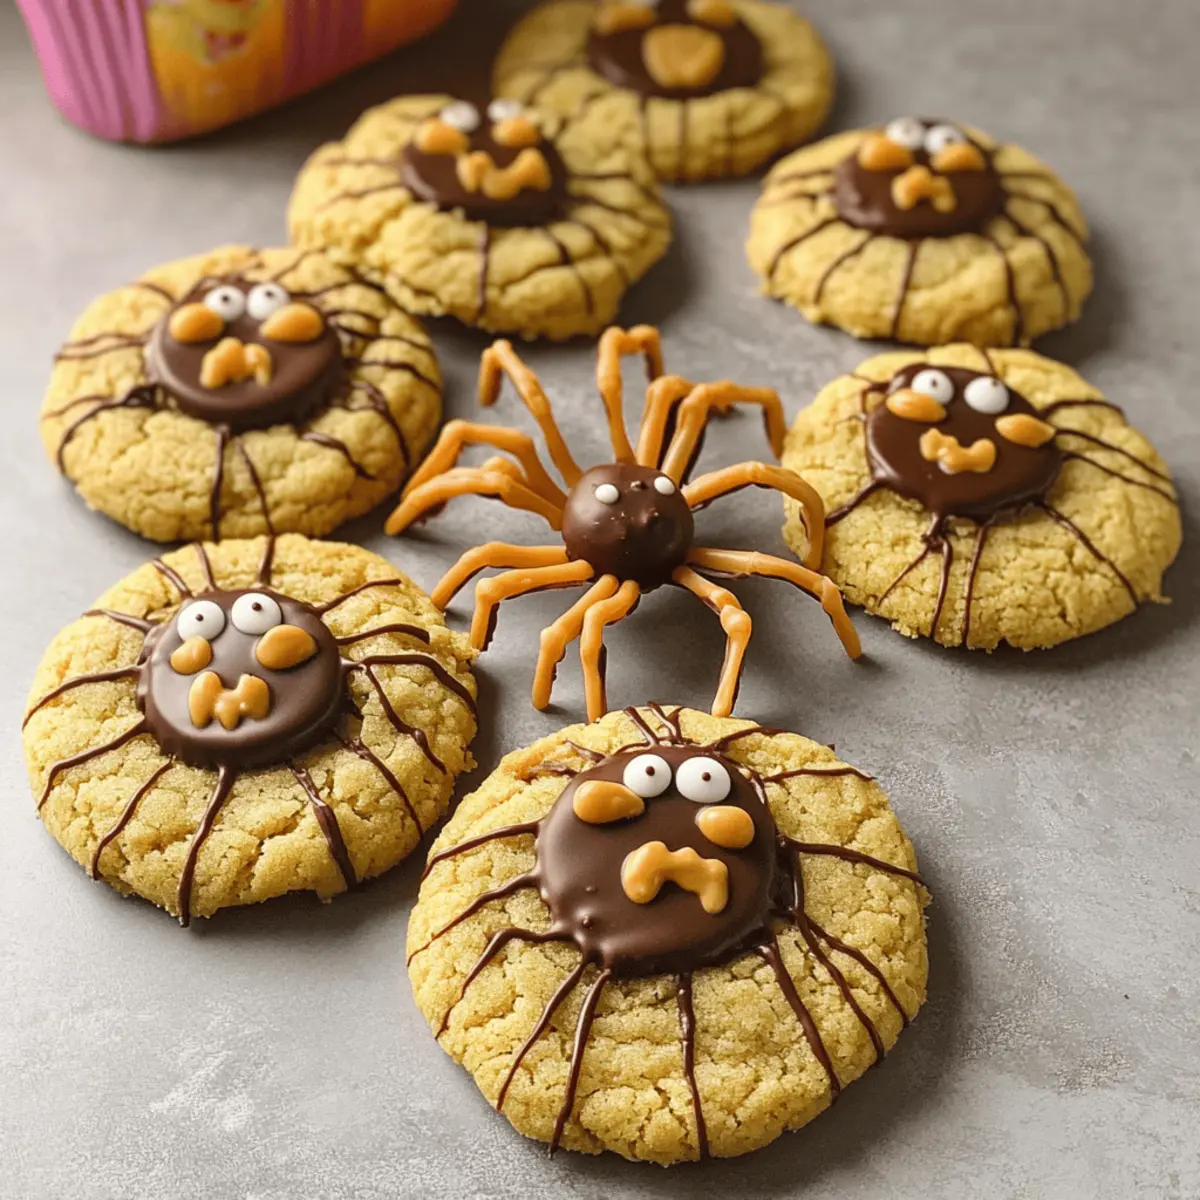
As Halloween creeps closer, a delightful challenge awaits me in the kitchen: creating fun and festive treats that evoke giggles and smiles. Enter my Peanut Butter Spider Halloween Cookies, the perfect blend of spooky and delicious! These adorable cookies not only bring a playful twist to your Halloween festivities but are also incredibly easy to whip up. With their chewy centers and crisp edges, they quickly become a crowd-pleaser at any gathering. Plus, the decorating fun allows for endless creativity—swap in your favorite candies for a personalized touch! Curious about how to make these creepy crawlers? Let’s dive into this sweet adventure that’s bound to become a new family tradition!
Why Are These Cookies a Must-Try?
Festive and Fun: These Peanut Butter Spider Halloween Cookies transform your kitchen into a spooky wonderland, perfect for celebrating Halloween with a delightful twist.
Endless Creative Freedom: With options to swap candies, you can customize these cookies to fit everyone’s taste.
Crowd-Pleasing Treats: Their cute spider decoration will charm both kids and adults at any gathering—just like my Twix Cookies Taste.
Quick and Simple: Whipping up a batch is an effortless task. The straightforward method means you’ll spend less time baking and more time enjoying.
Memorable Moments: These cookies aren’t just desserts; they’re opportunities for creativity and family fun, sparking joy and laughter around the table. Enjoy them with a glass of milk or a cup of hot cocoa for the ultimate treat experience!
Peanut Butter Spider Halloween Cookies Ingredients
• Get ready to create some creepy and delicious treats!
For the Cookie Dough
- All-Purpose Flour – Provides structure to the cookies; you can use a gluten-free flour blend for a gluten-free version.
- Baking Soda – Acts as a leavening agent for a delightful rise; no need for substitutions.
- Salt – Balances flavors beautifully; opt for kosher or sea salt for best results.
- Unsalted Butter – Ensures rich, moist cookies; substitute with coconut oil or vegan butter for a dairy-free option.
- Light Brown Sugar – Adds moisture and a hint of molasses; granulated sugar works in a pinch for a less moist cookie.
- Granulated Sugar – Sweetens the mix and contributes to crispiness.
- Smooth Peanut Butter – Offers delectable flavor and moisture; creamy works best, while crunchy may alter the cookie’s texture.
- Egg – Binds the ingredients for a perfect cookie; use flaxseed meal mixed with water for a vegan alternative.
- Vanilla Extract – Introduces a depth of flavor; feel free to omit if you’re running low.
- Whole Milk – Adjusts dough texture and moisture; almond milk or oat milk makes it dairy-free.
For the Spider Decoration
- Miniature Reese’s Peanut Butter Cups – Serve as the spider’s body; any chocolate candy, like Whoppers or Hershey Kisses, can substitute.
- Semi-Sweet Chocolate – Used to pipe spider legs and attach decorations; choose dark or milk chocolate based on your personal preference.
- Candy Eyes – Add a fun touch to your spiders; you can replace them with chocolate chips if necessary.
Now that you have everything ready, let’s embark on a spooky baking adventure! 🌟
Step‑by‑Step Instructions for Peanut Butter Spider Halloween Cookies
Step 1: Prep Dough
In a large mixing bowl, whisk together 2 cups of all-purpose flour, 1 teaspoon of baking soda, and ½ teaspoon of salt until well combined. In another bowl, cream ½ cup unsalted butter with ¾ cup light brown sugar and ½ cup granulated sugar until fluffy and light in color. Gradually mix in 1 cup of smooth peanut butter until smooth, followed by 1 egg, 2 tablespoons of whole milk, and 1 teaspoon of vanilla extract. Combine wet and dry ingredients until a dough forms.
Step 2: Chill Dough
Cover the cookie dough with plastic wrap and place it in the refrigerator for at least 1 hour. Chilling the dough is crucial in achieving the perfect texture for your Peanut Butter Spider Halloween Cookies, preventing them from spreading too much while baking. Once the dough is firm, it’s time to shape those adorable cookies.
Step 3: Shape Cookies
Preheat your oven to 350°F (175°C) while you prepare the cookies. Line a baking sheet with parchment paper for easy cleanup. Scoop tablespoon-sized balls of the chilled dough onto the baking sheet, spacing them about 2 inches apart to allow for spreading. The dough should feel slightly sticky but manageable, which ensures a soft and chewy cookie once baked.
Step 4: Bake
Bake the cookies in the preheated oven for 10-12 minutes, or until the edges are set and just starting to turn golden but the centers still look soft. When you remove the cookies, they will continue cooking slightly on the baking sheet, giving you that perfect chewy texture in the Peanut Butter Spider Halloween Cookies. Let them cool for about 3-5 minutes on the baking sheet before transferring them to a wire rack.
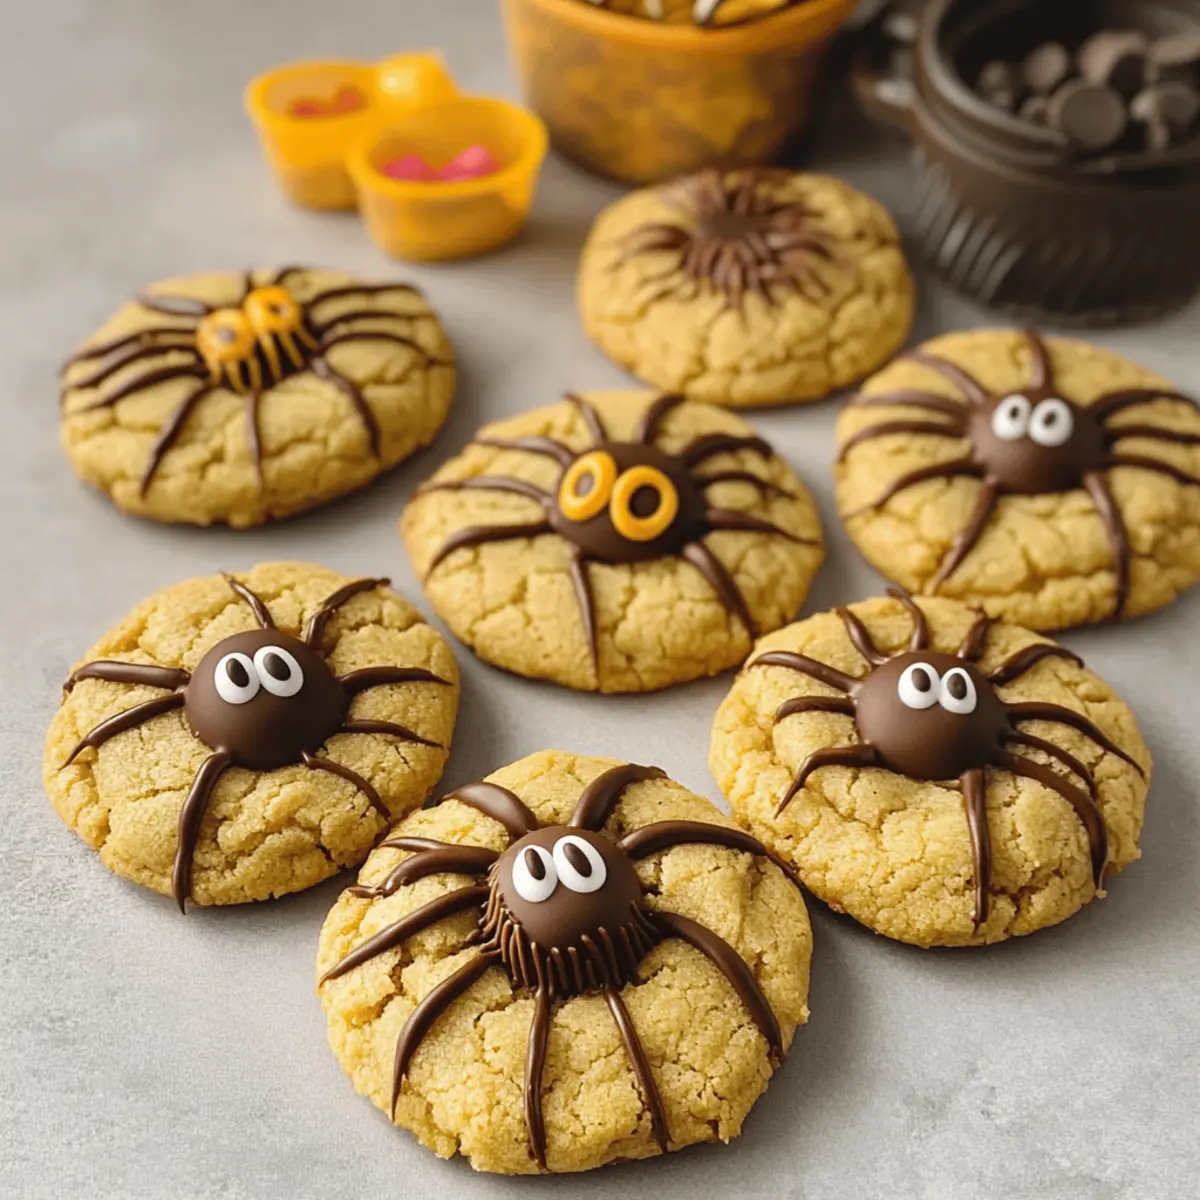
Step 5: Decorate
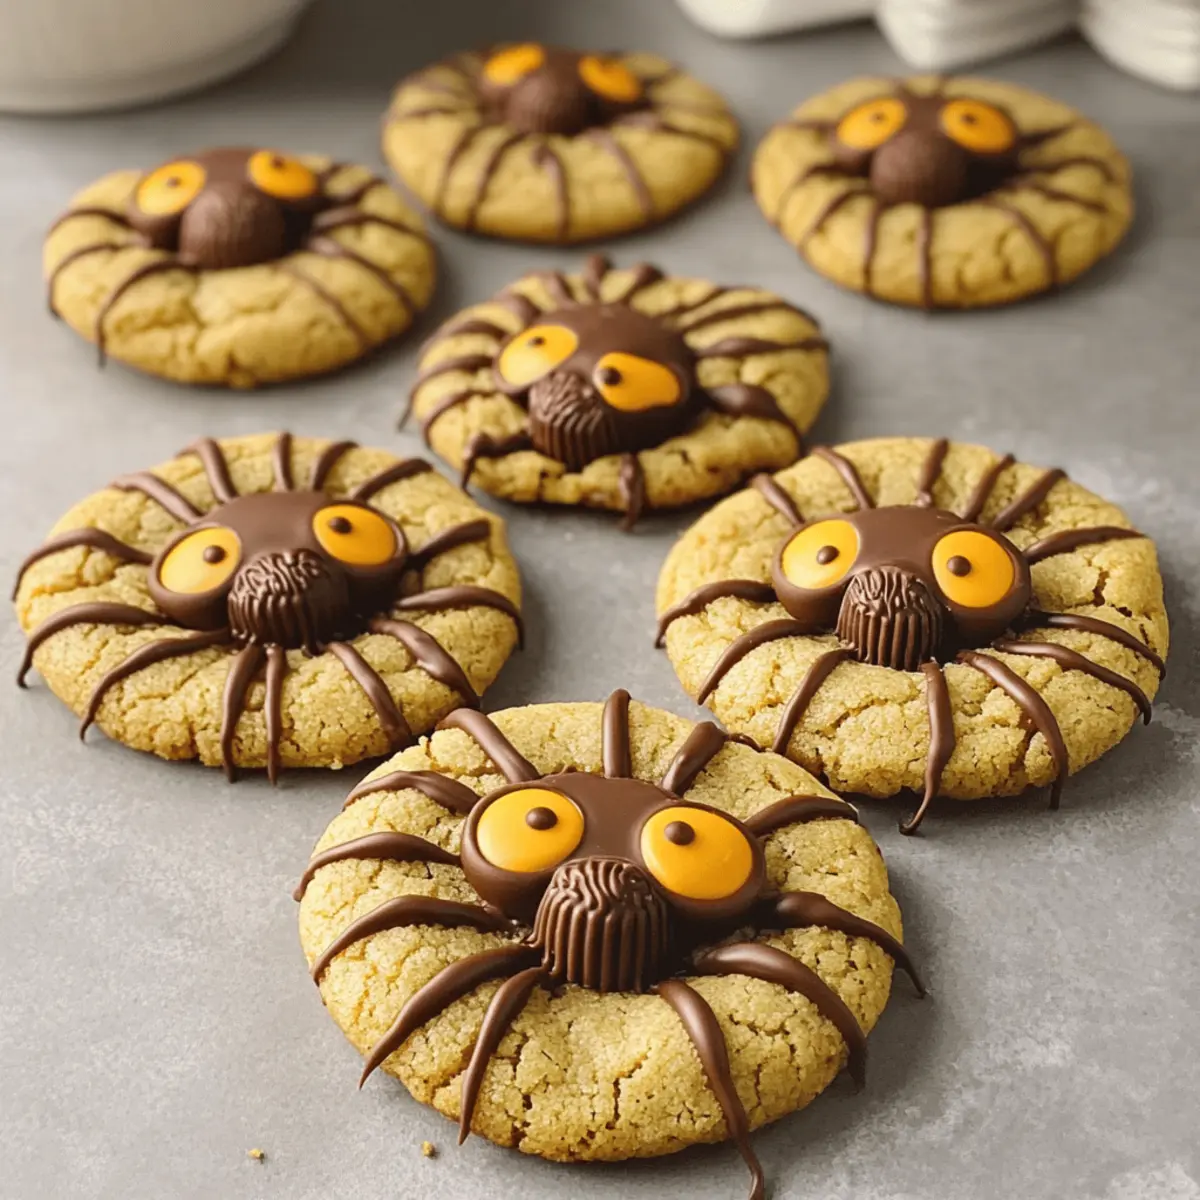
Once the cookies are slightly cooled, place a miniature Reese’s Peanut Butter Cup right in the center of each cookie to resemble the body of a spider. Allow the cookies to cool completely as you prepare your chocolate for decorating. Melt ¼ cup of semi-sweet chocolate in a microwave-safe bowl in 20-second intervals, stirring until smooth for creating spider legs and attaching candy eyes.
Step 6: Chill Again
Use the melted chocolate to pipe legs onto each cookie, extending from the Reese’s Peanut Butter Cup. Then, gently attach two candy eyes for a fun finish! Once decorated, refrigerate the cookies for about 15-20 minutes to set the chocolate and ensure everything holds together nicely. Your Peanut Butter Spider Halloween Cookies are now ready to thrill everyone at your spooky gathering!
What to Serve with Peanut Butter Spider Halloween Cookies
As you dive into the whimsical world of spooky treats, think about how to create a sweet spread that delights your guests.
-
Chilled Milk: The classic choice! A cold glass of milk perfectly balances the sweetness of the cookies, creating a comforting experience for all ages.
-
Pumpkin Spice Hot Cocoa: Embrace the season! Rich, chocolatey cocoa infused with warm spices offers a festive touch to your gathering, perfect for sipping alongside these cookies.
-
Autumn Fruit Salad: Fresh, juicy fruits like apples and pears add a refreshing contrast, bringing a burst of colorful fall flavors that complement the richness of the cookies.
-
Caramel Apple Slices: Sweet and slightly tart, dipping crisp apple slices in warm caramel sauce makes for a delightful snack that echoes the peanut butter and chocolate flavors.
-
Ginger Snap Cookies: Their spicy crunch provides a fun textural contrast! Pairing these traditional cookies with the soft and chewy Halloween cookies creates an inviting variety on your dessert platter.
-
Spiced Apple Cider: Warm or cold, this seasonal drink is perfect for bringing a cozy ambiance to your Halloween festivities. It pairs splendidly with the peanut butter flavors in the cookies.
-
Chocolate Dipped Pretzels: The sweet-and-salty combo adds a satisfying crunch, making them a fun and addictive snack alongside your Peanut Butter Spider Halloween Cookies.
-
Candy Corn: Add a colorful and nostalgic touch to your treat table. Its sweetness and crunch offer a playful contrast to the chewy texture of the cookies.
With these delicious pairings, your Halloween festivities will be both tasty and memorable!
Peanut Butter Spider Halloween Cookies Variations
Feeling creative with your baking? Let these delightful variations inspire your kitchen adventures!
-
Candy Swap: Replace Reese’s with Whoppers or cookie crumbs to create fun decorations. Not only do they look great, but they also add unique flavors and textures.
-
Nut-Free Delight: For a nut-free version, use sun butter or another nut-free spread instead of peanut butter. This keeps everyone safe while still providing deliciousness and fun!
-
Chocolate Lovers: Substitute semi-sweet chocolate with dark or white chocolate for a different flavor profile. Each variation brings its own sweetness and richness—so why not experiment?
-
Add Some Heat: For those who enjoy a spicy kick, try mixing in a dash of cayenne pepper with the cookie dough. The heat and sweet is a combination that sparks both intrigue and delight!
-
Chewy Texture Lovers: If you prefer an even chewier cookie, add an extra egg yolk to the dough. This tweak guarantees a gooey inside that’s simply irresistible, enhancing the overall experience.
-
Dairy-Free Option: Swap whole milk with almond or oat milk keeping diet preferences in mind. Not only do they maintain the dough texture, but they also cater to various dietary needs.
-
Flavor Boost: Mix in a teaspoon of cinnamon or nutmeg to the dough for a warm and cozy flavor. These spices complement the peanut butter beautifully, making each bite a comforting experience.
-
Fruity Accent: Add mini chocolate chips or chopped dried fruit, like cranberries, to the dough for unexpected bursts of flavor and sweetness. It’s a delightful surprise when you take a bite!
Just like the enchanting season of Halloween, with these variations, your cookies can take on new characters—just like my Ground Beef Halloween Stuffed Peppers that are perfect for this festive time of year! Enjoy the creativity that comes with baking!
Storage Tips for Peanut Butter Spider Halloween Cookies
- Room Temperature: Store cookies in an airtight container at room temperature for up to 1 week. This keeps them fresh and delightful for snacking!
- Fridge: If you’d like to extend their life, you can refrigerate the cookies in an airtight container for up to 2 weeks, though they may lose some of their original texture.
- Freezer: For longer storage, place the cookies in a freezer bag or airtight container and freeze for up to 3 months. Thaw them in the fridge before serving for the best results.
- Reheating: If you prefer warm cookies, pop them in the microwave for about 10-15 seconds. This will refresh them and enhance that chewy goodness of your Peanut Butter Spider Halloween Cookies!
Expert Tips for Peanut Butter Spider Halloween Cookies
-
Chill Dough Properly: Chilling the dough prevents spreading during baking, ensuring perfect shape and texture—skipping this step could lead to flat cookies.
-
Stick to Creamy Peanut Butter: Using creamy peanut butter enhances the cookies’ texture; crunchy varieties can create an undesirable crunch that impacts your chewy centers.
-
Monitor Chocolate Temperature: When piping chocolate legs, let it cool slightly after melting. If it’s too warm, it might not hold its shape, leading to messy decorations.
-
Use Quality Ingredients: The flavor and texture of your Peanut Butter Spider Halloween Cookies are greatly influenced by your ingredients; using high-quality chocolate and nut butters makes a difference!
-
Experiment with Candies: Feel free to swap Reese’s with other favorite candies for a unique take. Just ensure they are stable enough to be used as decorations.
Make Ahead Options
These Peanut Butter Spider Halloween Cookies are perfect for meal prep, allowing you to save time for the spooky festivities! You can prepare the cookie dough up to 2 days in advance—just mix all the ingredients and refrigerate the dough covered in plastic wrap. Chilling is crucial for maintaining that chewy texture, so make sure to keep it well-wrapped to prevent drying out. When you’re ready to bake, simply scoop, shape, and bake as directed. For the decoration, you can also pipe the chocolate and attach the candies up to 24 hours in advance, storing the cookies in an airtight container in the refrigerator. With these make-ahead tips, you’ll have charming treats ready to impress your guests with minimal last-minute effort!
Peanut Butter Spider Halloween Cookies Recipe FAQs
What type of peanut butter works best for the cookies?
Using creamy peanut butter is essential for achieving that perfect texture in your Peanut Butter Spider Halloween Cookies. It provides the necessary moisture and ensures a chewy center. If you prefer a crunchier bite, you might be tempted to use crunchy peanut butter, but keep in mind that it could alter the overall texture of your cookies.
How long can I store these Halloween cookies?
You can store your delicious Peanut Butter Spider Halloween Cookies in an airtight container at room temperature for up to 1 week. If you want to enjoy them longer, refrigerate them in the airtight container for up to 2 weeks, although they might become slightly less soft. For long-term storage, freeze the cookies for up to 3 months in a freezer bag or airtight container. Just thaw them in the fridge before serving!
Can I freeze the cookie dough before baking?
Absolutely! You can freeze your cookie dough by following these steps: After preparing it, scoop tablespoon-sized balls onto a baking sheet lined with parchment paper, and freeze them for about 1 hour. Once they are firm, transfer the dough balls to a freezer bag and store them for up to 3 months. When you’re ready to bake, just pop them straight into the preheated oven—no need to thaw!
What if my cookies turn out too flat?
If you find your Peanut Butter Spider Halloween Cookies are spreading too much while baking, it’s likely the dough was not chilled long enough. Be sure to refrigerate the dough for at least 1 hour before shaping the cookies. Additionally, using too much butter or not measuring accurately can lead to flat cookies, so ensure that all ingredients are precisely measured.
Are there any allergy considerations I should keep in mind?
Yes! Since this recipe contains peanuts, those with nut allergies should avoid these cookies. You can substitute peanut butter with sun butter or another nut-free alternative to keep it inclusive for everyone. Always double-check the candy you use for decorations, as they may contain allergens such as dairy or soy.
Can the cookies be decorated differently?
Absolutely! While the classic look is fun, you can get creative with your designs! Substitute Reese’s with other candies like Whoppers, M&Ms, or even gummy worms for a different spooky effect. Get the kids involved and introduce them to the world of imaginative decoration! The more, the merrier!

Peanut Butter Spider Halloween Cookies That Bring Spooky Fun
Ingredients
Equipment
Method
- In a large mixing bowl, whisk together 2 cups of all-purpose flour, 1 teaspoon of baking soda, and ½ teaspoon of salt until well combined.
- In another bowl, cream ½ cup unsalted butter with ¾ cup light brown sugar and ½ cup granulated sugar until fluffy and light in color.
- Gradually mix in 1 cup of smooth peanut butter until smooth, followed by 1 egg, 2 tablespoons of whole milk, and 1 teaspoon of vanilla extract. Combine wet and dry ingredients until a dough forms.
- Cover the cookie dough with plastic wrap and place it in the refrigerator for at least 1 hour.
- Preheat your oven to 350°F (175°C) and line a baking sheet with parchment paper.
- Scoop tablespoon-sized balls of the chilled dough onto the baking sheet, spacing them about 2 inches apart.
- Bake the cookies in the preheated oven for 10-12 minutes, or until the edges are set and just starting to turn golden.
- Let them cool for about 3-5 minutes on the baking sheet before transferring them to a wire rack.
- Once slightly cooled, place a miniature Reese’s Peanut Butter Cup in the center of each cookie.
- Melt ¼ cup of semi-sweet chocolate in a microwave-safe bowl and use it to pipe spider legs and attach candy eyes.
- Refrigerate the cookies for about 15-20 minutes to set the chocolate before serving.
Leave a Reply