
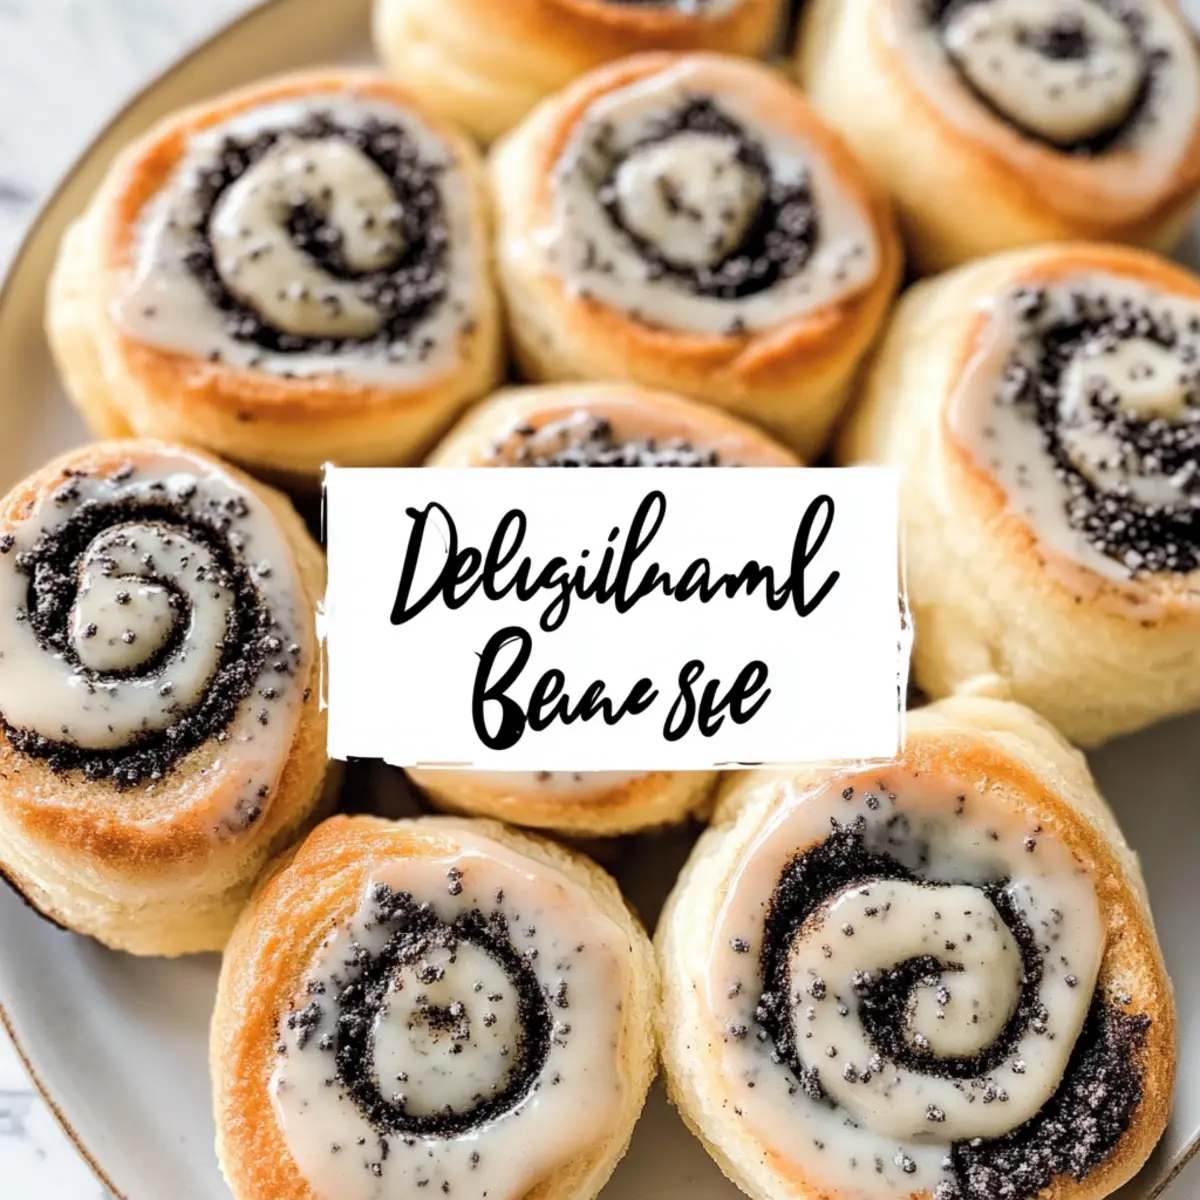
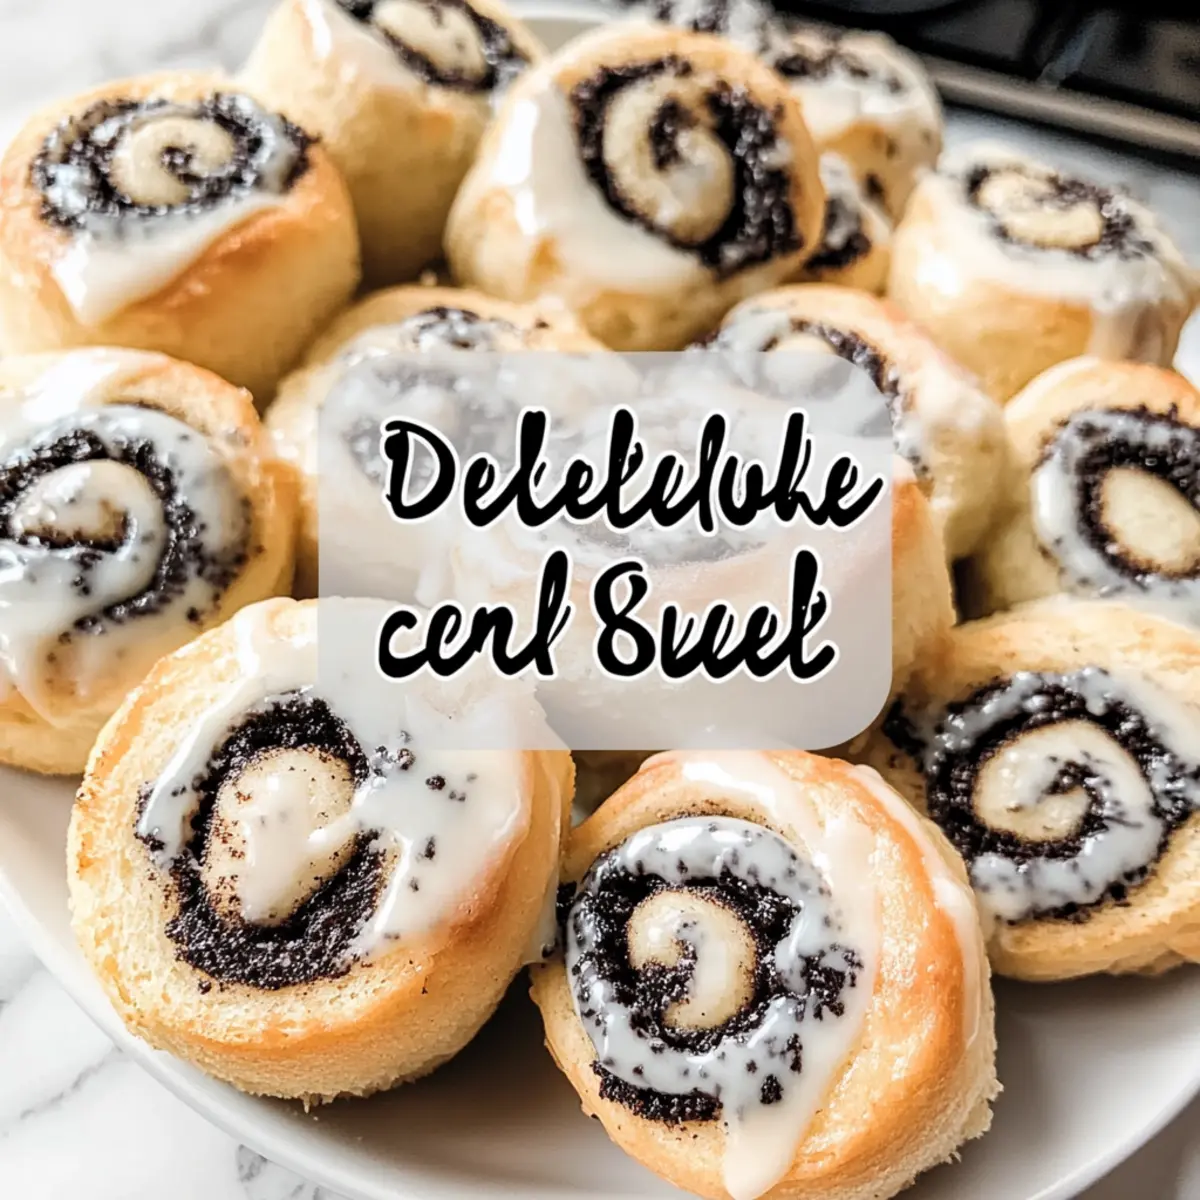
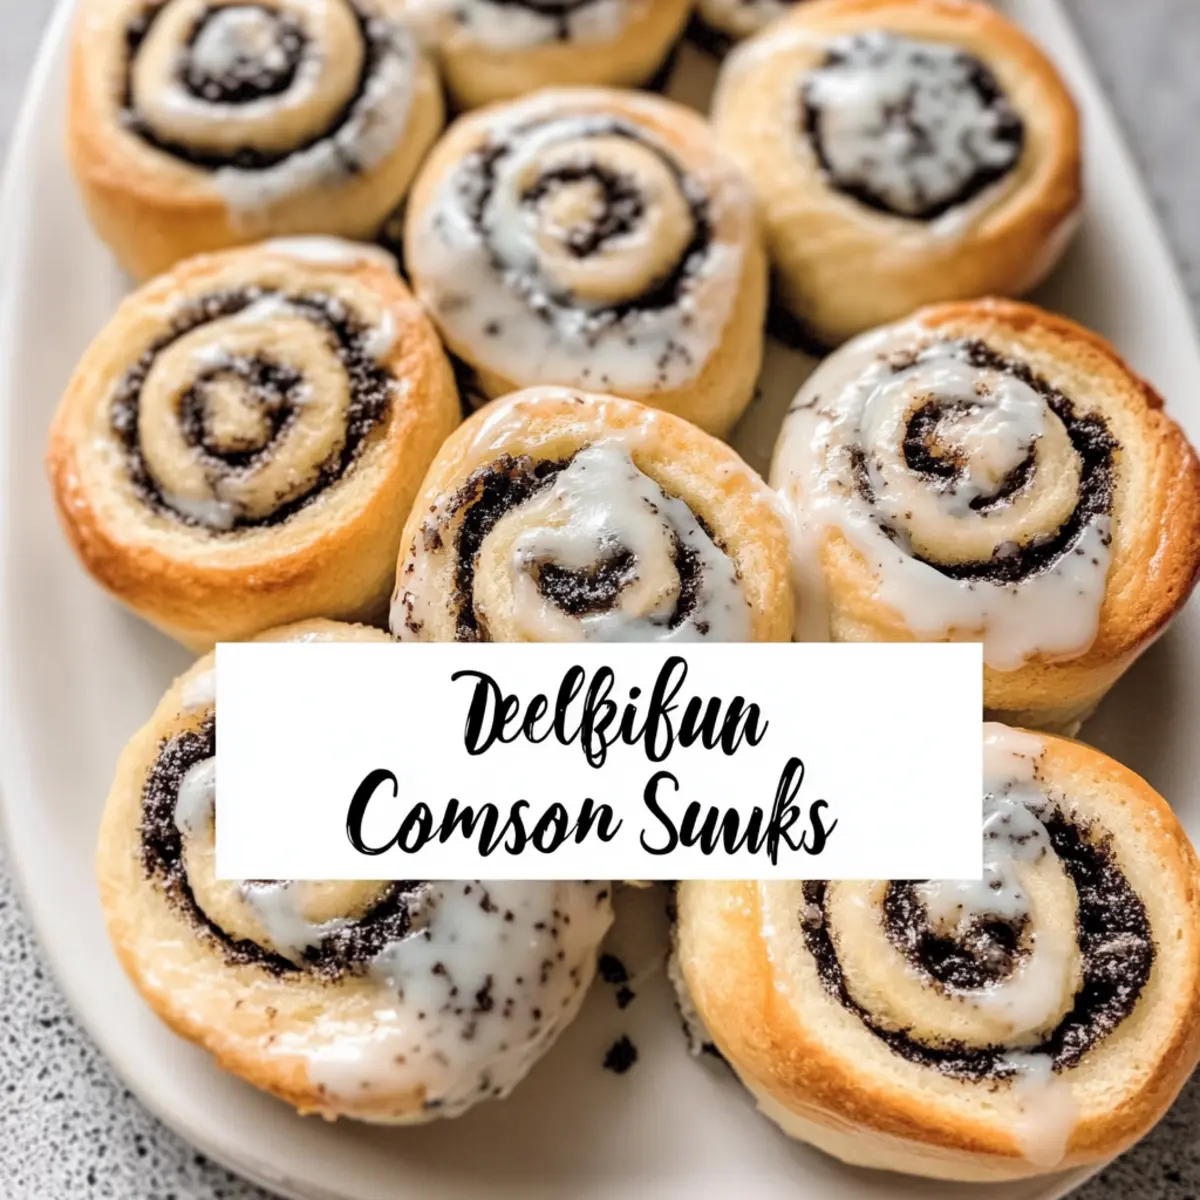
The aroma wafting from my kitchen was like a hug for the senses: warm, sweet, and completely inviting. I had just pulled out a pan of what can only be described as the ultimate indulgence—Cookies and Cream Cinnamon Rolls. These delightfully fluffy rolls are stuffed with crushed chocolate sandwich cookies and drizzled with a sweet vanilla glaze, making them perfect for any gathering or simply a cozy self-treat. Not only are they quick to whip up, but they also offer a fun twist on a classic favorite, guaranteed to impress friends and family alike. The joy of pulling apart these soft, gooey rolls while still warm is an experience that keeps me coming back for more. Are you ready to transform your baking game with this delightful recipe?
Why are these rolls a must-try?
Irresistible Flavor: The blend of chocolate sandwich cookies and brown sugar creates a flavor explosion that’s hard to resist.
Quick Prep Time: You’ll have fresh, homemade Cookies and Cream Rolls ready in just about an hour with minimal effort!
Versatile Twists: Feel free to get creative! Add more cookie crumbs for deeper flavor or stir in a scoop of peanut butter for extra richness.
Perfect for Any Occasion: Ideal for brunch gatherings, these rolls are sure to wow your guests alongside coffee or fresh fruit.
Crowd-Pleasing Texture: Each roll boasts a soft, fluffy exterior while the gooey cookie filling inside adds a delightful crunch.
Try these delicious rolls and see why they’re a hit—just like our Cinnamon Roll Cookies will be at your next gathering!
Cookies and Cream Rolls Ingredients
• Get ready to whip up a sweet treat!
For the Dough
- Flour – Use all-purpose flour for the best structure.
- Granulated Sugar – Adds sweetness and activates the yeast.
- Yeast – Choose active dry yeast for a light and fluffy texture.
- Milk – Warm milk helps activate the yeast effectively.
- Butter – Room temperature butter ensures easy mixing.
- Egg – Large eggs provide moisture and richness to the dough.
- Salt – Enhances flavor and controls the yeast activity.
For the Filling
- Chocolate Sandwich Cookies – Crush these to create that irresistible cookie flavor; feel free to use Oreos or similar brands.
- Brown Sugar – This adds depth to the filling’s sweetness.
- Vanilla Extract – A splash enhances the overall flavor; optional if you prefer a simpler filling.
For the Icing
- Powdered Sugar – This sweetens your glaze beautifully.
- Milk – Mix in for a smooth, drizzling consistency.
These Cookies and Cream Rolls will elevate your baking game and leave everyone craving more!
Step‑by‑Step Instructions for Cookies and Cream Rolls
Step 1: Prepare the Dough
In a large mixing bowl, combine all-purpose flour, granulated sugar, active dry yeast, and salt, mixing well. Gradually add warm milk, room temperature butter, and a large egg, stirring until the mixture is smooth and cohesive. Knead the dough for about 5-7 minutes until it becomes soft and elastic. Cover the bowl with a clean cloth and let it rise in a warm place for about 1 hour or until doubled in size.
Step 2: Make the Filling
While the dough is rising, crush the chocolate sandwich cookies into coarse crumbs in a separate bowl. Mix these crumbs with brown sugar, softened butter, and a splash of vanilla extract until you have a spreadable filling. Ensure the mixture is well combined, creating a rich, cookie-flavored paste that will fill your Cookies and Cream Rolls beautifully.
Step 3: Roll Out the Dough
Once your dough has risen, punch it down gently to release the air. On a lightly floured surface, roll out the dough into a rectangle about ¼ inch thick. Spread the cookie filling evenly over the surface, leaving a small border around the edges to prevent any spilling during rolling. The filling should cover every inch to ensure each roll is packed with flavor.
Step 4: Assemble the Rolls
Starting from the longer edge of the rectangle, carefully roll the dough tightly into a log shape. Pinch the seam to seal it, ensuring your Cookies and Cream Rolls stay intact. Once rolled, slice the log into even pieces, about 1-2 inches thick. Place the slices in a greased baking dish, arranged snugly together to help them rise.
Step 5: Let the Rolls Rise
Cover the baking dish with a clean kitchen towel and let the sliced rolls rise for an additional 30 minutes. This second rise allows the Cookies and Cream Rolls to become fluffy and soft. Look for them to expand noticeably, filling in any gaps between rolls as they rest.
Step 6: Bake the Rolls
Preheat your oven to 350°F (175°C), ensuring it’s fully heated before placing your rolls inside. Bake the Cookies and Cream Rolls for approximately 20-25 minutes, or until they are golden brown on top and a toothpick inserted in the center comes out clean. The delicious aroma will fill your kitchen, signaling that they are nearly ready!
Step 7: Prepare the Icing
While the rolls are cooling, mix powdered sugar with a splash of milk and a hint of vanilla extract in a small bowl. Whisk until the icing reaches a smooth, drizzle-worthy consistency. Adjust the milk or sugar as needed to find the perfect balance for your glaze.
Step 8: Glaze and Serve
After allowing the Cookies and Cream Rolls to cool slightly, drizzle the icing generously over the warm rolls. This sweet finishing touch enhances the flavor and makes each roll visually appealing. Serve them warm, and prepare for everyone to be delighted with your delectable treat!

How to Store and Freeze Cookies and Cream Rolls
Room Temperature: Store leftover rolls in an airtight container at room temperature for up to 2 days to maintain their softness.
Fridge: For extended freshness, refrigerate the rolls in an airtight container for up to 5 days. Just be aware they might become a bit denser.
Freezer: You can freeze these delightful Cookies and Cream Rolls for up to 3 months. Wrap them tightly in plastic wrap followed by aluminum foil to prevent freezer burn.
Reheating: To enjoy warm rolls, reheat in the microwave for 15-20 seconds or place in a preheated oven at 350°F (175°C) for about 10 minutes. Enjoy the warm, gooey goodness!
Make Ahead Options
These Cookies and Cream Rolls are perfect for busy home cooks looking to save time during the week! You can prepare the dough and filling up to 24 hours in advance. Simply follow the first two steps, then cover the bowl with plastic wrap and refrigerate the dough until you’re ready to bake. The cookie filling can be made separately and stored in an airtight container at room temperature. When you’re ready to bake, let the dough warm up for about 30 minutes before rolling and shaping. This method ensures your Cookies and Cream Rolls turn out just as delicious and fluffy, with minimal effort on the day you plan to serve them!
Cookies and Cream Rolls Variations
Feel free to customize your Cookies and Cream Rolls to suit your tastes and dietary needs!
-
Extra Cookie Crumbs: Enhance the cookie flavor by adding more crushed chocolate sandwich cookies to the filling. A little more crunch never hurt anyone!
-
Peanut Butter Bliss: Mix in some creamy peanut butter with the filling for a rich, nutty twist. The combination of peanut butter and chocolate is simply irresistible.
-
Fruit Infusion: For a fresh take, add chopped berries or bananas to the filling. The fruity flavors provide a delightful contrast to the rich chocolate.
-
Spice It Up: Sprinkle some cinnamon into the filling for a warm, cozy flavor. This simple adjustment can evoke memories of your favorite baked goods.
-
Dairy-Free Option: Substitute dairy milk with almond or oat milk and use dairy-free butter or margarine. It’s a simple way to enjoy these rolls while accommodating dietary preferences.
-
Nutty Delight: Fold in chopped nuts, like pecans or walnuts, into the filling for added crunch and richness. Nuts bring a delightful texture that compliments the rolls beautifully.
-
Chocolate Overload: Drizzle melted chocolate over the icing for a decadent finish. It turns these rolls into an absolute chocolate lover’s dream.
-
Flavored Icing: Experiment with different flavors for the icing, like almond or orange extract. A simple change can add a delightful twist, making your rolls even more special.
Give these variations a try, and let your baking creativity shine! Whether they’re for a brunch gathering or a cozy treat at home, these rolls are sure to impress, similar to our Twix Cookies Taste or the Cannoli Cookies that are always a hit!
What to Serve with Cookies and Cream Rolls
Satisfy your sweet tooth and enhance that delightful experience with complementary treats that create a memorable meal.
-
Rich Hot Chocolate: The chocolatey embrace of hot cocoa pairs perfectly with these rolls, creating a cozy indulgence that feels like a warm hug.
-
Fresh Berries: The tartness of fresh strawberries or raspberries balances the sweetness of the rolls, adding a refreshing bite that brightens your palate.
-
Vanilla Ice Cream: Serving a scoop of creamy vanilla ice cream with warm rolls creates a delectable contrast. The melting ice cream enhances the gooey cookie filling, making every bite extra indulgent.
-
Cream Cheese Frosting: For an extra layer of decadence, drizzle or spread cream cheese frosting on top, complementing the rich flavors while adding a tangy twist.
-
Coffee or Espresso: The robust flavors of coffee or a shot of rich espresso are perfect companions to mellow out the sweetness, making this breakfast or dessert feel both indulgent and sophisticated.
-
Caramel Sauce: A light drizzle of caramel sauce over the rolls adds a sticky sweetness that elevates the dessert experience, enhancing those cookie flavors even more.
Let your imagination soar as you explore these delightful pairings, turning a simple treat into the star of your next gathering!
Expert Tips for Cookies and Cream Rolls
-
Room Temperature Ingredients: Ensure all ingredients, especially butter and eggs, are at room temperature for easy mixing and dough rise.
-
Watch the Dough: If the dough feels sticky, gradually sprinkle in more flour until it becomes smooth and elastic. Avoid over-flouring to keep the rolls tender.
-
Cookie Crumbs: Experiment with extra cookie crumbs in the filling for a richer flavor. Adjust to your taste for the perfect Cookies and Cream Rolls.
-
Second Rise Importance: Don’t skip the second rise! It’s crucial for creating that light, fluffy texture. Let the rolls rise until they nearly double in size.
-
Cooling Before Icing: Allow the rolls to cool for a few minutes before drizzling the icing. This helps prevent the glaze from melting away and keeps it drizzled on top.
Cookies and Cream Rolls Recipe FAQs
What kind of chocolate sandwich cookies should I use?
Absolutely! You can use any chocolate sandwich cookies, but I recommend classic Oreo cookies for the perfect flavor and texture. Just make sure to crush them into coarse crumbs for the best filling!
How should I store leftover Cookies and Cream Rolls?
For optimal freshness, store leftover rolls in an airtight container at room temperature for up to 2 days. If you’d like them to last a bit longer, refrigerate for up to 5 days. Just keep in mind they may become slightly denser in the fridge!
Can I freeze these rolls?
Yes! You can freeze Cookies and Cream Rolls for up to 3 months. Wrap each roll tightly in plastic wrap, then in aluminum foil to prevent freezer burn. When you’re ready to enjoy, simply thaw in the refrigerator overnight and reheat!
What if my dough is too sticky?
Very! If your dough feels sticky, don’t worry. Just sprinkle in a little more flour, about a tablespoon at a time, and knead until it becomes smooth and elastic. Keep in mind that it’s better to add flour gradually to maintain that soft texture.
Are these rolls safe for pets?
I recommend caution! These Cookies and Cream Rolls contain ingredients like chocolate and sugar, which can be harmful to pets. Keep them stored safely away from curious paws!
Can I make these rolls vegan or gluten-free?
Absolutely! For a vegan version, substitute dairy ingredients with plant-based alternatives, like almond milk and a flaxseed egg. To make them gluten-free, use a gluten-free all-purpose flour blend suitable for baking. Just ensure that all other ingredients are also gluten-free!
Cookies and Cream Cinnamon Rolls: Soft, Sweet, and Irresistible
Ingredients
Equipment
Method
- Prepare the Dough: In a large mixing bowl, combine all-purpose flour, granulated sugar, active dry yeast, and salt, mixing well. Gradually add warm milk, room temperature butter, and a large egg, stirring until the mixture is smooth and cohesive. Knead the dough for about 5-7 minutes until it becomes soft and elastic. Cover the bowl with a clean cloth and let it rise in a warm place for about 1 hour or until doubled in size.
- Make the Filling: While the dough is rising, crush the chocolate sandwich cookies into coarse crumbs in a separate bowl. Mix these crumbs with brown sugar, softened butter, and a splash of vanilla extract until you have a spreadable filling. Ensure the mixture is well combined, creating a rich, cookie-flavored paste.
- Roll Out the Dough: Once your dough has risen, punch it down gently to release the air. On a lightly floured surface, roll out the dough into a rectangle about ¼ inch thick. Spread the cookie filling evenly over the surface, leaving a small border around the edges.
- Assemble the Rolls: Starting from the longer edge, carefully roll the dough tightly into a log shape. Pinch the seam to seal it. Slice the log into even pieces, about 1-2 inches thick. Place the slices in a greased baking dish.
- Let the Rolls Rise: Cover the baking dish with a clean kitchen towel and let the sliced rolls rise for an additional 30 minutes.
- Bake the Rolls: Preheat your oven to 350°F (175°C). Bake for approximately 20-25 minutes, or until golden brown.
- Prepare the Icing: While the rolls are cooling, mix powdered sugar with a splash of milk in a small bowl. Whisk until the icing reaches a smooth, drizzle-worthy consistency.
- Glaze and Serve: After allowing the rolls to cool slightly, drizzle the icing generously over the warm rolls.
Leave a Reply