
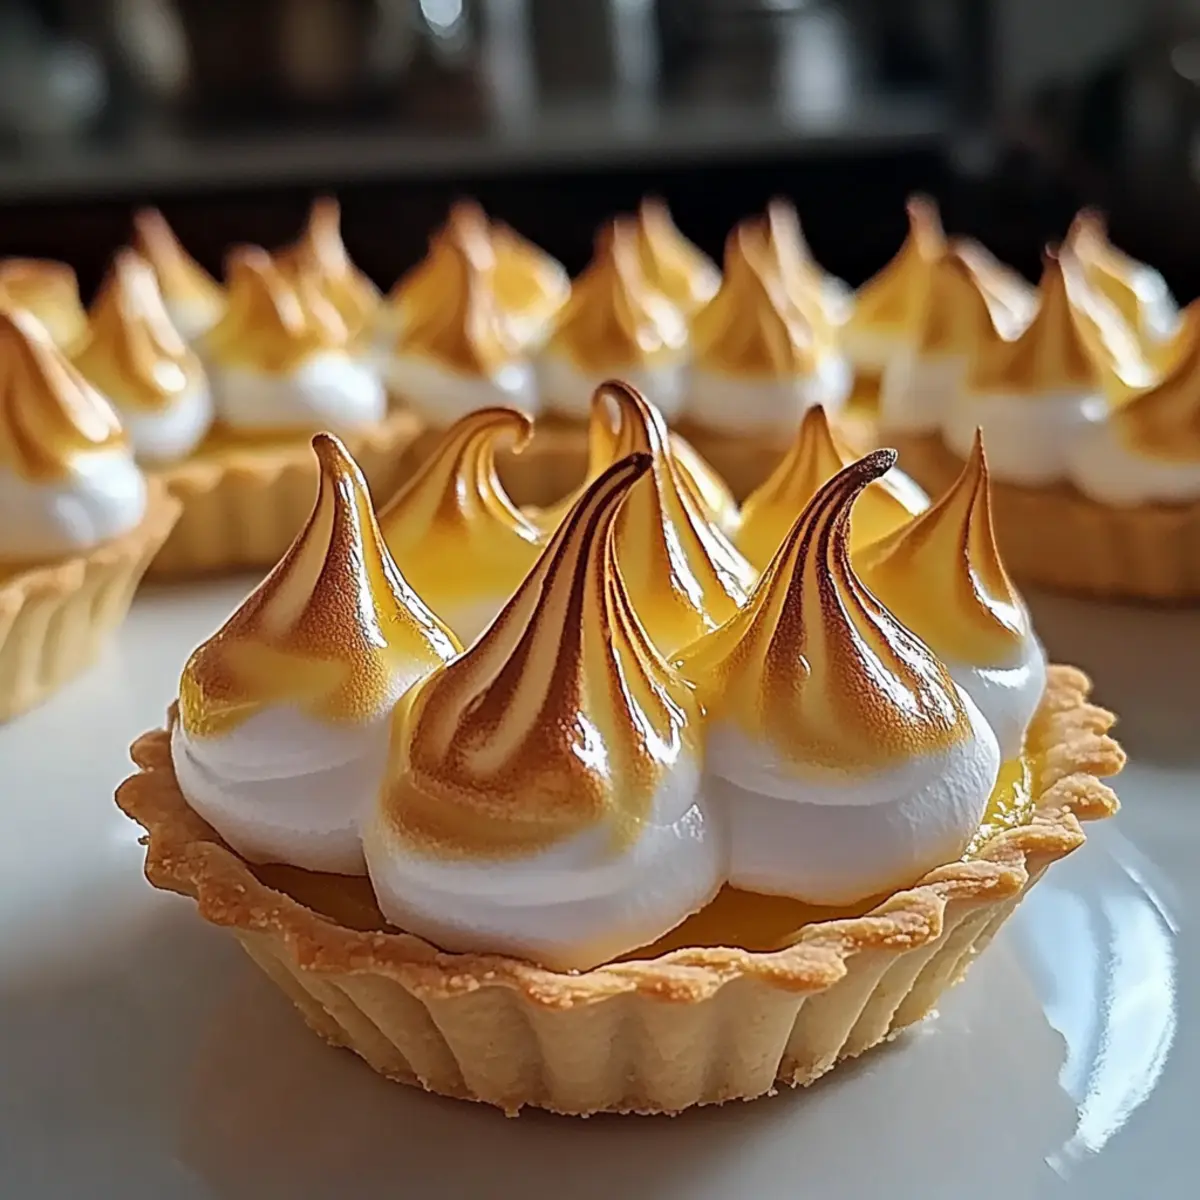
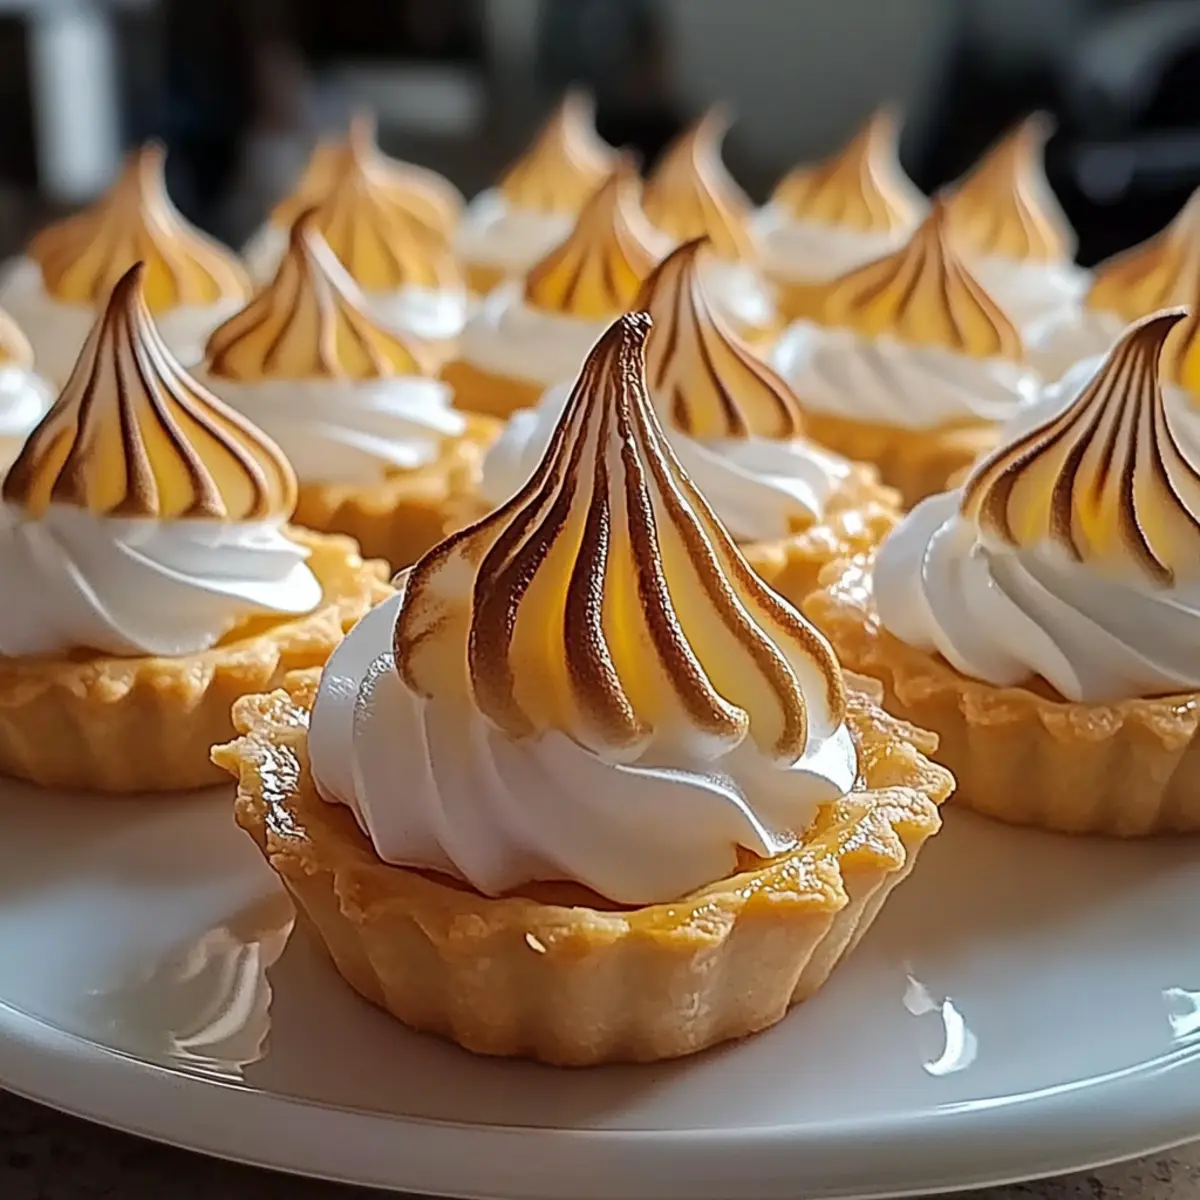
In a tiny morsel of joy, I discovered the delightful world of Mini Lemon Meringue Tarts! These little wonders are the perfect blend of tart lemon filling and fluffy meringue, all nestled in a buttery crust that practically melts in your mouth. With their vibrant appearance and bright flavors, these tarts make for an impressive yet easy dessert that can brighten up any gathering. Plus, they’re quick to whip up, allowing you to spend more time with friends and family rather than slaving away in the kitchen. Whether you’re a seasoned baker or a kitchen novice, this recipe is designed to bring a touch of sunshine to your table. Ready to make your taste buds dance? Let’s dive into the zesty adventure of crafting these charming treats!
Why Are Mini Lemon Meringue Tarts Irresistible?
Bursting with Flavor: Each bite of these tarts delivers a delightful tang from the lemons, balanced perfectly by the airy sweetness of the meringue.
Easily Adaptable: You can personalize these treats with different citrus fruits or fun flavor twists — imagine lime zest in the meringue!
Visually Stunning: Their vibrant appearance makes them a show-stopper at any gathering, ensuring you’ll impress your guests without breaking a sweat.
Quick and Simple: Ready in no time, these tarts are perfect for unexpected guests or a spontaneous dessert craving.
Perfect for Any Occasion: Whether it’s a family dinner or a festive celebration, these tarts are sure to add a dash of elegance and joy to your table.
Mini Lemon Meringue Tart Ingredients
For the Tart Crust
• Powdered Sugar – Provides sweetness and a smooth texture; can be replaced with granulated sugar for a less fine finish.
• Unsalted Butter – Adds richness and moisture; use coconut oil for a dairy-free option if desired.
• Salt – Enhances flavor; no suitable substitutes for this essential ingredient.
• Large Egg – Binds the ingredients together and adds moisture; a flax egg can be used for a vegan adaptation.
• Vanilla Extract – Infuses the crust with aromatic flavor; feel free to switch to almond extract for a nutty note.
• All-Purpose Flour – Gives structure to the tart shell; a gluten-free flour mix is a viable substitute.
For the Lemon Filling
• Large Whole Eggs & Egg Yolks – Provide richness and creaminess; remember to save the egg whites for your meringue.
• Granulated Sugar – Offers sweetness to balance the tartness; organic cane sugar is a great alternative.
• Lemons (juice) – Delivers fresh, tart flavor; bottled lemon juice can be used in a pinch.
For the Meringue
• Egg Whites – Essential for creating a fluffy meringue; no substitutes are recommended for best results.
• Vanilla Extract (for meringue) – Adds depth to the meringue; consider alternatives mentioned above for extra flavor.
Now you’re ready to gather these ingredients and embark on your delightful baking journey with Mini Lemon Meringue Tarts that will surely bring sunshine to your table!
Step‑by‑Step Instructions for Mini Lemon Meringue Tarts
Step 1: Prepare Tart Crust
In a mixing bowl, cream together softened butter, powdered sugar, salt, egg, and vanilla extract until light and fluffy. Gradually incorporate the all-purpose flour until a smooth dough forms. Press this mixture into tart molds, ensuring an even layer. Bake the crusts in a preheated oven at 180°C (350°F) for about 15 minutes, or until they turn a lovely golden brown.
Step 2: Make Lemon Filling
While the crusts are baking, prepare your lemon filling. In a separate bowl, blend the freshly squeezed lemon juice, softened butter, and egg yolks until smooth and creamy. This mixture should have a vibrant yellow hue. Once the tarts are baked and cooled slightly, pour the lemon filling into each tart shell, filling them about three-quarters full to allow space for the meringue.
Step 3: Bake Filled Tarts
Return the filled tarts to the oven and bake for an additional 10 minutes. You’ll know they are done when the filling is set and slightly firm to the touch, with a glossy surface. Take them out of the oven and let them cool completely on a wire rack before moving on to the meringue.
Step 4: Prepare Meringue
In a clean mixing bowl, whip the room-temperature egg whites with vanilla extract until they begin to form soft peaks. Gradually add the granulated sugar, continuing to whip until stiff peaks form and the meringue is glossy and smooth. This will create the fluffy topping for your Mini Lemon Meringue Tarts.
Step 5: Top and Brown Meringue
Once the tarts are completely cooled, generously spread or pipe the meringue over each tart, ensuring to cover the lemon filling entirely. For a beautifully browned finish, broil the meringue under high heat for 1-3 minutes or use a kitchen torch. Keep a close eye to prevent burning—withdraw them from the heat once golden brown.
Step 6: Serve and Enjoy
Let the tarts set for a few minutes before serving. These Mini Lemon Meringue Tarts are best enjoyed fresh, so gather your friends and family to share in the sunshine-filled delight!
Storage Tips for Mini Lemon Meringue Tarts
Fridge: Store leftover tarts in an airtight container for up to 2 days. The meringue may soften over time, so it’s best to enjoy them fresh.
Freezer: If you need to freeze your tarts, wrap them individually in plastic wrap and place in a freezer-safe container. These can be frozen for up to 1 month.
Reheating: If served cold, allow the tarts to come to room temperature before enjoying. Avoid reheating, as it can affect the texture of the meringue.
Mini Lemon Meringue Variations to Explore
Customize your Mini Lemon Meringue Tarts with these delightful twists that will spark joy in every bite!
-
Lime Twist: Substitute lemon juice with freshly squeezed lime juice for a tropical zing, bringing a new dimension of flavor.
-
Berry Blast: Top your tarts with fresh berries or a berry coulis for a vibrant look and extra sweetness; strawberries and blueberries are particularly delightful.
-
Coconut Cream: Incorporate shredded coconut into your meringue for a chewy texture; it adds a fun twist that transports you to the tropics.
-
Herbal Infusion: Add a hint of fresh mint or basil to the lemon filling, creating an exciting herbal contrast that enhances flavor and freshness.
-
Spicy Surprise: Mix a pinch of cayenne or chili powder into the lemon filling for a surprising kick; the heat beautifully balances the tartness.
-
Flavored Meringue: Fold in some citrus zest, like orange or grapefruit, into the meringue for an aromatic flavor boost that elevates every tart.
-
Chocolate Drizzle: Drizzle dark chocolate over the tops of the tarts for a decadent finish that combines tart and sweet in the most satisfying way.
These creative variations invite you to explore and enjoy a personal touch on your Mini Lemon Meringue Tarts! And if you’re in the mood for another refreshing dessert, don’t forget to check out our Fil Frosted Lemonade recipe — it’s just as delightful and sure to impress!
What to Serve with Mini Lemon Meringue Tarts?
Treat your guests to a delightful spread that perfectly complements these zesty individual desserts.
- Fresh Berries: Strawberries, blueberries, or raspberries add a natural sweetness and vibrant color that contrast beautifully with the tartness of the lemon.
- Whipped Cream: A dollop of airy whipped cream on the side elevates the experience, enhancing the dessert’s creamy textures while balancing its tartness.
- Mint Leaves: Fresh mint leaves sprinkled on top not only provide a refreshing hint but also introduce a pop of color that makes each serving remarkably appealing.
- Iced Tea: A chilled citrus-infused iced tea creates a harmonious pairing, echoing the tart flavors of the tarts and giving a refreshing accompaniment.
- Almond Biscotti: Crunchy almond biscotti offers a delightful texture contrast; its nuttiness mingles wonderfully with the lightness of the tarts.
- Chocolate Drizzle: For an indulgent twist, drizzle some melted dark chocolate over the tarts before serving — the rich chocolate enhances the citrus in a rich, sophisticated way.
- Lemonade: A glass of homemade lemonade ties the flavor thread together, making for a refreshing and cohesive treat.
- Fruit Salad: A light fruit salad with kiwi, pineapple, and melon will serve as a delightful, fresh complement to the richness of the meringue.
- Prosecco: For a celebratory touch, a glass of chilled Prosecco adds a bubbly lift, making your dessert truly festive and enjoyable.
- Vanilla Ice Cream: A scoop of smooth vanilla ice cream brings creaminess that contrasts beautifully with the bright, zesty lemon, leaving your diners in sweet bliss.
Make Ahead Options
These Mini Lemon Meringue Tarts are a fantastic option for busy home cooks looking to save time! You can prepare the tart crust up to 24 hours in advance; just store it in an airtight container at room temperature to keep it fresh. Additionally, the lemon filling can be made up to 3 days ahead; refrigerate in a covered bowl to maintain its vibrant flavor. When you’re ready to complete the tarts, fill each cooled crust with the lemon filling and whip the meringue just before serving to ensure its airy texture is preserved. Simply broil the meringue for that lovely golden finish, and enjoy these delightful tarts with ease!
Expert Tips for Mini Lemon Meringue Tarts
• Room Temperature Eggs: Ensure egg whites are at room temperature; this helps achieve better volume when whipping for a fluffy meringue.
• Avoid Over-Beating: Be cautious not to over-beat the meringue, as this can lead to a grainy texture and collapse during baking.
• Watch the Broiler: Keep a close eye on the meringue as it browns under the broiler; it can go from perfectly toasted to burnt in a matter of seconds.
• Fill with Care: Fill the tart shells three-quarters full to accommodate the meringue without overspilling during baking.
• Zest it Up: Consider adding lemon or lime zest to the filling for an extra pop of flavor that enhances the Mini Lemon Meringue experience.

Mini Lemon Meringue Tarts Recipe FAQs
What kind of lemons should I use for my Mini Lemon Meringue Tarts?
Absolutely, fresh, ripe lemons are best for this recipe! Look for lemons that are brightly colored and feel heavy for their size, indicating juiciness. Avoid any with dark spots or wrinkled skin, as they may be overripe or dry. If you’re in a pinch, bottled lemon juice can work, but fresh is always ideal for that vibrant flavor.
How should I store my Mini Lemon Meringue Tarts?
Very! Store your leftover tarts in an airtight container in the fridge. They’ll stay good for up to 2 days. Just keep in mind that the meringue may start to soften over time, so they’re best enjoyed fresh and within that short timeframe for optimal texture and flavor.
Can I freeze Mini Lemon Meringue Tarts?
Absolutely! If you’d like to freeze your tarts, wrap them individually in plastic wrap and place them in a freezer-safe container. They can be stored this way for up to 1 month. To enjoy, simply thaw in the fridge overnight and let them sit at room temperature for a bit before serving. Avoid reheating as it can affect the meringue’s delicate texture.
What if my meringue won’t form stiff peaks?
No worries, this is a common issue! Ensure your mixing bowl and whisk are thoroughly clean and free from grease, which can hinder egg whites from whipping up properly. Using room temperature egg whites helps achieve better volume as well. If they aren’t forming stiff peaks, try whipping a bit longer, but be cautious not to over-beat, which can lead to a grainy texture.
Are there any allergy concerns with Mini Lemon Meringue Tarts?
Definitely something to keep in mind! These tarts contain eggs, dairy (from the butter), and gluten (from the flour). If you’re accommodating dietary restrictions, consider using a flax egg to replace the large egg and coconut oil for a dairy-free option. Always make sure to check labels for any hidden allergens in your alternatives!

Mini Lemon Meringue Tarts That Brighten Every Occasion
Ingredients
Equipment
Method
- Cream butter, powdered sugar, salt, egg, and vanilla extract in a bowl until fluffy. Gradually add flour to form dough, press into tart molds, and bake at 180°C (350°F) for 15 minutes.
- Blend lemon juice, butter, and egg yolks. Once tart shells are cooled, fill with lemon mixture to three-quarters full.
- Bake filled tarts for 10 minutes until set and glossy. Cool completely on a wire rack.
- Whip egg whites with vanilla until soft peaks form. Gradually add sugar, whip to stiff peaks. Spread or pipe meringue over cooled tarts.
- Broil meringue under high heat for 1-3 minutes until golden brown. Watch closely to prevent burning.
- Let tarts set for a few minutes before serving.
Leave a Reply